Garage Door Framing
Many homeowners want to install a new garage door but feel unsure about the framing process. Getting the garage door framing right is important. A solid frame supports the door, keeps out bad weather, and helps your garage stay safe. If the frame is wrong, the door might not fit or work properly. This can lead to extra costs, drafts, leaks, or even security issues.
In this guide, you’ll learn how to frame for a garage door, step by step. You’ll see what materials to use, which measurements matter, and how to avoid common mistakes. This article covers the basics and gives you practical examples.
Whether you want to do it yourself or just understand what your contractor is doing, you’ll find answers here.
What Is Garage Door Framing?
Garage door framing means building the rough opening and support structure for your garage door. It’s the wood or metal structure that holds the door in place and gives it strength. The frame is built before the garage door is installed. If the frame is strong and straight, the door will open and close smoothly.
Key parts of garage door framing:
- Header: The top beam above the door.
- Jambs: The side supports (left and right).
- Sill or threshold: The base, at ground level.
Framing is not just about making a hole in the wall. The frame must be the right size, straight, and strong enough for your door.
Why Good Framing Matters
A strong, accurate frame helps your garage door in many ways:
- Safety: The door won’t fall or jam.
- Weatherproofing: Keeps out wind, rain, and pests.
- Security: Harder for intruders to break in.
- Door fit: The door seals tightly and works well.
- Long life: Reduces repairs and extends door lifespan.
For example, a gap of just 1 inch can let in water or make the door stick. That’s why careful framing is worth the effort.

Credit: chsgaragerepair.com
Basic Garage Door Framing Sizes
Most garage doors in the US are standard sizes. The framing must match the door size you want.
Here are the most common sizes and their framing requirements:
| Garage Door Size (feet) | Rough Opening (inches) | Header Size (typical) |
|---|---|---|
| 8 x 7 | 96 x 84 | 2 x 10 or 2 x 12 |
| 9 x 7 | 108 x 84 | 2 x 10 or 2 x 12 |
| 16 x 7 | 192 x 84 | 2 x 12 with support posts |
| 18 x 8 | 216 x 96 | Engineered beam (LVL or steel) |
Rough opening is the space you frame, and it’s usually the same as the door size. The finished opening will be slightly smaller after jambs are added.
Pro tip: Always check the door manufacturer’s instructions. Some brands need a slightly different opening.
Materials For Framing
Choosing the right materials is important for strength and durability.
Most common materials:
- Lumber: Usually 2×4 or 2×6 wood studs and beams.
- Engineered beams: For wide doors, use LVL or steel beams for the header.
- Pressure-treated wood: For the bottom plate or threshold, especially if it touches concrete.
Comparing lumber choices:
| Material | Pros | Cons |
|---|---|---|
| Standard 2×4 or 2×6 | Easy to find, affordable | May warp if wet |
| Pressure-treated wood | Resists rot and insects | Heavier, more expensive |
| Engineered beam (LVL/steel) | Very strong, good for wide spans | Costly, needs skilled handling |
Tip: For a single car door (up to 9 feet wide), standard lumber works fine. For double doors (16+ feet), always use an engineered header.
Step-by-step: How To Frame For A Garage Door
Framing can look tricky, but it follows clear steps. Here’s a simple process for beginners.
1. Measure And Mark The Opening
- Measure the width and height needed for your door.
- Mark the rough opening on the wall. Use a level to draw straight lines.
- Add 1.5–2 inches on each side for jambs (if using 2×6 lumber).
Example: For a 9×7 door, mark an opening 9 feet wide by 7 feet high.
2. Build The Side Jambs
- Cut two studs for each side jamb.
- Secure them to the floor and ceiling plates.
- Make sure they are perfectly vertical (plumb).
Tip: Use a long level or laser level for accuracy.
3. Install The Header
- Cut a beam to fit the width of the opening.
- Place it above the opening, on top of the jambs.
- Add short studs (“cripple studs”) above the header up to the top plate.
Header size example: For a 16-foot opening, use a double 2×12 beam or an LVL beam.
4. Add The Sill Or Threshold
- For wood frames, place a pressure-treated board at the bottom.
- Make sure it’s level and even with the garage floor.
5. Check And Reinforce
- Check all sides for square and level.
- Add extra studs or metal straps if needed for strength.
- Secure everything with nails or screws.
6. Finish The Opening
- Attach jamb boards (trim) to the sides and top.
- The opening should now be ready for the garage door tracks and hardware.
Common mistake: Cutting the opening too large or small. Double-check measurements before cutting.
Example: Framing For A 16×7 Double Garage Door
Let’s look at a practical example.
Goal: Frame an opening for a 16-foot wide, 7-foot high garage door.
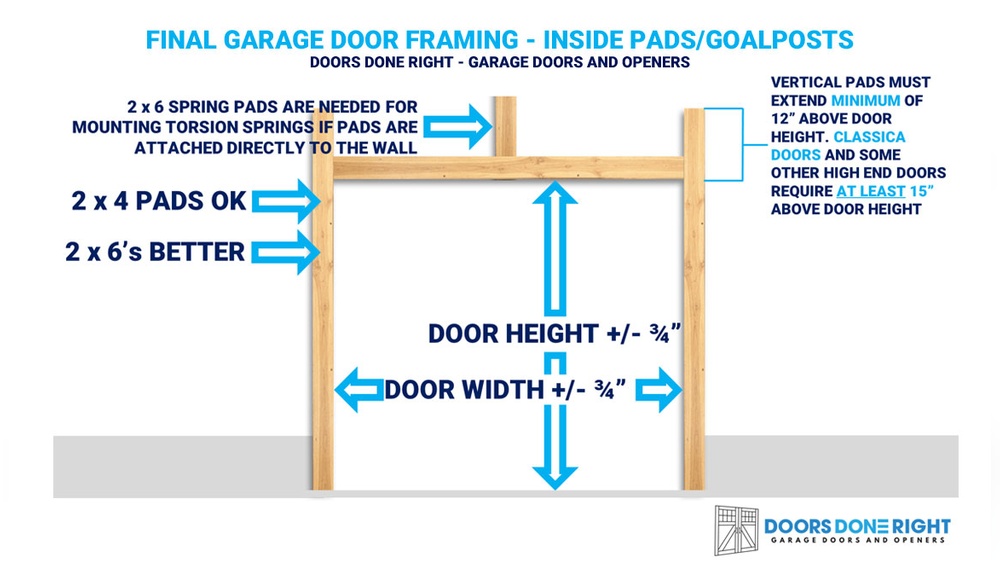
- Rough opening: 16 feet wide x 7 feet high (192 x 84 inches)
- Header: Two 2x12s with a 1/2″ plywood spacer, or LVL beam if required by code
- Side jambs: 2×6 studs, one on each side
- Cripple studs: Placed every 16 inches above header
- Bottom plate: Pressure-treated 2×6
Steps:
- Mark the opening on the wall.
- Install side jamb studs, check for plumb.
- Place header on top, secure with nails.
- Add cripple studs above header.
- Remove the bottom plate in the opening before installing the door.
Note: For wide doors, always check your local building codes for header size and support post requirements.
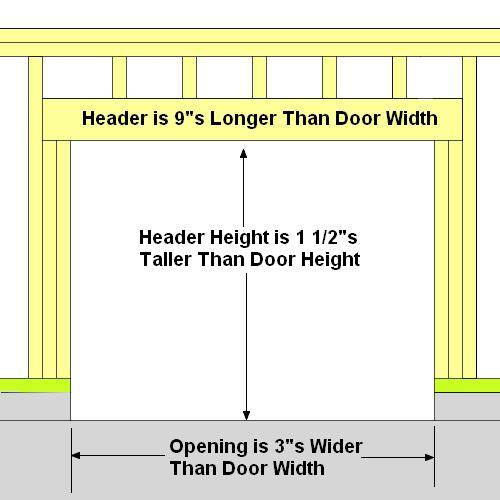
Credit: www.doorsdoneright.net
Framing For Different Wall Types
Not all garages use the same wall construction. The framing steps are similar, but there are small differences.
Wood-framed Walls
- Use standard lumber sizes (2×4 or 2×6).
- Nail directly to the wall studs.
- Easy to adjust if you make a mistake.
Concrete Or Block Walls
- Attach pressure-treated wood using anchor bolts.
- Use masonry drill and anchors for header support.
- Often needs a metal or engineered header for wide openings.
Metal Stud Walls
- Use heavy-gauge steel studs.
- Headers may need to be doubled or reinforced.
- Secure jambs with screws, not nails.
Tip: Always use pressure-treated wood where framing touches concrete or masonry. It prevents rot and termite problems.
Common Mistakes And How To Avoid Them
Even skilled DIYers make framing mistakes. Here’s what to watch out for:
- Wrong opening size: Always check the garage door manufacturer’s instructions for exact measurements.
- Weak headers: Don’t use undersized beams, especially for double doors. The header must hold the weight above.
- Poor alignment: If the frame isn’t plumb and square, the door may jam or not seal.
- Skipping pressure-treated wood: Regular wood can rot when touching concrete.
- Not checking local codes: Some areas need special framing for wind, snow, or earthquakes.
Extra insight: Many beginners forget to remove the bottom plate after framing. If you leave it in place, the garage door won’t close properly.
Cost And Time Estimates
Framing for a garage door is not too expensive, but costs rise with larger sizes and stronger materials.
Typical costs (for DIY, excluding tools):
- Single door (8×7 or 9×7): $100–$250 for lumber and fasteners
- Double door (16×7): $250–$600, especially if using LVL or steel beams
Time needed:
- Simple single door: 2–4 hours for experienced DIYer
- Double door or concrete wall: 4–8 hours
Pro tip: Hiring a professional adds $500–$1,500 to the total cost, depending on the complexity.
Insulation And Weatherproofing Tips
Good framing helps, but don’t forget insulation and sealing.
- Use caulk or foam sealant around the frame to block air leaks.
- Add weatherstripping to the jambs after the door is installed.
- For cold climates, consider insulated jambs or headers.
Advanced tip: If energy efficiency is important, ask for insulated headers or use rigid foam around the frame.

Credit: www.youtube.com
When To Call A Professional
Some garage door framing jobs are simple. But there are times when you should call an expert:
- The wall is load-bearing (supports the roof or upper floor).
- The opening is over 16 feet wide.
- The structure is old, cracked, or damaged.
- You need to meet strict local building codes.
A professional can also help if you want a custom-sized door. They know how to make the frame strong and safe.
Building Codes And Permits
Most US cities require a permit for garage door framing. Codes cover header size, framing anchors, and wind resistance.
- Always check with your local building department before starting.
- Inspections are usually needed for finished framing.
- Failure to get a permit can lead to fines or problems when selling your house.
For code details, see the International Code Council.
Tip: Save your receipts and permit papers for your records.
Frequently Asked Questions
How Big Should The Rough Opening Be For A Garage Door?
The rough opening should match the garage door size. For example, a 9×7 door needs a 9-foot wide by 7-foot high opening. This does not include the finish trim or jambs.
Can I Use 2x4s For The Header?
2x4s are not strong enough for most garage door headers. Use 2x10s, 2x12s, or LVL beams, especially for double doors or load-bearing walls.
What Type Of Wood Is Best For Framing?
Use standard lumber for most of the frame, but always use pressure-treated wood for the bottom plate or any part touching concrete. This prevents rot and insect damage.
Do I Need A Permit To Frame A Garage Door Opening?
In most areas, yes. Permits help ensure your framing is safe and meets local building codes. Check with your city or county before starting.
How Do I Know If My Frame Is Strong Enough?
Check the building code for your area, or ask a local inspector. If your header and jambs are the correct size and properly installed, your frame should be strong enough for most standard garage doors.
A well-built garage door frame makes a big difference in how your door works and lasts. Taking time to measure, use the right materials, and follow the steps above will help you get a safe, secure, and weather-tight garage door for years to come.