Measuring garage door springs might seem tricky at first, but it’s a skill any homeowner can learn with patience and the right steps. Whether you want to replace a broken spring or just check the size for maintenance, knowing how to measure garage door springs will save time and money.
Accurate measurement is vital because the wrong spring can damage your door or even cause injuries. This guide will walk you through the process step by step, using simple words and practical examples for beginners.
Why Accurate Spring Measurement Matters
Garage door springs balance the door’s weight. If the spring size is wrong:
- The door might not open or close fully.
- The opener motor could wear out quickly.
- There’s a risk of the spring snapping, which can be dangerous.
Correct measurement keeps your garage door safe and working smoothly. Most springs last about 10,000 cycles (one cycle is an open and close). Choosing the right size can help your spring last longer.
Types Of Garage Door Springs
There are two main types of garage door springs. Understanding which one you have makes measuring easier.
- Torsion springs – Mounted above the door, parallel to the top edge.
- Extension springs – Run alongside the door tracks, stretching as the door closes.
Most modern doors use torsion springs, but many older or lightweight doors still use extension springs.
Torsion Springs Vs Extension Springs
Here’s a comparison to help you identify your spring type:
| Feature | Torsion Spring | Extension Spring |
|---|---|---|
| Location | Above the door, horizontal bar | Alongside the tracks |
| Appearance | Thick, coiled spring | Long, thin spring with hooks |
| Usage | Heavier or newer doors | Lighter or older doors |
| Safety | Safer, less likely to snap | Can snap violently if old |
If you’re unsure, take a picture and compare with online guides or ask a professional.
Credit: www.youtube.com
Tools Needed For Measuring Springs
Before you start, gather these tools:
- Measuring tape (preferably steel, for accuracy)
- Wrench or pliers (for removing the spring, if needed)
- Marker or tape (to mark points)
- Protective gloves and glasses (for safety)
- Notepad or phone (to record measurements)
Never measure springs under tension. Always release tension or call a technician if you’re unsure.
How To Measure Torsion Springs
Torsion springs are common in modern garage doors. Measuring them requires three key values:
- Length of the spring (not including the end cones)
- Inside diameter of the coil
- Wire size (thickness of the wire itself)
Step 1: Measure The Length
- Close the garage door.
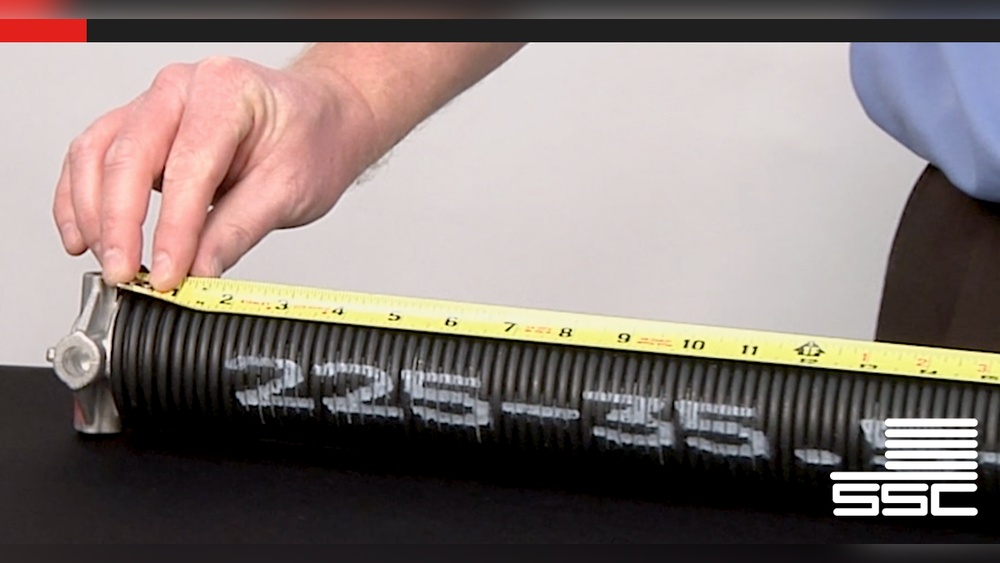
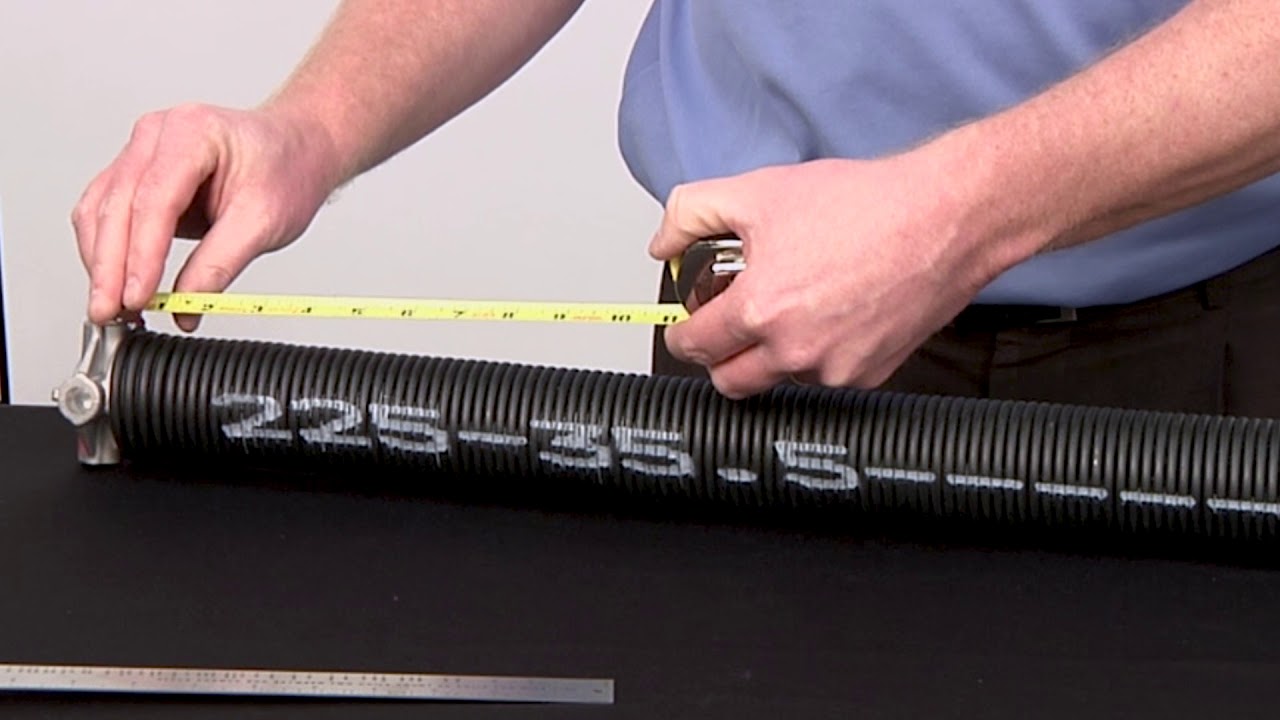
- Use a tape measure to measure the spring’s length from one end of the coil to the other, not including the end cones.
- Write down the number in inches.
*Example*: A typical torsion spring might be 38 inches long.
Step 2: Measure The Inside Diameter
- Look for a number on the spring or the stationary cone (often 1.75″ or 2″).
- If there’s no marking, measure across the center of the coil (not the outer edge).
- Write down the inside diameter.
*Common sizes*: 1.75 inches or 2.0 inches.
Step 3: Find The Wire Size
You can’t eyeball this measurement accurately. Here’s how to check:
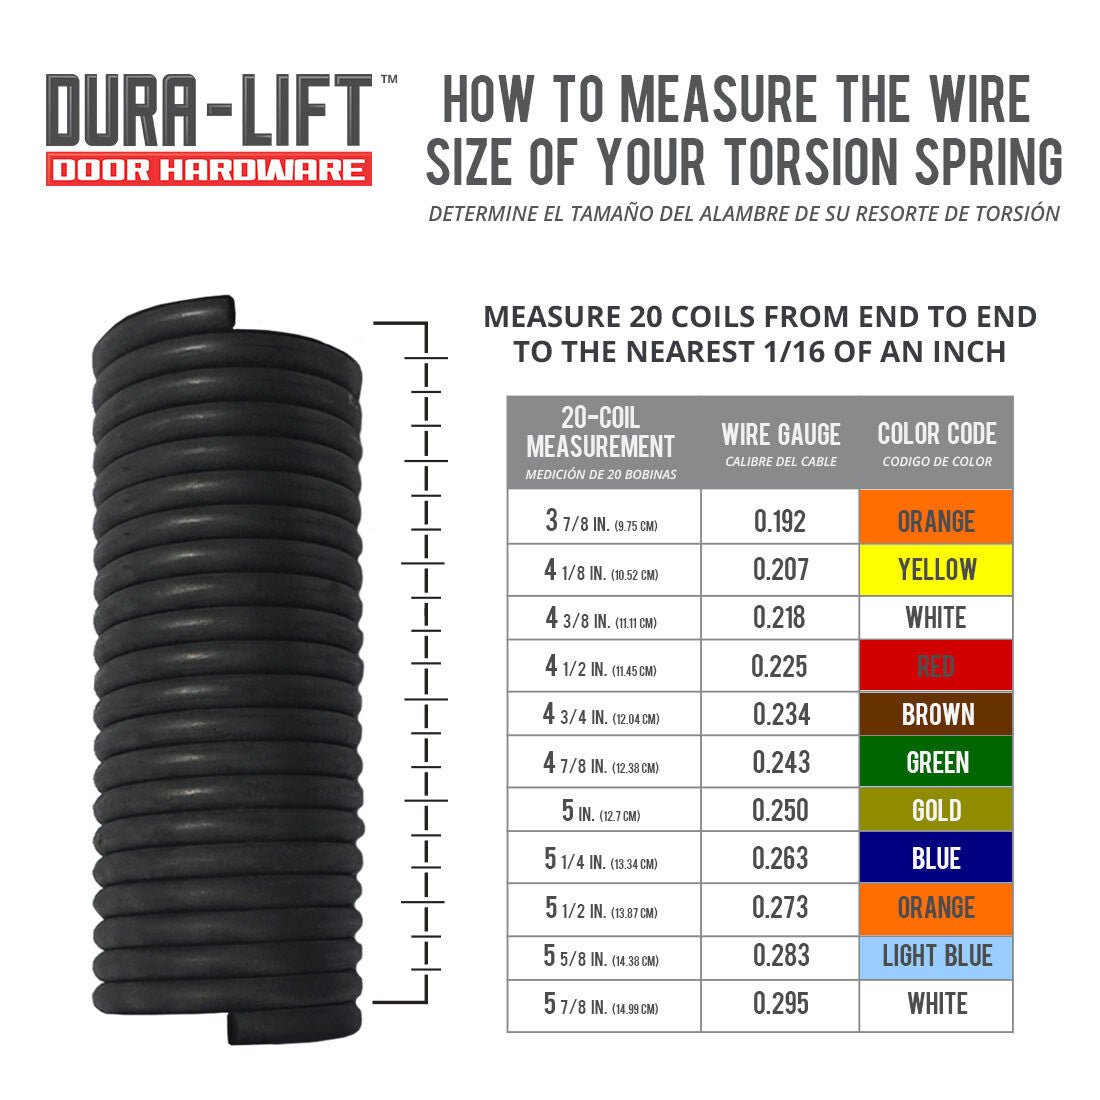
- Count 20 or 40 coils along the spring.
- Use a tape measure to measure the distance those coils cover.
- Divide the distance by the number of coils to find the wire size.
*Example*: If 20 coils measure 5 inches, then 5 ÷ 20 = 0.25 inches (wire size).
Step 4: Identify Wind Direction
Garage doors use left-wound and right-wound springs. Look for color codes at the end:
- Red = Right-wound (usually left side of the door)
- Black = Left-wound (usually right side of the door)
If the color is worn off, check the spring’s end. If the coils point up to the left, it’s left-wound; up to the right, right-wound.
Typical Torsion Spring Data
| Measurement | Common Value | What It Means |
|---|---|---|
| Length | 24″ – 42″ | Shorter for lighter doors, longer for heavier |
| Inside Diameter | 1.75″ or 2.0″ | Fits most US garage doors |
| Wire Size | 0.192″ – 0.295″ | Thicker wire for heavier doors |
How To Measure Extension Springs
Extension springs are found on the sides of the garage door. You need to measure:
- Length of the spring (without hooks)
- Outside diameter of the coil
- Wire gauge (diameter)
Step 1: Measure The Length
- Close the door fully.
- Measure the length of the spring not including the hooks or loops at the ends.
*Example*: Many extension springs are 25 inches long when relaxed.
Step 2: Measure The Outside Diameter
- Place the tape measure across the widest part of the coil.
- Write down the outside diameter.
*Common sizes*: 1 inch or 1.5 inches.
Step 3: Find The Wire Gauge
- Measure 10 coils of the spring.
- Divide that distance by 10.
*Example*: 2.5 inches for 10 coils means 0.25 inches wire gauge.
Step 4: Check For Color Codes
Many extension springs are color-coded at the end. Colors indicate the door weight they’re designed for:
- White: 10 lbs
- Green: 140 lbs
- Yellow: 130 lbs
- Blue: 120 lbs
Always double-check with a scale if you’re not sure.
Common Mistakes When Measuring Springs
Many beginners make mistakes that lead to buying the wrong spring. Avoid these errors:
- Measuring with tension: Springs must be relaxed or removed.
- Including cones or hooks in length: Only measure the coil part.
- Ignoring wind direction: Both sides of the door need opposite wind springs.
- Guessing wire size: Use coil count and measurement, not just look.
- Not double-checking measurements: Write down and confirm every number.
A surprising fact: Over 30% of DIY garage spring buyers order the wrong size the first time.
Credit: duralifthardware.com
Example: Measuring A Real Torsion Spring
Let’s walk through a simple example. Suppose your garage door doesn’t open fully, and you want to replace the spring.
- Length: You measure 34 inches (just the coil).
- Inside diameter: There’s a “1.75” stamped on the stationary cone.
- Wire size: 20 coils measure 5 inches, so wire size is 0.25 inches.
- Wind direction: The end is painted red—right-wound.
So, you need a 34″ long, 1.75″ inside diameter, 0.25″ wire size, right-wound torsion spring.
Practical Tips For Accurate Measurement
- Always double-check each measurement before buying.
- Take a photo of the old spring and label your measurements for future reference.
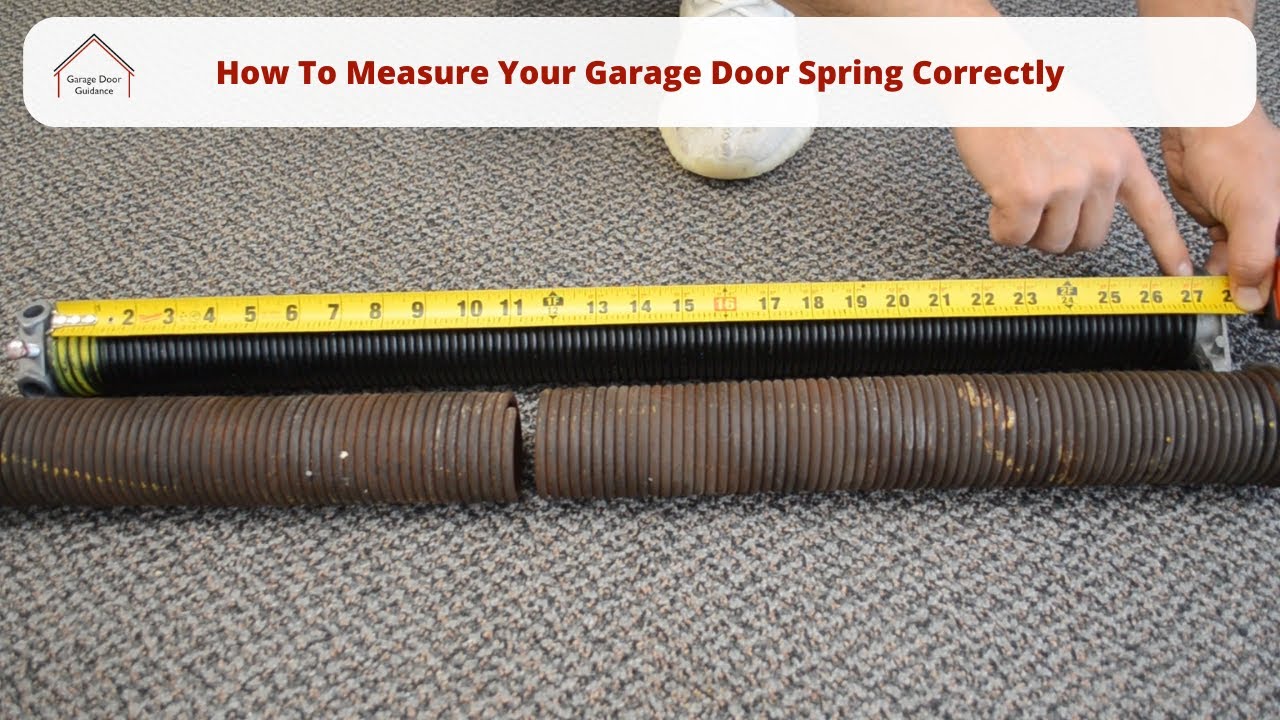
- If the spring is broken into pieces, tape the pieces together to measure total length.
- If color codes are missing, focus on accurate measurements and compare with the old spring.
- When in doubt, bring the spring to a hardware store for expert help.
Safety Precautions When Handling Garage Door Springs
Garage door springs are under high tension. Mishandling can cause injury. Follow these rules:
- Never attempt to remove or install springs under tension unless you’re trained.
- Always wear safety glasses and gloves.
- Use the correct tools for winding or unwinding torsion springs.
- If you feel unsure, hire a professional.
For more safety guidance, you can check resources like the OSHA Garage Door Safety page.
How To Choose The Right Replacement Spring
After measuring, you need to select a replacement spring. Here’s what matters most:
- Match all three measurements (length, diameter, wire size) exactly.
- For torsion springs, replace both springs if you have a pair—uneven springs wear out quickly.
- For extension springs, always replace both sides.
- Choose springs rated for at least 10,000 cycles for average home use.
- When ordering, provide all measurements and door weight if possible.
Comparing Spring Cycle Ratings
Here’s how spring life can vary:
| Cycle Rating | Approx. Years (4 cycles/day) | Best For |
|---|---|---|
| 10,000 cycles | ~7 years | Standard home use |
| 20,000 cycles | ~14 years | High-traffic homes |
| 50,000 cycles | ~35 years | Commercial/heavy use |
Paying a bit more for higher cycle springs can mean less hassle over time.
Credit: www.youtube.com
When To Call A Professional
Some jobs are best left to the experts. Call a garage door professional if:
- The spring is too heavy or under tension.
- You’re unsure about measurements.
- The door is unusually large or custom-built.
- You have difficulty identifying the spring type.
Professionals have the right tools and training to handle any spring safely.
Frequently Asked Questions
How Do I Know If My Spring Is Torsion Or Extension?
Check above the garage door. Torsion springs are mounted horizontally; extension springs run along the tracks. Torsion springs are thick and centered, while extension springs are long, skinny, and on the sides.
Can I Measure A Broken Spring?
Yes. Lay out all the pieces end to end. Measure the total length of the coil sections (not the end cones or hooks) to get the original length.
Why Is Wire Size So Important?
Wire size determines the strength and tension of the spring. Too thin, and the spring won’t lift the door. Too thick, and it may not stretch correctly, causing opener strain or early failure.
What If My Measurements Don’t Match Any Common Sizes?
Take clear photos and your measurements to a hardware store or send them to a garage door supplier. Many companies can custom-make springs for special sizes.
Is It Dangerous To Replace Springs Myself?
Yes, especially torsion springs. They’re under high tension and can cause injury if handled wrong. If you’re not confident or lack proper tools, it’s safer to call a professional.
Measuring garage door springs accurately is the first step to a safe and reliable garage door. With the right information, you can avoid common pitfalls, save money, and keep your door running smoothly for years. If you ever feel unsure, don’t hesitate to get expert help—your safety always comes first.