How Long Does It Take To Install A Garage Door
Many homeowners ask, “How long does it take to install a garage door? ” It’s a common question, especially if you’re planning a home upgrade or have a tight schedule. The answer is not always simple. Several factors affect the installation time, like door type, size, old door removal, and installer experience.
If you’re new to home improvement, this guide will help you understand what to expect and how to prepare.
Garage door installation is a mix of manual labor and technical skill. An experienced team can complete the job quickly, but beginners should know what really influences the timeline. This article explains every step, gives practical data, and shares tips for a smooth installation.
Typical Garage Door Installation Time
For most standard garage doors, installation time is between 4 and 8 hours. This estimate covers everything from removing the old door to testing the new one. If you’re getting a single, manual garage door, it can be faster—around 3 to 5 hours. Double doors, automatic openers, or custom designs often take longer.
Here’s a quick breakdown:
- Single manual door: 3–5 hours
- Single automatic door: 4–6 hours
- Double manual door: 4–6 hours
- Double automatic door: 5–8 hours
Some installations are finished in less than 3 hours. Others may stretch across a full day, especially if the old door needs major repairs or if parts are missing. It’s smart to ask your installer for a time estimate based on your specific door.
Factors That Affect Installation Time
Many beginners think all garage doors take the same time to install. This is not true. Here are key factors that change the timeline:
- Door Type and Size
- Larger doors require more labor.
- Custom or heavy doors need extra tools and people.
- Automatic vs. Manual
- Automatic doors take longer because of wiring and motor setup.
- Manual doors are simpler and faster to install.
- Removal of Old Door
- Removing an old, damaged door can add 1–2 hours.
- If the old frame is in poor condition, repairs can delay the process.
- Installer Experience
- Professional teams work faster and safer.
- DIY installation can take twice as long.
- Weather and Site Conditions
- Bad weather slows down outdoor work.
- Tight spaces or obstacles make installation harder.
- Extra Features
- Insulation, windows, or smart openers add steps.
- Unique finishes may require careful handling.
Many homeowners overlook these details. For a smooth process, check your garage and door specs before scheduling.
Credit: www.seohd.com
Step-by-step Installation Process
Understanding each step helps you estimate the true installation time. Here’s how a typical installation goes:
1. Preparation And Safety
- Clear the garage space.
- Check electrical connections if installing an automatic opener.
- Gather tools and materials.
- Review safety guidelines.
Preparation usually takes 30–60 minutes. Beginners often underestimate this step, but it prevents delays later.
2. Removing The Old Door
- Detach springs and opener.
- Remove panels carefully.
- Inspect and repair the frame if needed.
This step can take 1–2 hours, especially if the old door is damaged or stuck.
3. Assembling The New Door
- Lay out panels and hardware.
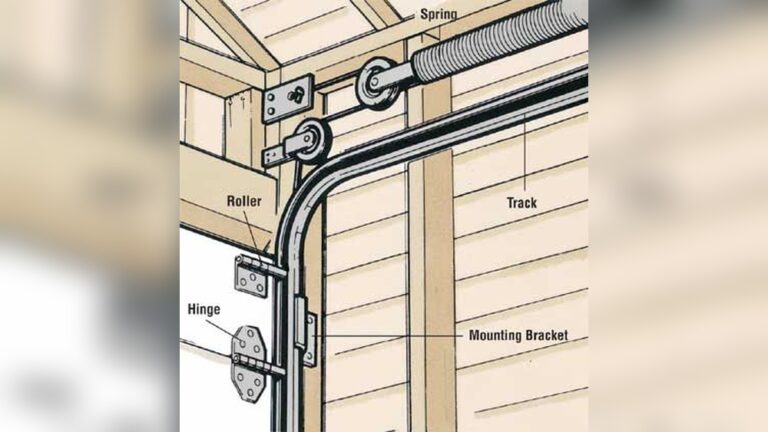
- Connect hinges, rollers, and tracks.
- Attach weatherproofing if needed.
Most doors arrive in parts. Assembly takes 1–2 hours. Double doors or insulated doors may take longer.
4. Installing The Door
- Position the door in the frame.
- Secure tracks and brackets.
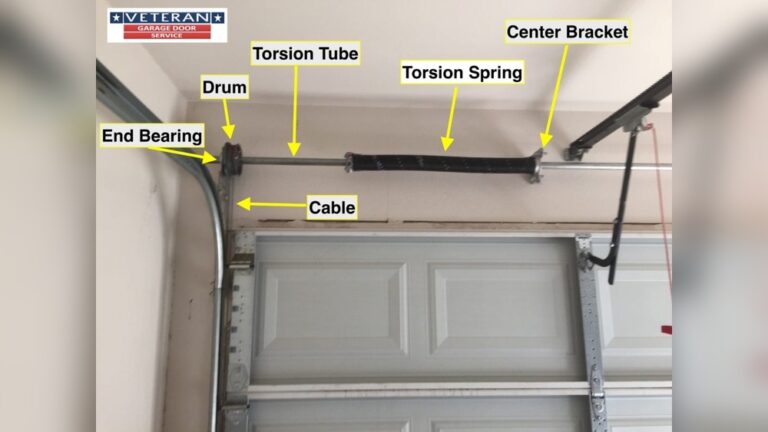
- Set up springs and cables.
Experienced installers finish this in 1–2 hours. DIY attempts often take longer.
5. Adding The Automatic Opener
- Mount the motor unit.
- Connect wiring and sensors.
- Test remote controls.
For automatic doors, this step adds 1–2 hours. If wiring is not ready, expect delays.
6. Testing And Adjustments
- Open and close the door several times.
- Check safety sensors.
- Adjust springs and tracks.
- Clean up the area.
Testing takes 30–60 minutes. Don’t skip this step—proper testing prevents costly repairs later.
Data Comparison: Professional Vs. Diy Installation
If you’re deciding between hiring a pro or doing it yourself, consider these differences.
| Aspect | Professional Install | DIY Install |
|---|---|---|
| Time Required | 4–8 hours | 8–12 hours |
| Quality | High, consistent | Varies, risk of mistakes |
| Safety | Trained for hazards | Risk if untrained |
| Warranty | Usually included | May void manufacturer warranty |
Many beginners underestimate the challenge of DIY installation. Garage doors are heavy, and springs are dangerous. If you’re not confident, hiring a professional is safer and faster.
Credit: www.columbusdoorsales.com
Typical Delays And How To Avoid Them
Some installations run longer than expected. Here are common causes:
- Missing parts: Double-check your order before the installer arrives.
- Frame damage: Inspect for wood rot or cracks ahead of time.
- Weather: Schedule installation on dry, mild days.
- Electrical issues: Make sure power is ready for automatic openers.
- Wrong door size: Measure your opening carefully.
A smart tip: Ask your installer for a checklist before the appointment. This prevents surprises and keeps the project on schedule.
Garage Door Types And Their Installation Times
Different doors have different installation needs. Here’s a quick comparison.
| Door Type | Average Time | Special Steps |
|---|---|---|
| Sectional | 4–6 hours | Assembly of panels, tracks |
| Roll-Up | 3–5 hours | Mounting drum, securing curtain |
| Side-Hinged | 3–4 hours | Hinge attachment, frame adjustment |
| Tilt-Up | 4–6 hours | Balance checks, single panel lift |
If you choose a custom or insulated door, add 1–2 hours to these estimates. Knowing your door type helps you plan better.
Real-life Example: Single Door Installation
Let’s say you’re installing a single automatic sectional door. Here’s a real-life timeline:
- 9: 00 AM: Installer arrives and prepares workspace.
- 9: 30 AM: Old door removal begins.
- 10: 30 AM: Frame inspected and minor repairs made.
- 11: 00 AM: New door assembly starts.
- 12: 30 PM: Lunch break and review progress.
- 1: 00 PM: Door installation and tracks secured.
- 2: 00 PM: Automatic opener installed and wired.
- 3: 00 PM: Testing and adjustments.
- 3: 30 PM: Final cleanup and handover.
Total Time: 6.5 Hours
This is a typical schedule for a professional team with no major issues. DIY installation might take two days.
Key Tips For Faster Installation
To avoid delays and mistakes, follow these tips:
- Prepare the garage: Remove clutter and park cars elsewhere.
- Check measurements: Make sure your new door fits the opening.
- Have all parts ready: Confirm delivery before the day of installation.
- Arrange electrical setup: For automatic doors, have outlets and wiring ready.
- Review safety steps: If doing it yourself, study spring handling and lifting techniques.
Many beginners skip preparation and end up with longer, more stressful installations.
Cost Vs. Time: What To Consider
Saving time often means spending more. Professional installation costs $300–$600 for a standard door, but you get speed, safety, and warranty. DIY may save $150–$350, but takes longer and risks mistakes.
Here’s a quick comparison:
| Option | Average Cost | Time Required |
|---|---|---|
| Professional | $300–$600 | 4–8 hours |
| DIY | $150–$350 | 8–12 hours |
If you value speed and peace of mind, professional installation is worth the extra cost.
Non-obvious Insights Beginners Miss
- Springs Are Dangerous: Garage door springs hold a lot of tension. Mishandling them can cause injury. Many beginners think springs are simple to remove, but they need special tools and skill.
- Warranty May Be Voided: Some manufacturers require professional installation for the warranty to be valid. Doing it yourself can save money but may cost more later if something breaks.
- Garage Door Weight: Even single doors can weigh over 150 pounds. Lifting and aligning them is hard, especially for one person.
- Code Compliance: In some areas, permits are needed for door replacement. Skipping this step can cause legal issues or insurance problems.
Credit: www.daytondoorsales.com
Practical Preparation Checklist
Before installation day, check these points:
- Door measurements match garage opening
- All hardware and parts are on site
- Electrical outlets are ready for automatic opener
- Garage cleared of obstacles
- Weather forecast is clear
- Permit (if needed) is secured
Taking time to prepare can shave hours off your installation.
Frequently Asked Questions
How Long Does It Take To Install A Garage Door?
Most installations take 4–8 hours for a standard door. Single manual doors can be done in 3–5 hours. Automatic or larger doors may take up to 8 hours. DIY installations often take longer, sometimes a full day.
Can I Install A Garage Door Myself?
Yes, but it’s challenging. DIY installation takes 8–12 hours and requires good tools and safety knowledge. Garage door springs and heavy panels can be dangerous. If you’re not experienced, hiring a pro is safer.
Does Weather Affect Installation Time?
Bad weather can slow down installation. Rain, snow, or extreme heat makes outdoor work harder and can cause delays. It’s best to schedule installation on a dry, mild day.
What Should I Prepare Before Installation?
Clear your garage, check measurements, confirm all parts are delivered, and have electrical outlets ready for automatic openers. Review safety steps and permit requirements if needed.
Will Installing A Garage Door Void My Warranty?
Some manufacturers require professional installation for warranty coverage. DIY installation can void the warranty. Always check your door’s warranty terms before starting.
Garage door installation is not as simple as many think, but with good preparation and the right team, you can expect a quick, safe process. If you want more details, check out Home Depot’s official guide for extra tips.
Whether you choose professional help or DIY, knowing the steps and potential delays helps you plan better. A little preparation can save hours and prevent stress. Now you’re ready to get your new garage door installed with confidence.