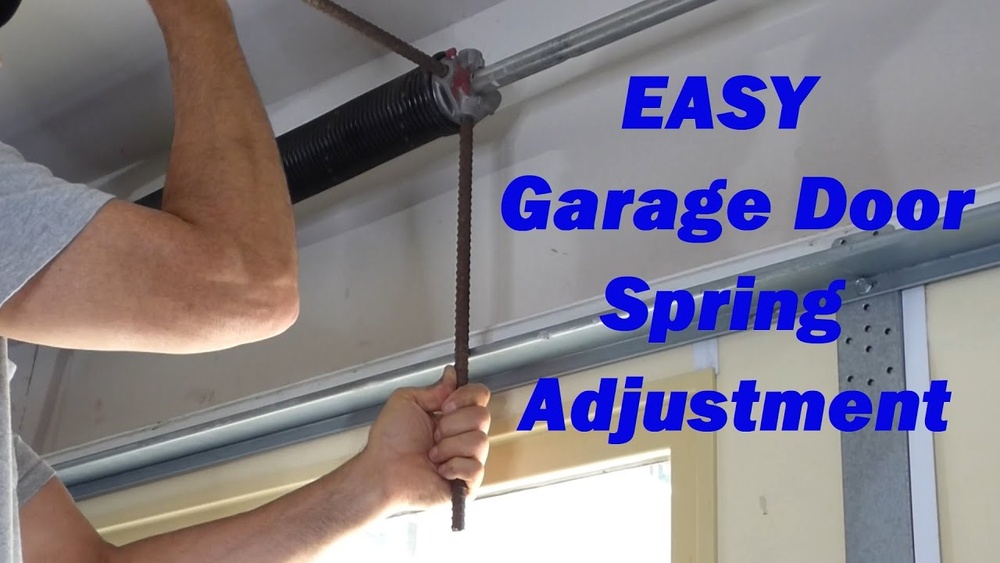
Adjusting Garage Door Springs
A garage door is more than just a large moving panel. It’s a complex system of springs, cables, and rollers. One of the most important parts is the garage door spring. When the spring works correctly, your door opens smoothly and safely. But when it’s out of adjustment, you might face problems like a heavy door, loud noises, or even a door that won’t open at all.
Many homeowners wonder if they can adjust garage door springs themselves. The answer is yes, but only with the right preparation, tools, and safety steps. Spring adjustment is not as simple as turning a screw; it requires understanding the type of springs you have, the correct tension, and how to avoid injury.
This guide explains each step in clear, simple language so even beginners can understand. If you’re new to garage door repair, read carefully before starting.
Types Of Garage Door Springs
Not all garage doors use the same kind of springs. Knowing your type is the first step.
Torsion Springs
- Located above the garage door, parallel to the ceiling.
- Usually mounted on a metal shaft.
- Most common in modern doors.
- Last longer (about 15,000-20,000 cycles).
Extension Springs
- Found above the horizontal tracks on each side.
- Stretch and contract as the door moves.
- Common in older or smaller doors.
- Shorter lifespan (about 10,000 cycles).
Why does type matter? The adjustment process is different for each spring. Torsion springs need winding bars and careful tensioning. Extension springs require different tools and methods.
How Garage Door Springs Work
Garage door springs counterbalance the weight of the door. When you lift the door (by hand or with a motor), the spring helps do the heavy lifting. If the spring is too loose, the door feels heavy or may slam shut.
If it’s too tight, the door can fly open or be hard to close.
Key insight: Many beginners think the motor lifts the door. In fact, the springs do most of the work. The opener just guides the movement.
Safety warning: Springs are under extreme tension. A sudden release can cause serious injury. Always use safety gear and proceed carefully.
Signs Your Garage Door Springs Need Adjustment
You should not adjust springs unless you see clear symptoms. Here’s what to watch for:
- The door feels very heavy or hard to lift by hand.
- The door does not stay open—it falls or drifts down.
- The door is crooked or uneven.
- The opener struggles or makes loud noises.
- There is a visible gap in the spring (for torsion springs).
If you see these signs, adjustment may help, but check for broken parts before proceeding.
Tools And Safety Equipment
Never start spring adjustment without the right tools. Using the wrong tool can strip screws or cause injury.
Basic tools:
- Winding bars (for torsion springs, never use screwdrivers)
- Adjustable wrench
- Socket set
- Clamps or locking pliers
- Stepladder
- Measuring tape
- Marker or chalk
Safety gear:
- Safety glasses
- Work gloves
- Long sleeves and pants
Non-obvious tip: Always use two winding bars of the correct size. Using just one is dangerous and can cause the bar to slip.

Credit: www.youtube.com
Preparing For Adjustment
Preparation is as important as the adjustment itself.
- Unplug the garage door opener. This prevents accidental activation.
- Open the door fully. Secure it with clamps or locking pliers on the track.
- Mark the shaft or spring. Use chalk or a marker to note the current position. This helps track how much you adjust.
Extra advice: Take a photo of your setup before starting. This makes it easier to reassemble if something goes wrong.
Adjusting Torsion Springs
Torsion springs are the most common type in modern homes. Adjusting them requires winding bars.
Step-by-step Guide
- Close the garage door completely. Secure it in place.
- Insert the first winding bar into the winding cone hole. Hold firmly.
- Loosen the set screws on the winding cone using a wrench.
- Turn the spring—one quarter turn at a time—using both winding bars. Add tension to lift the door easier, or release tension if the door is flying open.
- Tighten the set screws. Make sure they are snug but not overtightened.
- Test the door by lifting it halfway. It should stay in place. Repeat steps if more adjustment is needed.
Important: Never remove all tension from the spring unless replacing it. Sudden release can cause injury.
How Many Turns?
A standard 7-foot garage door usually needs 30-32 quarter turns (about 7-8 full turns) per spring. However, always follow the manufacturer’s instructions.
Adjusting Extension Springs
Extension springs are simpler but still require caution.
Step-by-step Guide
- Open the door fully and secure it.
- Locate the adjustment holes or hooks on the spring.
- Move the S-hook to a different hole to add or reduce tension.
- Adjust both sides evenly to avoid an uneven door.
- Lower the door and test. Make sure it stays halfway open.
Non-obvious insight: Extension springs often have safety cables running through them. Never remove these—they prevent injury if the spring breaks.
Common Mistakes To Avoid
Beginners often make simple but serious mistakes. Here’s how to avoid them:
- Using the wrong tool (e.g., a screwdriver instead of a winding bar)
- Adjusting only one spring instead of both (for double-spring systems)
- Over-tightening set screws, which can strip the threads
- Failing to secure the door before starting
- Ignoring worn or rusty parts, which may need replacement, not adjustment
Tip: If you’re unsure, call a professional. Garage door spring injuries are common and can be severe.
When To Replace Instead Of Adjust
Not all spring problems can be fixed by adjusting. Sometimes, replacement is safer and more effective.
- The spring is broken or has a visible gap.
- The spring is rusty or stretched out.
- The door still does not balance after adjustment.
Example: If your door drops quickly even after tightening the spring, the metal may have lost its tension.
Data point: Most torsion springs last 7-10 years with regular use. If yours is older, replacement is a better choice.
Cost Comparison: Diy Vs. Professional
How much can you save by adjusting springs yourself? Here’s a quick overview:
| Adjustment Type | DIY Cost (Tools & Parts) | Professional Cost |
|---|---|---|
| Torsion Spring Adjustment | $20–$50 | $80–$150 |
| Extension Spring Adjustment | $10–$30 | $60–$120 |
| Spring Replacement | $40–$100 | $150–$350 |
Note: DIY is cheaper but riskier. If you don’t have the right tools, add $10–$30 to DIY costs.
Spring Lifespan And Replacement Frequency
How long should garage door springs last? This depends on type and usage.
| Spring Type | Average Lifespan (Cycles) | Years (Normal Use) |
|---|---|---|
| Torsion | 15,000–20,000 | 7–12 |
| Extension | 10,000 | 5–8 |
One cycle = one open and close. If you use your garage as a main entrance, you may reach the cycle limit sooner.
Example: Adjusting A Torsion Spring On A 7-foot Door
Let’s say your 7-foot garage door won’t stay open halfway. You test and find it drops quickly. Here’s what you’d do:
- Unplug the opener and secure the door.
- Mark the current spring position.
- Insert two winding bars. Loosen set screws.
- Add one quarter turn at a time. Test after each full turn.
- After 1-2 full turns (4-8 quarter turns), the door now stays halfway open—this is the correct tension.
Practical tip: Never add more than 1 full turn at a time. Small changes make a big difference.
Advanced Tips For Beginners
- Lubricate springs after adjustment to reduce noise and friction.
- Check all hardware (hinges, rollers, cables) for wear before adjusting.
- Keep a record of adjustments (date, number of turns). This helps track problems in the future.
- If you hear a loud bang, the spring may have broken. Stop and inspect before using the door again.
Safety Checks After Adjustment
Always test the door after adjusting springs.
- Lift the door by hand. It should stay in place at 3 feet and at 5 feet.
- Check that the door moves smoothly, without sticking or jerking.
- Reconnect the opener and test automatic opening and closing.
- Listen for new noises. Clicking or grinding means further inspection is needed.
Extra safety note: If you feel unsafe at any point, stop. There’s no shame in calling a pro.

Credit: www.wikihow.com
Maintenance To Extend Spring Life
Proper maintenance can double the life of your springs.
- Lubricate springs every 6 months with garage door spray lube.
- Clean the tracks and rollers regularly.
- Inspect for rust or corrosion.
- Tighten any loose bolts or hardware.
Non-obvious tip: Never paint over springs. Paint traps moisture and speeds up rust.
Environmental Factors That Affect Springs
Springs are affected by:
- Moisture: Causes rust.
- Extreme temperatures: Can weaken the metal.
- Salt air (coastal areas): Accelerates corrosion.
If you live in a humid or coastal area, check your springs more often.

Credit: garagedoorflorida.com
Frequently Asked Questions
How Do I Know If My Garage Door Spring Is Broken?
A broken spring usually makes a loud bang. The door may become very heavy and won’t open, even with the opener. For torsion springs, look for a gap in the coil. For extension springs, look for a stretched or snapped spring.
Is It Safe To Adjust Garage Door Springs Myself?
It can be safe if you follow all instructions, use the right tools, and wear safety gear. However, there is always a risk of injury. If you’re unsure or uncomfortable, it’s better to hire a professional.
How Often Do Garage Door Springs Need Adjustment?
Springs usually only need adjustment if the door becomes unbalanced or after a repair. Most homes do not need regular adjustment—only maintenance like lubrication.
What Is The Difference Between Adjusting And Replacing Springs?
Adjusting means adding or removing tension to fix balance. Replacing is needed if the spring is broken, stretched, or rusty. Adjustment can’t fix a worn-out or damaged spring.
Where Can I Learn More About Garage Door Safety?
The International Door Association offers safety tips and industry standards. For more in-depth information, visit the Door & Access Systems Manufacturers Association website.
Taking care of your garage door springs ensures your door works safely and smoothly for years. With careful steps and attention to detail, many beginners can adjust springs themselves. But when in doubt, always choose safety first and call a professional.