How To Adjust Garage Door Travel
A garage door that doesn’t open or close all the way can be more than just annoying. It can affect your home’s security, energy efficiency, and even the life of your garage door opener. Adjusting garage door travel is a simple fix for most homeowners, but it’s important to do it safely and correctly.
If you’re new to home repairs, don’t worry—this guide walks you through everything you need to know to adjust the travel on your garage door, with practical examples and clear instructions.
What Is Garage Door Travel?
Garage door travel is the distance your door moves when opening or closing. Most automatic garage doors have travel limits set on the opener. These limits tell the door when to stop moving. If these are set too high or low, your door might:
- Not close all the way (leaving a gap)
- Reverse before it hits the floor
- Open too far and hit the stop bolt or wall
A travel adjustment ensures the door moves exactly as far as it should—no more, no less.
Why Adjust Garage Door Travel?
Making sure the travel is correct does more than just help the door work smoothly. It also:
- Prevents damage to the door and opener
- Reduces energy loss by ensuring a tight seal
- Improves security by closing the door fully
- Extends the life of your opener and hardware
If your garage door doesn’t close all the way, you may see higher energy bills or even allow pests inside. If it opens too far, it could damage the opener or the structure above the door. Proper travel adjustment solves these problems.

Credit: diy.stackexchange.com
Common Signs Your Garage Door Travel Needs Adjustment
It’s easy to overlook small problems with your garage door. Here are clear signs that travel needs adjusting:
- The door stops before it touches the ground
- The door reverses as it’s closing, even though nothing is blocking it
- The door opens and then immediately reverses
- There’s a gap at the bottom when the door is closed
- The door hits the floor hard or bounces
If you spot any of these, it’s time to check your travel settings.
How Garage Door Travel Adjustment Works
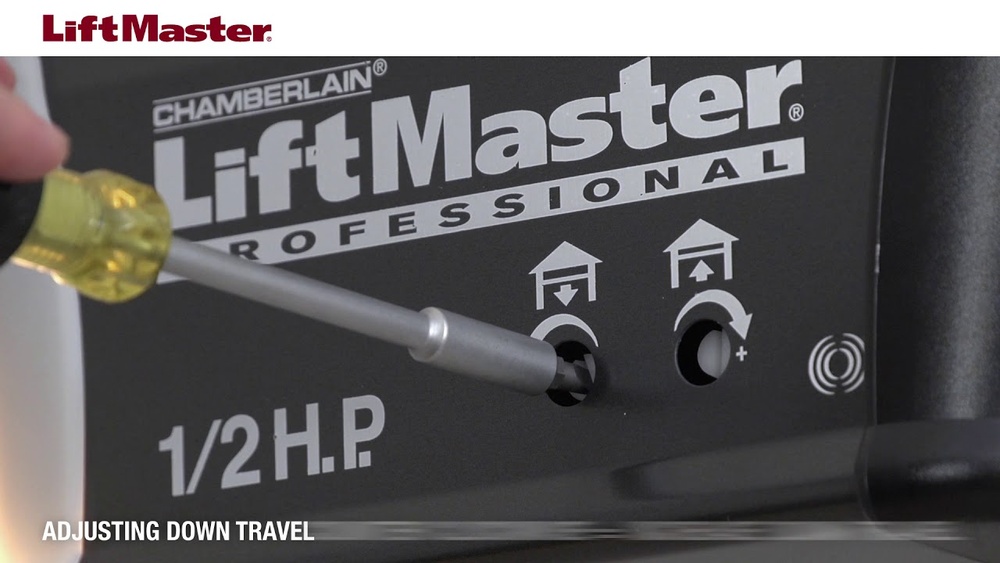
Garage door openers, whether chain-drive, belt-drive, or screw-drive, use travel or limit switches. These switches tell the opener motor where to stop. You’ll usually find two screws, knobs, or dials on the opener:
- Up/close limit: Controls how far the door closes
- Down/open limit: Controls how far the door opens
On newer openers, these may be labeled as “Travel” or “Limit” adjustments.
Typical Garage Door Opener Adjustments
Most openers have a travel adjustment range of about 2 to 4 feet for both open and close. This is more than enough for standard garage doors, which are usually 7 or 8 feet tall.
Example: If your garage door is 7 feet tall, and it’s stopping with a 3-inch gap at the bottom, you may need to increase the down travel limit by 3–4 inches.
Credit: www.youtube.com
Tools You Need
Adjusting garage door travel doesn’t require special tools. For most brands, you’ll need:
- A sturdy step ladder (to reach the opener)
- A flathead screwdriver or Phillips screwdriver (depending on your opener)
- Safety glasses (for eye protection)
- A flashlight (if your garage is dimly lit)
You do not need to disconnect the door from the opener for basic travel adjustments.
Step-by-step Guide: Adjusting Garage Door Travel
Follow these steps for a safe and effective adjustment:
1. Prepare The Area
- Make sure the garage is clear of people and pets.
- Pull vehicles out, if possible.
- Turn off the garage door opener (unplug or switch off power).
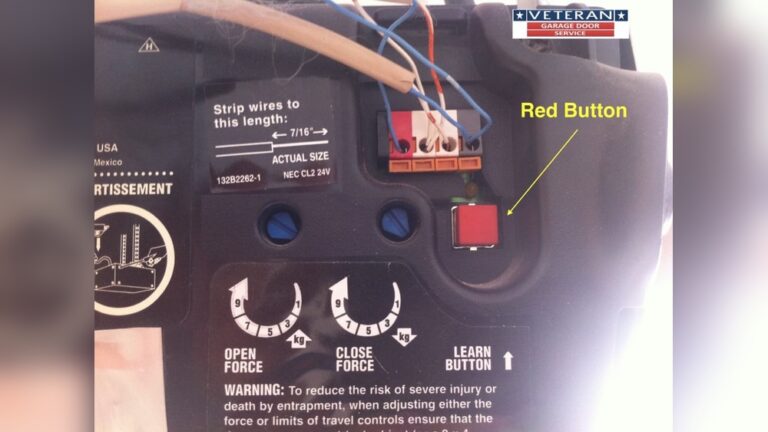
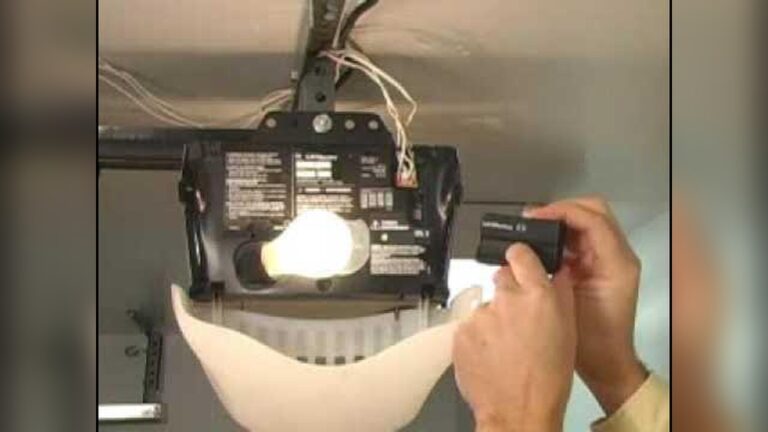
2. Locate The Travel Adjustment Screws
- Find your opener’s adjustment panel—usually on the back or side.
- Look for labeled dials, screws, or buttons: “Up,” “Down,” “Open,” “Close,” “Travel,” or “Limit.”
- Use your flashlight to read the labels.
3. Test The Current Door Travel
- Plug the opener back in.
- Use the wall switch or remote to open and close the door.
- Watch where the door stops in both directions.
- Note how much adjustment is needed (inches or centimeters).
4. Adjust The Close (down) Travel
- Turn the down travel screw (usually marked “Down” or “Close”) in small steps.
- Most openers increase travel by turning clockwise and decrease by turning counterclockwise. Check your opener’s label or manual.
- Make small adjustments—a quarter turn at a time.
5. Test The Door Again
- Run the door through a full cycle (open and close).
- Check if the door now closes fully and seals against the floor.
- If not, repeat the adjustment as needed.
6. Adjust The Open (up) Travel
- If the door isn’t opening fully, adjust the up travel screw (“Up” or “Open”).
- Again, make small changes and test each time.
- Do not set the up travel too high—the door should stop just short of hitting the opener’s stop bolt.
7. Final Safety Check
- After adjustments, check that the door reverses if it hits an object.
- Place a roll of paper towels under the door and close it. The door should reverse upon contact.
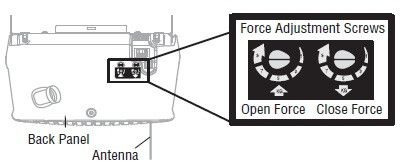
Credit: support.chamberlaingroup.com
Practical Example: Adjusting A Chamberlain Opener
Let’s say you have a Chamberlain garage door opener. The door leaves a 2-inch gap when closed.
- Find the “Down” travel adjustment screw.
- Turn it clockwise 1/4 turn.
- Test the door. If the gap remains, repeat the process until the door seals.
- If the door starts to hit the floor too hard and bounces, turn the screw back slightly.
This process is similar for LiftMaster, Genie, and other major brands.
Data: Typical Adjustments And Effects
Here’s a comparison of how much effect each adjustment makes on common openers:
| Opener Brand | 1/4 Turn Adjustment | Typical Door Movement |
|---|---|---|
| Chamberlain | 1/4 turn | 1–2 inches |
| Genie | 1/4 turn | 1–1.5 inches |
| LiftMaster | 1/4 turn | 1–2 inches |
| Craftsman | 1/4 turn | 1–2 inches |
Note: Always make small adjustments and test, as too much travel can cause the door to bind or reverse.
Safety Features And Travel Adjustment
Modern garage door openers have built-in safety reversal systems. If the door hits an object or binds, it should reverse automatically. If you set the travel too far:
- The door may try to close past the floor, causing stress on the motor.
- The reversal system may trigger, making the door open again.
- You might hear loud noises or see the opener lights flash.
If you notice these, reduce the travel slightly and test again.
Comparing Manual Vs Automatic Travel Adjustment
Some newer openers have automatic travel learning. Here’s how they compare with manual adjustment:
| Adjustment Type | How It Works | Pros | Cons |
|---|---|---|---|
| Manual | User turns screws/dials | Precise, works on most models | Takes more time, trial and error |
| Automatic | Opener learns door position | Easy, fast, fewer mistakes | May require several cycles, not on older models |
If your opener supports automatic travel adjustment, follow the manufacturer’s instructions.
Common Mistakes To Avoid
Many beginners make the same errors when adjusting garage door travel. Here’s what to watch out for:
- Turning the adjustment screw too far at once
- Forgetting to test after each adjustment
- Ignoring safety reversal tests
- Confusing force adjustments with travel adjustments (these are not the same!)
- Not checking both open and close positions
- Making adjustments with power on (except when testing)
When To Call A Professional
If the door still doesn’t open or close properly after careful adjustments, or you notice:
- Grinding noises
- The door comes off its tracks
- Broken springs or cables
- The door is extremely heavy or unbalanced
It’s time to call a professional. Adjusting springs or repairing hardware can be dangerous for beginners.
Non-obvious Tips For Better Results
- Mark the current screw position with a marker before you start. If you make a mistake, you can always return to the original setting.
- Keep a log of how many turns you make. This will help if you need to troubleshoot later or if someone else needs to adjust the door.
- Lubricate the door rollers and tracks before adjusting travel. A sticky door can give false readings on travel and force.
- Test during different weather conditions. Garage doors can expand or contract with temperature and humidity, affecting travel limits.
Real-world Data: Garage Door Sizes And Opener Compatibility
Most US garage doors are either 7 or 8 feet tall. Openers are designed to handle these common sizes. Here’s a quick comparison:
| Door Height | Standard Travel Range | Compatible Opener Models |
|---|---|---|
| 7 feet | Up to 7.5 feet | Chamberlain, Genie, LiftMaster, Craftsman |
| 8 feet | Up to 8.5 feet | Chamberlain, Genie, LiftMaster, Craftsman |
If your door is taller, you may need an extension kit for the opener.
Simple Maintenance To Prevent Future Problems
To keep your garage door working well after adjustment:
- Check travel settings every 6–12 months
- Clean the tracks and lubricate moving parts
- Test safety reversal features at least twice a year
- Tighten any loose bolts or screws on the door and opener
These small steps can prevent major repairs and keep your door running smoothly for years.
Frequently Asked Questions
How Do I Know If My Garage Door Travel Is Set Correctly?
Your door should open fully without hitting the stop bolt or ceiling, and close tightly against the floor without a gap. If the door reverses or won’t close all the way, the travel needs adjustment.
What’s The Difference Between Travel And Force Adjustment?
Travel adjustment controls how far the door moves. Force adjustment controls how much pressure the opener uses. Both are important, but they are set separately. Adjust travel before adjusting force.
Can I Adjust The Travel On Any Garage Door Opener?
Most modern openers allow travel adjustment, but the method may differ. Chain-drive, belt-drive, and screw-drive openers all have travel or limit screws. Some very old openers may not have these controls.
What If My Garage Door Still Won’t Close After Adjustment?
Check for blocked sensors, dirty tracks, or damaged hardware. If the opener lights flash or you hear beeping, refer to your manual for error codes. If you can’t find the problem, call a professional for help.
Where Can I Find More Information About My Opener Model?
Check your owner’s manual or visit the manufacturer’s website. For example, the Chamberlain Garage Door Openers page has guides for most models.
Getting your garage door travel right can make your life easier and protect your home. With these beginner-friendly steps, you can adjust your garage door travel confidently and safely. If problems continue or you’re unsure, don’t hesitate to get expert help.