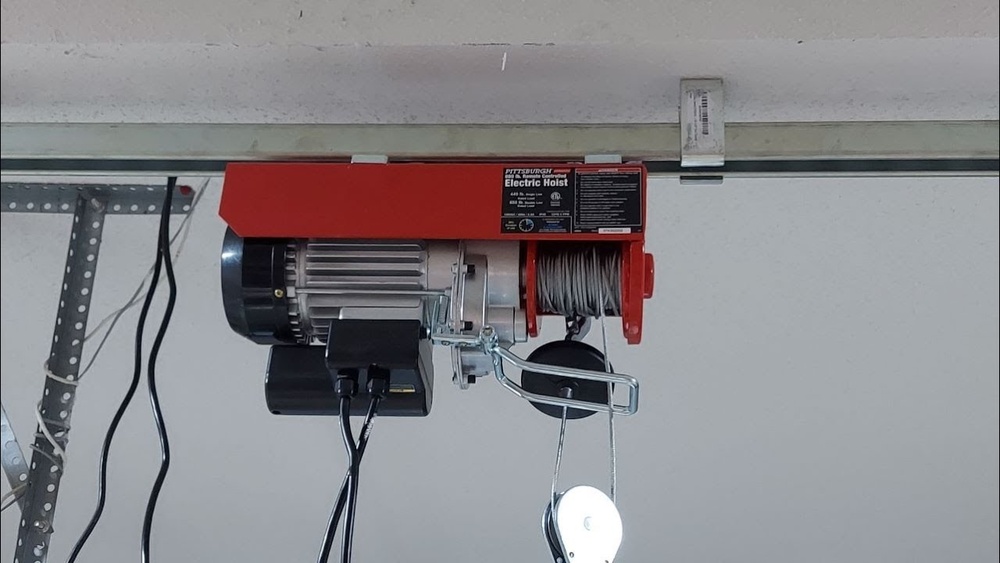
Installing a garage hoist can transform your home workshop. With a hoist, you can lift heavy objects like engines, bikes, or storage bins safely and easily. Many homeowners install a garage hoist to save space and make tasks simpler. If you’re new to DIY projects, you might wonder where to start.
This guide will walk you through every step. You’ll learn how to choose the right hoist, prepare your garage, install it safely, and avoid common mistakes. By the end, you’ll feel confident and ready to tackle the project yourself.
What Is A Garage Hoist?
A garage hoist is a device that helps lift and lower heavy items in your garage. It uses a pulley system or motor to move objects vertically. Hoists are popular for storing bikes, kayaks, engines, and bulky tools. Some models are manual, while others use electric motors.
- Manual hoist: Uses ropes and pulleys. You pull to lift or lower items.
- Electric hoist: Operates with a switch or remote. It’s easier for frequent use.
Garage hoists are practical for small spaces. They free up floor space and reduce lifting injuries.
Choosing The Right Garage Hoist
Selecting the best hoist depends on your needs, budget, and garage structure. Consider these factors:
- Weight capacity: Most hoists range from 200 to 2000 pounds. Pick one that’s stronger than your heaviest item.
- Type: Decide between manual or electric. Electric is best for frequent, heavy lifting.
- Mounting method: Ceiling or wall-mounted hoists? Ceiling mounts are common, but wall mounts work in some garages.
- Safety features: Look for brakes, automatic shutoff, and overload protection.
- Price: Manual hoists start around $50; electric models can reach $300 or more.
Here’s a comparison of popular hoist types:
| Hoist Type | Capacity (lbs) | Operation | Average Price | Best For |
|---|---|---|---|---|
| Manual Pulley | 200-500 | Hand Pull | $50-$100 | Bikes, small tools |
| Electric Winch | 500-2000 | Remote Switch | $120-$300 | Engines, large items |
| Wall-Mounted Hoist | 300-1000 | Hand/Remote | $80-$200 | Limited ceiling space |
Tip: Never use a hoist that’s rated below your item’s weight. Overloading is dangerous.

Credit: www.amazon.com
Preparing Your Garage For Installation
Before installing your hoist, check your garage’s structure and clear the area. Preparation is essential for safety and success.
- Inspect ceiling joists: Most hoists mount to ceiling joists. Make sure they’re solid wood, not just drywall.
- Measure clearance: Check for enough vertical space. You need room for the hoist, ropes, and items.
- Clear obstacles: Remove bikes, shelves, or tools from the area.
- Gather tools: Common tools include a drill, socket set, ladder, and measuring tape.
Here’s a quick checklist for beginners:
- Locate sturdy ceiling joists (use a stud finder).
- Verify joist spacing (usually 16 or 24 inches apart).
- Measure the distance from the ceiling to the floor.
- Plan where the hoist will hang, avoiding lights and garage doors.
- Mark drill points with a pencil.
Non-obvious insight: Many beginners forget to check for electrical wires or pipes above the ceiling. Always inspect before drilling.
Garage Hoist Installation Steps
Installing a garage hoist is straightforward if you follow step-by-step instructions. Here’s a beginner-friendly guide.
Step 1: Read The Manufacturer’s Manual
- Every hoist is slightly different. Read the instructions to understand mounting points, hardware, and safety notes.
Step 2: Mark Your Mounting Points
- Use a measuring tape and pencil to mark where you’ll install the hoist.
- For ceiling hoists, mark directly on the joist.
Step 3: Drill Pilot Holes
- Drill small holes at your marked points. This helps screws go in straight and prevents wood splitting.
Step 4: Install Mounting Brackets
- Most hoists come with brackets. Use lag bolts (large, strong screws) to attach brackets to the joist.
- Tighten bolts securely with a socket wrench.
Step 5: Attach The Hoist
- Lift the hoist onto the brackets. Secure it with the provided hardware.
- For electric hoists, connect the power cord (follow manufacturer’s instructions).
Step 6: Test The Hoist Without Load
- Operate the hoist empty. Make sure it moves smoothly up and down.
- Listen for unusual noises or vibration.
Step 7: Test With A Light Load
- Attach a light item (like a bag or bike). Lift and lower to check balance and stability.
- Watch for any movement in the brackets or joist.
Step 8: Final Safety Check
- Inspect all bolts and connections.
- Make sure the hoist stops smoothly and doesn’t sway.
- Check for clear paths so nothing gets caught.
Common mistake: Beginners often skip the pilot hole step. This can make installation much harder and damage your joists.
Practical Example: Installing An Electric Garage Hoist
Let’s look at a real-world example. Suppose you bought a 1000-pound electric hoist to lift an engine.
- Garage specs: Standard 2-car garage, 10-foot ceiling, wood joists spaced 16 inches apart.
- Tools needed: Drill, 3/8-inch lag bolts, socket set, ladder, stud finder.
- Installation time: About 2 hours.
Steps:
- Use the stud finder to locate a solid joist. Mark two points 8 inches apart for the brackets.
- Drill 3/16-inch pilot holes at the marks.
- Attach brackets with lag bolts. Tighten until firm.
- Lift the hoist onto the brackets. Secure with bolts.
- Plug in the hoist and check power.
- Test with a light bag. Then try lifting the engine block.
Practical tip: If you’re working alone, use a helper for lifting the hoist. Some units weigh over 40 pounds.
Safety Tips For Garage Hoist Installation
Safety is vital when working with heavy equipment. Follow these tips to avoid accidents:
- Wear safety glasses when drilling or working overhead.
- Never overload the hoist. Check weight limits before lifting.
- Keep children and pets away during installation and use.
- Inspect hardware regularly for wear or rust.
- Unplug electric hoists when not in use.
Here’s a quick comparison of common safety features:
| Feature | Manual Hoist | Electric Hoist |
|---|---|---|
| Brake System | Manual lever | Automatic |
| Overload Protection | No | Yes |
| Emergency Stop | No | Yes |
Non-obvious insight: Many accidents happen when people leave items hanging for months. Always lower items when not needed.
Maintenance And Troubleshooting
Keeping your garage hoist in good shape is easy if you follow basic maintenance steps:
- Lubricate moving parts every 6 months. Use standard machine oil.
- Check cables and ropes for fraying or wear. Replace if damaged.
- Inspect bolts for loosening. Tighten if needed.
- Clean the hoist with a dry cloth. Avoid water on electric motors.
If your hoist isn’t working smoothly:
- Hoist won’t lift: Check power supply (for electric), or pulley alignment (for manual).
- Strange noises: Lubricate gears and check for loose bolts.
- Hoist moves slowly: Inspect cable for kinks or obstructions.
Expert tip: Keep the manual handy. It often has troubleshooting charts for common problems.
Cost Breakdown: Garage Hoist Installation
Budgeting your project helps avoid surprises. Here’s an example breakdown for a typical electric hoist:
| Item | Average Cost |
|---|---|
| Electric Hoist (1000 lbs) | $180 |
| Mounting Hardware | $20 |
| Tools (if bought) | $50 |
| Safety Gear | $30 |
| Total | $280 |
You can reduce costs by using tools you already have. Manual hoists are much cheaper but require more effort.

Credit: www.youtube.com
Common Mistakes And How To Avoid Them
Beginners often make a few errors during installation. Here’s how to avoid them:
- Skipping joist inspection: Weak joists can fail. Always check wood quality.
- Using incorrect hardware: Only use lag bolts, not drywall screws.
- Overloading the hoist: Know your item’s weight. Never guess.
- Neglecting pilot holes: These prevent wood cracking.
- Not testing before use: Always run empty and with a light load first.
Advice: Keep your workspace organized. A cluttered garage increases accident risk.
When To Hire A Professional
Some situations call for expert help:
- Your garage ceiling is not standard wood (e.g., concrete or steel beams).
- You need to lift items over 2000 pounds.
- You’re unsure about electrical wiring for electric hoists.
- The installation manual is unclear or missing.
Professionals charge $100–$300 for installation. They have the experience and tools for tricky jobs.

Credit: www.amazon.com
Where To Find Reliable Hoists
Look for hoists at hardware stores, online retailers, or specialty shops. Read reviews and compare specs before buying. For detailed product research, visit Home Depot for trusted brands and installation guides.
Frequently Asked Questions
How Do I Know Which Garage Hoist Is Right For Me?
Choose a hoist based on your item’s weight and how often you’ll use it. Electric hoists are best for heavy or frequent lifting. Manual hoists are cheaper and good for light items.
Can I Install A Hoist On Any Garage Ceiling?
No. Your ceiling must have strong wood joists. Avoid mounting on drywall or weak beams. If unsure, consult a professional.
Is It Safe To Use A Garage Hoist Alone?
For light items, yes. For heavy hoists or objects, use a helper. Always follow safety guidelines and avoid rushing.
How Often Should I Inspect My Garage Hoist?
Check your hoist every 3–6 months. Look for wear, rust, loose bolts, and damaged cables. Regular checks prevent accidents.
What Should I Do If My Hoist Stops Working?
First, check power and connections. For manual hoists, inspect pulleys and ropes. If you can’t fix it, call a technician or follow the troubleshooting guide in your manual.
Installing a garage hoist is a smart way to organize your space and make heavy lifting safe. With careful planning, the right tools, and attention to safety, even beginners can complete this project successfully. Take time to choose the right hoist, prepare your garage, and follow each step closely.
You’ll enjoy a safer, more efficient workspace for years to come.