Replacing a garage door bottom seal might seem like a small task, but it makes a big difference in your home. A worn-out seal allows water, dust, pests, and cold air inside. Over time, this can damage items in your garage and increase energy bills. If you notice gaps under your garage door, a cracked seal, or light shining through, it’s time for a replacement.
Many homeowners worry that this job is complicated or expensive. In reality, it’s a simple DIY project that can save you money and protect your garage. You don’t need special skills—just a few tools and some careful steps. This guide will walk you through everything, from choosing the right seal to installing it correctly.
You’ll also learn mistakes to avoid and get answers to common questions.
Why The Garage Door Bottom Seal Matters
The garage door bottom seal is a strip that runs along the lower edge of your garage door. Its main job is to block out:
- Rainwater
- Small animals and insects
- Leaves and debris
- Cold or hot air
When the seal is damaged, you might notice these problems:
- Wet spots inside the garage after rain
- More dust or dirt than usual
- Higher energy bills due to heat loss
- Mice, bugs, or other pests getting inside
Replacing the seal helps keep your garage cleaner and your house more comfortable.
Signs Your Garage Door Bottom Seal Needs Replacement
Not sure if your seal is ready for a change? Look for these signs:
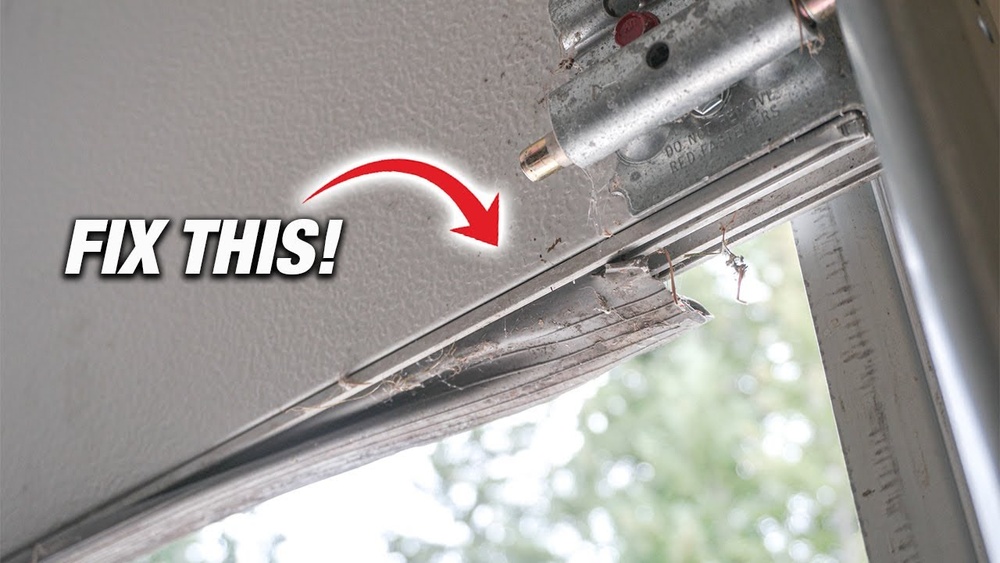
- Visible cracks or tears: Rubber becomes brittle over time. Check for splits.
- Hard, flattened seal: If the seal no longer feels flexible, it won’t work well.
- Light coming through: Close the garage door and see if daylight shows beneath.
- Water leaks: Puddles after rain mean the seal isn’t doing its job.
- Drafts or pests: Feeling air or seeing bugs indoors often points to a bad seal.
Types Of Garage Door Bottom Seals
Choosing the right seal is important for a snug fit. There are several common types:
| Type | Description | Best For |
|---|---|---|
| Bulb Seal | Rounded bottom, compresses for tight fit | Uneven floors |
| Flat Seal | Simple flat strip | Smooth surfaces |
| T-Style Seal | Has “T” ends that fit into tracks | Metal doors with track grooves |
| Bead Seal | Round beads on edges snap into channels | Specialty door systems |
| U-Shape Seal | U-shaped cross-section for universal fit | Most modern doors |
Tip: Check your current seal and the bottom of your door to match the style. Not all seals fit every door.
Tools And Materials Needed
Before you start, gather these items:
- Replacement garage door bottom seal (correct length and type)
- Measuring tape
- Utility knife or scissors
- Flathead screwdriver
- Pliers
- Soap and water (for cleaning the track)
- WD-40 or similar lubricant
- Work gloves
Some doors may need a drill or screwdriver for removing old screws or brackets.
How To Measure For A New Seal
Measuring correctly ensures a good fit. Follow these steps:
- Open the door so you can access the bottom edge.
- Use a measuring tape to measure the full width of the door.
- Check the track or channel type under the door—note if it’s a T-style, bead, or flat.
- Add an extra 1-2 inches when buying the seal. You can trim off the excess for a perfect fit.
Example: If your door is 96 inches wide, buy a seal at least 98 inches long.
Step-by-step Guide: Replacing The Garage Door Bottom Seal
1. Remove The Old Seal
- Raise the garage door to a comfortable working height.
- If the old seal is screwed in, remove the screws with a screwdriver.
- For track-style seals, use pliers to pull one end out of the track.
- Slide the old seal out completely.
2. Clean The Bottom Track
- Dirt and rust can prevent a good seal.
- Use a brush or rag with soap and water to clean the entire area.
- Dry the track thoroughly.
- Spray a little WD-40 to help the new seal slide in smoothly.
3. Cut The New Seal To Size
- Lay the new seal next to the door.
- Cut it with a utility knife or scissors, leaving a slight extra length.
- Trim neatly for a professional look.
4. Install The New Seal
- For T-style or bead seals: Slide one end into the track and feed it through.
- For screw-on types: Hold the seal in place and secure with screws.
- Make sure the seal sits evenly and covers the entire bottom edge.
5. Check The Fit
- Close the garage door slowly.
- Look for gaps—adjust the seal if needed.
- Trim any extra seal length hanging out the sides.
Pro Tip: If the seal won’t slide easily, use a little dish soap as a lubricant.
Comparing Garage Door Seal Materials
Garage door seals are usually made from one of these materials:
| Material | Durability | Weather Resistance | Cost |
|---|---|---|---|
| Rubber | High | Excellent | $$ |
| Vinyl | Medium | Good | $ |
| Thermoplastic | Very High | Outstanding | $$$ |
- Rubber: Flexible and strong, handles temperature changes well.
- Vinyl: Less expensive but can crack in extreme cold.
- Thermoplastic: Lasts longest, but costs more.
Insight: If you live in a cold climate, avoid vinyl—it tends to become brittle and break.
Common Mistakes To Avoid
Many beginners make small errors that can cause leaks or early wear. Watch out for these:
- Choosing the wrong seal type: Not all seals fit every door. Double-check your door’s bottom track.
- Cutting the seal too short: Always leave a little extra and trim at the end.
- Not cleaning the track: Dirt prevents a tight fit and makes installation harder.
- Ignoring old hardware: Replace rusty screws or bent tracks for the best seal.
- Forgetting to test the door: Always check for gaps by closing the door before finishing.

Credit: www.youtube.com
How Often Should You Replace The Garage Door Seal?
Most seals last between 3 to 7 years, depending on weather and material quality. Check the seal every year, especially after harsh winters or storms. Replace it as soon as you see cracks, flattening, or leaks.
Example: In areas with heavy snow, seals may wear out faster due to salt and moisture.
Cost Of Replacing A Garage Door Bottom Seal
This project is affordable for most homeowners. Here’s a quick breakdown of typical costs:
- Replacement seal: $10–$40 (depending on material and length)
- Basic tools: Most people already own them
- Professional installation: $60–$120 (labor only)
DIY tip: Doing it yourself can save you up to $100 compared to hiring a pro.
When To Call A Professional
Most people can handle this project. However, you may need expert help if:
- The bottom of the door is bent or rusty
- You have a custom or very old garage door
- The track is damaged or missing
- You’re not comfortable with basic tools
A professional can also adjust the door if it’s not closing evenly.
Extra Tips For A Long-lasting Seal
- Check your seal twice a year (spring and fall).
- Clean away dirt and leaves from the garage door edge regularly.
- Apply a rubber conditioner or silicone spray every 6 months to keep the seal soft.
- Avoid using sharp objects to clean under the door to prevent damage.
Non-obvious insight: If your driveway slopes toward the garage, consider adding a threshold seal to block water even more effectively.

Credit: www.familyhandyman.com
Example: Simple Replacement Scenario
Anna noticed water in her garage after heavy rain. She saw daylight under her door and found the seal hard and cracked. She measured her single-car door (96 inches), purchased a rubber T-style seal for $18, and replaced it in 30 minutes using just a screwdriver and scissors.
After installation, she tested for leaks with a garden hose—no water entered. Her garage stayed cleaner, and her energy bill dropped by 5% that month.
Environmental Impact Of A Good Garage Door Seal
A tight seal does more than keep your garage clean. It also:
- Reduces energy loss: Less heat or cool air escapes, lowering utility bills.
- Prevents pest entry: Fewer chemicals needed for pest control.
- Cuts down on waste: Durable seals need replacing less often.
According to the U.S. Department of Energy, sealing leaks in and around your home can save up to 20% on heating and cooling costs. This small project can be a step toward a greener home.
For more details on home sealing and energy savings, see this official guide.

Credit: www.amazon.com
Frequently Asked Questions
How Do I Know What Type Of Garage Door Bottom Seal I Need?
Check the underside of your garage door for a track or channel shape. T-style and bead seals fit into grooves, while flat and screw-on seals attach directly. Remove the old seal and match it to the new one, or take a picture to show at the hardware store.
Can I Replace The Seal Without Removing The Garage Door?
Yes. Most seals can be replaced with the door in place. Just raise the door to waist height and work from one end to the other. Only in rare cases (like badly damaged tracks) would you need to remove the door.
What If My Garage Floor Is Uneven?
Choose a bulb-style or U-shaped seal, as these are best at closing gaps on uneven surfaces. For large gaps, you might also add a garage threshold seal to block water and air.
How Long Does It Take To Replace A Garage Door Bottom Seal?
For most beginners, the job takes 30–60 minutes. Prepare all your tools before starting to save time.
Is It Worth Hiring A Professional For This Job?
If you’re handy with tools, DIY replacement is easy and much cheaper. Hire a pro if your door is damaged, if you’re unsure about the right seal, or if you want a perfect fit without any hassle.
Replacing your garage door bottom seal is a simple project with big benefits. With the right steps and a little care, you can keep your garage dry, clean, and comfortable all year round.