Getting strong and reliable WiFi in a detached garage can be challenging. Many people want internet in their garage for work, streaming, smart security cameras, or even a home gym. But when your garage sits away from your main house, the WiFi signal often can’t reach, or it’s weak and unstable. The good news is that there are several beginner-friendly ways to extend your WiFi to a detached garage—and most do not require advanced tech skills.
This guide will show you clear, practical steps to get internet in your detached garage. You’ll learn about the best methods, what equipment works, common mistakes, and how to pick the right solution for your space and budget.
Why Is Garage Wifi So Hard To Get?
A detached garage is separated from your house, sometimes by 20, 50, or even 100 feet. WiFi signals weaken quickly as they travel through walls, windows, and outdoor air. Common reasons for poor garage WiFi include:
- Distance: WiFi routers are designed for homes, not outdoor spaces.
- Obstacles: Walls, especially brick or concrete, block signals.
- Interference: Other electronics, power lines, or even trees can disrupt WiFi.
- Router location: Most people keep their router deep inside the house, far from the garage.
Main Ways To Get Wifi To A Detached Garage
There’s no single “best” solution. The right choice depends on how far your garage is, your budget, and how strong you want the signal. Here are the most common and effective methods:
1. Wifi Range Extender
A WiFi range extender (also called a repeater) picks up your home’s WiFi signal and “rebroadcasts” it toward the garage.
How it works:
- Plug the extender into an outlet halfway between your router and garage.
- The extender creates a second WiFi network near the garage.
Pros:
- Easy to install
- Inexpensive ($20–$80)
- No extra wiring needed
Cons:
- Signal loss: Extenders usually cut speed by 30–50%
- Limited range: Best for garages close to the house (20–50 feet)
- May create a new WiFi network name
Example: If your router is 40 feet from the garage, place the extender in a window or wall facing the garage.
2. Powerline Adapter
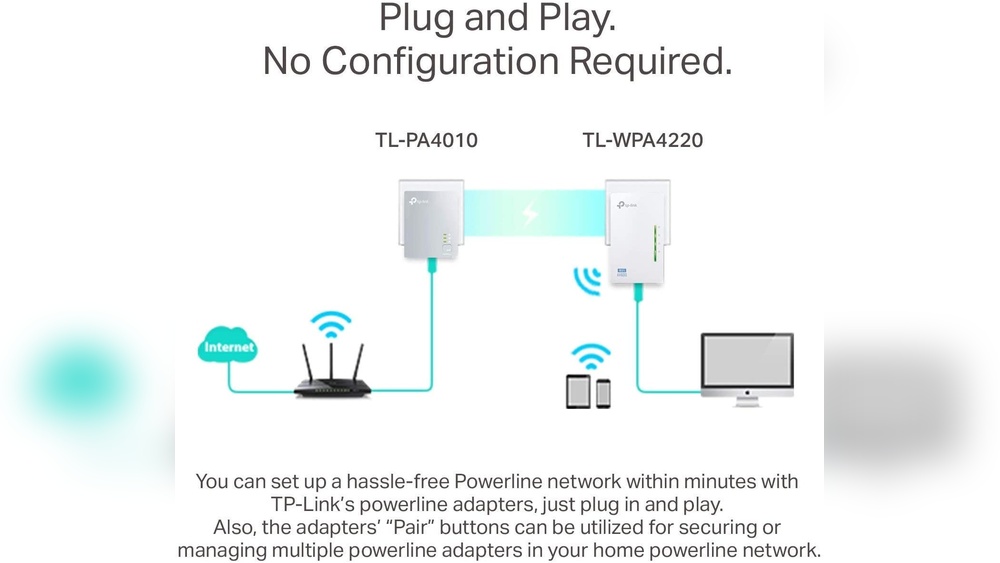
A powerline adapter uses your home’s electrical wiring to carry internet from your router to your garage.
How it works:
- Plug one adapter into an outlet near your router. Connect it with an Ethernet cable.
- Plug a second adapter into an outlet in your garage. Connect to a device or a WiFi access point.
Pros:
- No need to run long cables
- Works through most walls
- Simple setup
Cons:
- Needs both buildings on the same electrical circuit
- Old or complex wiring can reduce speed
- Can be affected by electrical noise
Typical speeds: 100–600 Mbps (depends on wiring age and quality)
Example: If your house and garage share a breaker box, powerline adapters are often the easiest fix.
3. Outdoor Wifi Access Point
An outdoor WiFi access point is a weather-resistant device that extends WiFi to open areas.
How it works:
- Mount the access point on the outside wall of your house, facing the garage.
- Connect it to your router with an Ethernet cable.
- The device broadcasts strong WiFi outdoors, easily reaching detached buildings.
Pros:
- Great range (up to 200 feet or more)
- Fast, stable connection
- Designed for outdoor weather
Cons:
- Requires running an Ethernet cable from your house to outside
- Costs more ($60–$200)
- Needs mounting/installation
Example: Ideal if your garage is 50–150 feet away with clear line-of-sight.
4. Wifi Mesh System
A mesh WiFi system uses multiple units (“nodes”) to create a single, seamless network.
How it works:
- Place one node in your house, another in the garage (or in between).
- The nodes talk to each other, blanketing your property with strong WiFi.
Pros:
- Easy to expand coverage
- Single network name everywhere
- Smart, self-adjusting signals
Cons:
- More expensive ($150–$300+ for a starter kit)
- Works best with clear path between nodes
- Setup can be confusing for beginners
Example: Good choice for large properties or if you want WiFi outside and in multiple buildings.
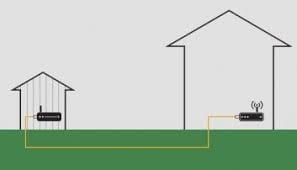
5. Ethernet Cable (wired Connection)
For the most reliable and fastest connection, run an Ethernet cable (Cat6 or Cat5e) from your house to your garage.
How it works:
- Bury or secure an outdoor-rated Ethernet cable between your house and garage.
- Connect one end to your router, the other to a WiFi access point or device in the garage.
Pros:
- Maximum speed (up to 1,000 Mbps or more)
- Stable and secure
- Works for any distance up to 300 feet
Cons:
- Labor to install (digging, conduit, sealing holes)
- Cost of cable, tools, and time
- May need professional help
Example: Essential for workshops or home offices needing fast, uninterrupted internet.
Comparing The Methods: What’s Right For You?
Here’s a quick side-by-side look at the most popular solutions:
| Method | Cost Range | Max Range | Speed Loss | Difficulty |
|---|---|---|---|---|
| WiFi Range Extender | $20–$80 | ~50 ft | High (30–50%) | Easy |
| Powerline Adapter | $40–$120 | ~300 ft (if wiring allows) | Medium (10–30%) | Easy–Medium |
| Outdoor Access Point | $60–$200 | ~200 ft | Low (5–10%) | Medium |
| Mesh WiFi System | $150–$300+ | ~200 ft/node | Low (5–10%) | Medium |
| Ethernet Cable | $30–$120 (DIY) | ~300 ft | None | Hard |
Step-by-step: Setting Up Wifi In Your Garage
Let’s go through the typical installation process for the most common solutions.
Using A Wifi Range Extender
- Choose a location: Find a spot in your house as close as possible to the garage, ideally near a window.
- Plug in the extender: Follow the manufacturer’s instructions. Most models have an app or WPS button for easy setup.
- Test the signal: Use your phone in the garage to check if you get a strong connection.
- Adjust if needed: Move the extender to different outlets until you get the best coverage.
Tip: Don’t place the extender inside the garage if it can’t pick up your main WiFi signal from the house.
Using A Powerline Adapter
- Plug in both units: One near your router, the other in the garage.
- Connect to router: Use the included Ethernet cable.
- Pair the adapters: Most have a “pair” button. Wait until the lights show a connection.
- Connect devices: Plug a computer, smart TV, or WiFi access point into the garage unit.
Insight: Powerline adapters work best when both outlets are on the same electrical phase. Older homes or separate panels can reduce performance.
Outdoor Wifi Access Point
- Plan cable route: Choose the shortest, safest path from your router to an outdoor wall near the garage.
- Mount the device: Attach the access point high on the wall, facing your garage, away from heavy tree cover.
- Run Ethernet cable: Use outdoor-rated Cat6 cable. Protect it with conduit if buried.
- Connect and configure: Follow the access point’s setup guide. Test signal in the garage.
Practical tip: Angle the device slightly downward for best coverage, and avoid direct sun exposure if possible.
Mesh Wifi System
- Place main node: Connect the first unit to your router.
- Install secondary node: Put the second node in the garage, or halfway if the signal is weak.
- Follow app setup: Most mesh systems use a smartphone app for easy configuration.
- Test throughout garage: Move the node if needed for the best speed.
Beginner insight: Mesh systems often need “line of sight” between nodes for top speeds. Thick walls and metal siding may reduce performance.
Running An Ethernet Cable
- Measure distance: Add extra for bends and entrances.
- Buy outdoor-rated cable: Cat6 is best for long runs and future speed.
- Plan and dig: Bury cable at least 6 inches deep, in conduit if possible.
- Drill entry holes: Seal holes with weatherproof caulk.
- Connect and test: Plug into a WiFi access point or device in the garage.
Safety note: Check for underground power lines before digging.

Credit: www.radiolabs.com
Real-world Examples
- Small backyard (30 ft garage): A WiFi range extender or mesh node in a window can often cover the distance.
- Older home, same power meter: Powerline adapters usually work well, with speeds for streaming and smart cameras.
- Garage 100+ ft away: Outdoor access point or buried Ethernet cable is the most reliable option.
- Metal garage walls: Mesh nodes or outdoor access points placed outside the garage usually work better, since metal can block WiFi.
Mistakes To Avoid
Many beginners waste time and money by:
- Buying a regular extender and putting it in the garage (too far from router to work)
- Not checking electrical wiring for powerline adapters (different panels often won’t work)
- Using cheap, indoor Ethernet cable outside (it will fail in rain, sun, or cold)
- Trying to boost the main router’s power instead of moving it closer to the garage
- Ignoring WiFi interference from cordless phones, microwaves, or Bluetooth devices
Pro tip: Always test your solution with a speed test app in the garage before buying extra gear.
Credit: ontrackgaragedoorservice.com
How Weather And Materials Affect Wifi
- Brick, stone, or concrete walls can reduce WiFi strength by 70–90%.
- Metal siding reflects signals—try to aim devices through windows or open doors.
- Trees and rain can lower outdoor WiFi range, especially on 5 GHz networks.
- Cold weather generally doesn’t hurt devices, but moisture can damage them.
Optimizing Your Setup For Best Performance
- Use 5 GHz WiFi for speed, but 2.4 GHz for longer range.
- Raise devices up high (shelves, wall mounts) to reduce obstructions.
- Keep firmware updated for security and speed.
- If using Ethernet, always buy a little more cable than you think you need.

Credit: www.radiolabs.com
Cost And Speed Comparison
Here’s a quick reference for real-world speeds and costs:
| Method | Typical Speed | Cost Estimate | Best Use Case |
|---|---|---|---|
| WiFi Extender | 20–80 Mbps | $20–$80 | Streaming, web, cameras |
| Powerline Adapter | 40–300 Mbps | $40–$120 | Workshops, smart TVs |
| Outdoor Access Point | 50–500 Mbps | $60–$200 | Gaming, heavy streaming |
| Mesh System | 50–400 Mbps | $150–$300+ | Multiple devices/large area |
| Ethernet Cable | Up to 1,000 Mbps | $30–$120 | Offices, workshops |
Long-term Solutions And Security
Once you set up WiFi in your garage:
- Use a strong, unique WiFi password.
- Update all devices regularly.
- Consider a network switch if you need multiple wired connections.
- For smart security cameras, check if you need a dedicated WiFi network for better privacy.
For more details on WiFi technology and standards, see Wikipedia.
Frequently Asked Questions
How Far Can Wifi Reach Outdoors?
With a good router and clear line of sight, WiFi can reach about 100–200 feet outdoors. Walls, trees, and weather can reduce this distance. Outdoor access points and mesh systems can help cover longer distances.
Can I Use The Same Wifi Name In The Garage?
Yes. If you use a mesh system or an access point set to “bridge” mode, your garage can share the same WiFi network name. Basic extenders may create a second network.
Do Smart Garage Door Openers Need Strong Wifi?
Most smart garage devices work with slow internet (as low as 1–2 Mbps), but a stronger signal is better for reliability and security updates.
Is It Safe To Run An Ethernet Cable Outside?
Yes, if you use outdoor-rated cable (Cat6 or better) and protect it in a conduit. Always check for underground utilities before digging.
What If My Garage Is On A Separate Power Meter?
Powerline adapters usually won’t work if the garage has a separate electrical panel or meter. Use a wireless method or run an Ethernet cable instead.
Getting WiFi to your detached garage is possible for almost any situation and budget. With the right equipment and setup, you’ll enjoy fast, reliable internet for streaming, work, or smart devices—no matter how far your garage sits from your home.