Insulating your garage ceiling is one of the best ways to improve comfort, save energy, and protect your belongings. Many homeowners skip this project, thinking it’s difficult or expensive. But with the right guidance, even beginners can insulate a garage ceiling with confidence.
This article will show you how, step by step, using simple explanations, practical data, and examples. If you want to keep your garage warmer in winter and cooler in summer, read on.
Why Insulate Your Garage Ceiling?
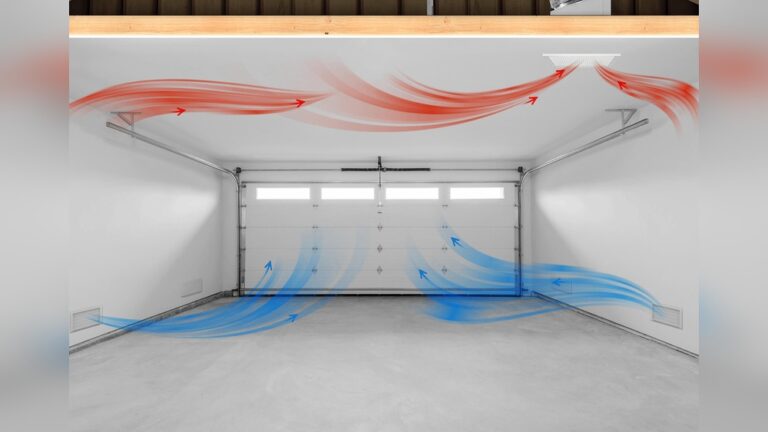
Most garages are built with minimal insulation. This means hot air escapes in winter, and heat builds up in summer. By insulating the ceiling, you:
- Reduce energy bills: Proper insulation cuts heat loss, making your home more efficient.
- Increase comfort: Garages become less drafty and more usable year-round.
- Protect items: Tools, paint, and electronics last longer in a stable temperature.
- Prevent moisture problems: Insulation helps stop condensation, which can lead to mold.
A study by the U.S. Department of Energy shows that insulation can reduce heating costs by 10-20%. If your garage shares a ceiling with your house, insulating it can make your home warmer too.
Choosing The Right Insulation Material
There are several types of insulation for garage ceilings. Each has strengths and weaknesses. Here’s a clear overview:
| Type | R-Value (per inch) | Cost (per sq ft) | Ease of Install | Best For |
|---|---|---|---|---|
| Fiberglass Batt | R-3.1 to R-3.7 | $0.40–$0.60 | Easy | Standard joists |
| Blown-In (Cellulose) | R-3.2 to R-3.8 | $0.70–$1.00 | Moderate | Attic spaces |
| Spray Foam | R-6.0 | $1.50–$3.00 | Hard | Air sealing |
| Rigid Foam Board | R-5.0 | $0.90–$1.45 | Moderate | Flat ceilings |
Most beginners choose fiberglass batts. They’re easy to handle, affordable, and fit between ceiling joists. If your garage ceiling is flat and exposed, you can use rigid foam boards for a clean look. Spray foam offers the best air sealing, but it’s expensive and needs special equipment.
How Much Insulation Do You Need?
Insulation is measured by R-value. The higher the R-value, the better the insulation. For garage ceilings, most experts recommend:
- R-13 to R-19 in mild climates
- R-19 to R-30 in cold regions
To calculate how much insulation you need:
- Measure the length and width of your garage ceiling.
- Multiply these to get square footage.
- Divide by the coverage per package (listed on insulation packaging).
Example: If your garage is 20 feet by 22 feet, you have 440 sq ft to cover. Fiberglass batts usually cover about 40 sq ft per package, so you’ll need 11 packages.
Preparing The Garage Ceiling
Before installing insulation, make sure your garage ceiling is ready.
- Clear the area: Remove items below where you’ll work.
- Check for moisture: Look for water stains or leaks. Fix these before insulating.
- Seal gaps: Use caulk or foam sealant to close holes or cracks.
- Look for electrical wires: Turn off power if you’re working near wires.
If your garage ceiling is open (joists visible), insulation is easy. If it’s finished (drywall installed), you may need to cut access holes or use blown-in insulation.
Step-by-step Guide To Insulating A Garage Ceiling
Let’s break down the process for beginners.
1. Gather Materials And Tools
- Insulation (batts, boards, or blown-in)
- Utility knife or insulation saw
- Stapler or fasteners
- Measuring tape
- Safety gear: Gloves, mask, goggles
- Ladder
2. Measure And Cut Insulation
- Measure the space between joists (usually 16 or 24 inches apart).
- Cut insulation to fit snugly. Too tight can cause compression and reduce effectiveness.
3. Install Insulation
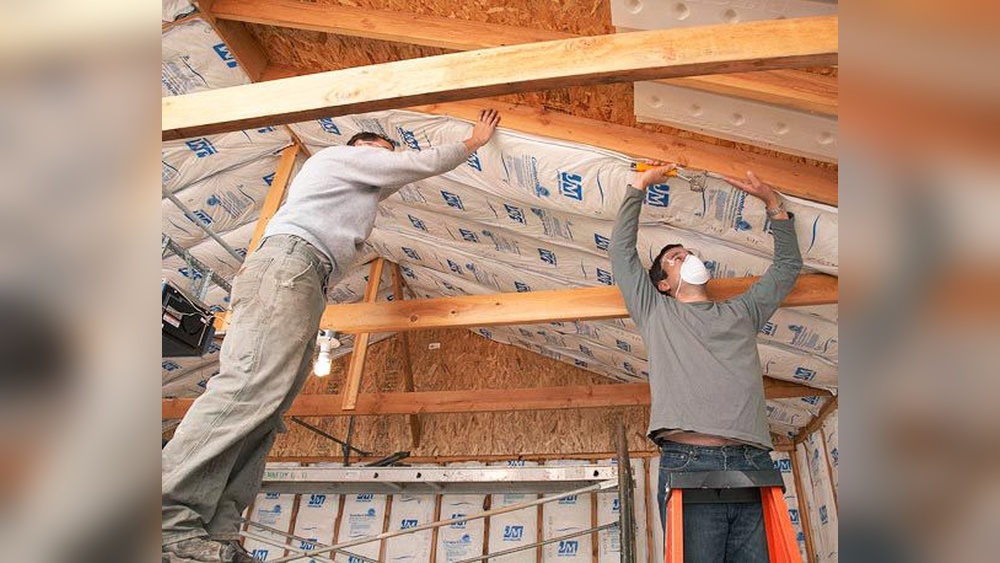
For fiberglass batts:
- Place batts between joists, facing the vapor barrier down (if included).
- Staple flanges to the joists for secure fit.
- Avoid gaps—insulation works best when it fills the space.
For rigid foam boards:
- Cut boards to size.
- Press boards against the ceiling.
- Secure with screws or special fasteners.
For blown-in insulation:
- Rent a blower machine.
- Cut small holes in the ceiling if drywall is installed.
- Blow insulation in until full.
4. Finish The Ceiling (optional)
If you want a clean look or extra fire safety:
- Install drywall or plywood over the insulation.
- Paint or seal as needed.
5. Clean Up
- Remove scraps and packaging.
- Vacuum dust and debris.
- Dispose of insulation waste safely.
Common Mistakes Beginners Make
Many beginners miss important details. Here are some to watch for:
- Leaving gaps: Even small gaps reduce insulation power.
- Compressing insulation: Flattened insulation loses R-value.
- Ignoring vapor barriers: In cold climates, always install a vapor barrier facing the warm side.
- Covering vents: Do not block air vents or attic access.
One insight beginners miss: air leaks are as important as insulation. Seal cracks and gaps first, or insulation won’t perform well.

Credit: www.reddit.com
Comparing Insulation Methods For Garage Ceilings
Let’s compare how different methods work in real life.
| Method | DIY Difficulty | Time Needed | Best For |
|---|---|---|---|
| Fiberglass Batts | Easy | 4-6 hours | Exposed joists |
| Rigid Foam Board | Moderate | 5-8 hours | Flat ceilings |
| Blown-In | Moderate | 3-5 hours | Finished ceilings |
| Spray Foam | Hard | 1-2 days | Air sealing |
If you want a fast, easy DIY project, fiberglass batts are the best choice. Blown-in insulation is good for finished ceilings, but you may need help with the blower machine.
Practical Tips For Insulating A Garage Ceiling
Here are some expert tips to make your project smoother:
- Wear safety gear: Insulation fibers can irritate skin and lungs.
- Work in sections: Don’t try to insulate the entire ceiling at once.
- Check local building codes: Some areas require fire-rated materials.
- Label wires and pipes: If you cover them, label for future access.
- Ventilation matters: Don’t block attic vents—they help prevent moisture buildup.
A non-obvious insight: adding insulation to the ceiling can also help soundproof your garage. If you use your garage as a workshop or gym, insulation reduces noise.
How Much Does Garage Ceiling Insulation Cost?
Costs vary by material, garage size, and labor. Here’s a breakdown:
- DIY with fiberglass batts: $200–$500 for a standard 2-car garage (440 sq ft)
- Rigid foam board DIY: $400–$600
- Blown-in insulation (DIY with rental): $350–$700
- Professional spray foam: $1,500–$2,500
If you hire a contractor, labor costs can double these numbers. But most homeowners can insulate a garage ceiling themselves and save money.
Is Insulating A Garage Ceiling Worth It?
Many people wonder if the project is worth the time and cost. Here’s why it is:
- Energy savings: You save money every month. The U.S. Department of Energy estimates that proper insulation can pay for itself in 2–5 years.
- Comfort: You can use your garage for more purposes—workshop, gym, storage.
- Home value: Insulated garages are attractive to buyers.
- Moisture control: Less risk of mold, mildew, and damage.
If you store valuable items or want a better living space, insulating the garage ceiling is a smart investment.
Example: Insulating A 2-car Garage Ceiling
Let’s look at a real example. John from Ohio insulated his 20×22 ft garage ceiling.
- Chose R-19 fiberglass batts
- Total material cost: $320
- Time spent: 6 hours
- Result: Garage stayed 10°F warmer in winter, and energy bills dropped by $15/month.
This shows how even a simple DIY project can have big results.
Should You Hire A Pro Or Diy?
Most beginners can handle garage ceiling insulation if the ceiling is open and accessible. If you have a finished ceiling or special needs (like spray foam), consider hiring a professional.
Here are signs you should call a pro:
- Large or complex ceiling
- Electrical hazards
- Major moisture problems
- Need for spray foam
For most standard garages, DIY is safe, easy, and cost-effective.

Credit: www.youtube.com
Safety And Environmental Considerations
Always keep safety in mind:
- Wear gloves, mask, and goggles.
- Keep children and pets away during work.
- Dispose of old insulation at a proper facility.
Modern insulation materials are safer and more eco-friendly than older types. Look for products with low VOCs and made from recycled content.
For more on insulation safety and environmental benefits, visit the Department of Energy.
Frequently Asked Questions
How Long Does It Take To Insulate A Garage Ceiling?
Most DIY projects take 4–8 hours for a standard 2-car garage. If your ceiling is finished or you use spray foam, it may take longer.
Can I Insulate A Garage Ceiling Myself?
Yes, if you have basic tools and can safely use a ladder. Fiberglass batts and rigid foam boards are beginner-friendly. Blown-in insulation needs a rented machine.
What Is The Best Insulation For Garage Ceilings?
Fiberglass batts are most popular for exposed joists. Rigid foam boards are good for flat ceilings. Spray foam is best for air sealing but needs a pro.
Do I Need A Vapor Barrier In My Garage Ceiling?
If you live in a cold climate, a vapor barrier helps stop moisture. Place it facing the heated side (the inside of your garage). In mild climates, it may not be needed.
How Much Money Can I Save By Insulating My Garage Ceiling?
Most homeowners save 10–20% on heating bills. For a typical home, that’s $100–$300 per year. The savings depend on your climate, garage use, and insulation quality.
Insulating your garage ceiling is a simple project with big rewards. Whether you want lower energy bills, more comfort, or better storage, this upgrade pays off quickly. By following these steps, using the right materials, and avoiding common mistakes, even beginners can transform their garage.
If you have questions or need extra safety tips, consult local experts or check resources from the Department of Energy.

Credit: www.hemmings.com