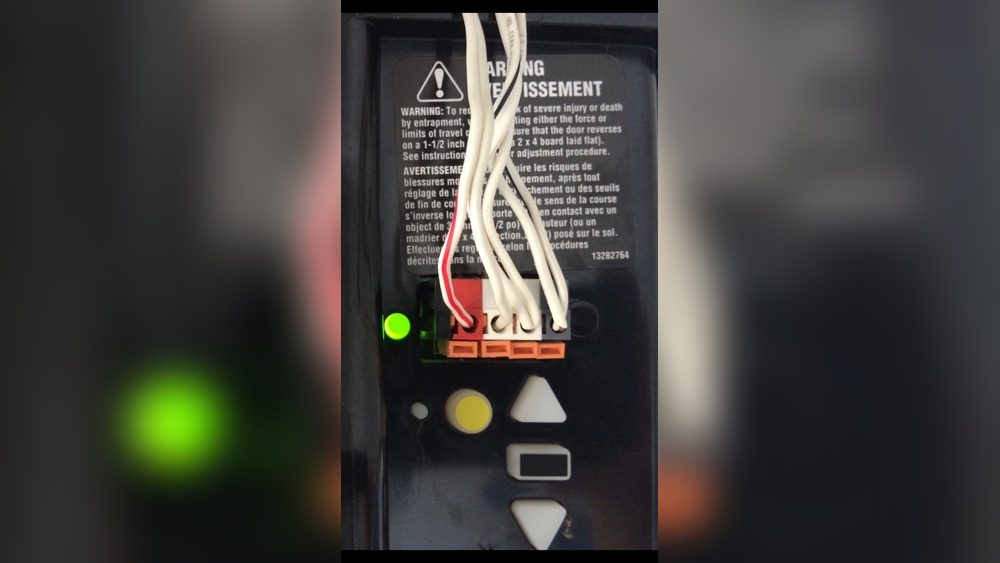
Garage Door Opener Wiring: A Beginner’s Guide
A garage door opener makes life easier, but the wiring behind it can feel confusing—especially if you’re new to home improvement. This guide breaks down the basics of garage door opener wiring, using simple language and step-by-step advice. Whether you’re installing a new unit or troubleshooting an old one, you’ll find practical tips, safety advice, and answers to common questions.
What Is Garage Door Opener Wiring?
Garage door opener wiring includes all the electrical connections that allow your opener to work. These wires connect the power supply, wall switch, safety sensors, and sometimes extra accessories like keypads. Good wiring ensures your garage door opens and closes smoothly, safely, and reliably.
Main Components
- Power cord: Brings electricity from your home to the opener.
- Wall control wires: Connect the wall-mounted button to the opener.
- Safety sensor wires: Link the sensors near the door bottom to the opener.
- Accessory wires: Connect other devices like keypads or smart controllers.
Most openers use low-voltage wiring for controls and sensors, but the main power is always standard house voltage (120V in the US).
Types Of Garage Door Opener Wiring
There are two main types of wiring you’ll see:
1. High-voltage Wiring (power Supply)
- Carries 120 volts AC (standard in the US).
- Powers the opener motor.
- Must be installed according to code.
- Should be done by a licensed electrician if you’re not experienced.
2. Low-voltage Wiring (controls & Sensors)
- Usually 18-24 gauge wire.
- Runs between the opener, wall control, and safety sensors.
- Safe for most homeowners to handle.
Common Wire Types
| Wire Type | Typical Use | Color Code |
|---|---|---|
| 14/2 Romex | Power supply (120V) | Black, White, Bare |
| 18/2 Bell Wire | Wall switch, sensors | Red, White |
| 22/2 Solid | Accessories/keypads | Varies |
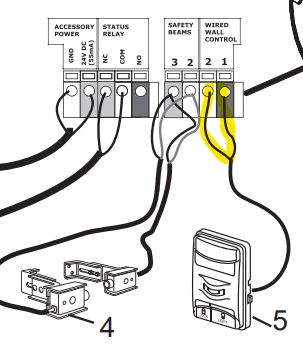
Credit: community.garadget.com
Tools And Materials Needed
Before you begin, gather these items:
- Screwdriver set (flat and Phillips)
- Wire stripper/cutter
- Drill (for running wires through walls)
- Electrical tape
- Voltage tester
- Wire nuts or connectors
- Staples for securing wires
Make sure to have the correct wire type for your opener brand. Most common brands include Chamberlain, LiftMaster, and Genie.
How To Wire A Garage Door Opener: Step-by-step
Step 1: Cut Power To The Circuit
Safety comes first. Turn off the breaker controlling the garage circuit. Use a voltage tester to confirm there’s no power before you start.
Step 2: Run Power To The Opener
If you already have a ceiling outlet, you’re set. If not, you may need to add one. This step usually requires:
- Running 14/2 Romex wire from your breaker box to the garage ceiling.
- Installing a standard outlet near where the opener will hang.
- Mounting the opener so its cord can reach the outlet (usually 3–4 feet from the garage door).
If you’re not comfortable with high-voltage wiring, hire a professional for this part.
Step 3: Attach The Wall Control
Most garage openers use a simple wall button. Here’s how to wire it:
- Find the terminals on the opener marked “Wall Control” or “Push Button.”
- Run 18/2 bell wire from the wall button location to the opener.
- Strip ½ inch of insulation from each wire end.
- Attach wires to the wall button and opener terminals (polarity usually doesn’t matter).
- Secure the wire along the wall/ceiling with staples, but don’t crush the wire.
Step 4: Connect The Safety Sensors
Safety sensors prevent the door from closing if something is in the way. Wiring them is important for safe operation:
- Place the sensors on each side of the garage door, 4–6 inches above the floor.
- Run paired wires from each sensor to the opener.
- Most sensors use color-coded wires (usually black and white).
- Connect black to black, white to white at both sensor and opener ends.
- Secure wires to the wall with staples, keeping them neat and out of the way.
Step 5: Wire Accessories (keypads, Wifi Modules)
If you have extra features:
- Check your opener manual for accessory terminals.
- Use the recommended wire type (often 22/2 solid).
- Connect as instructed—some accessories require specific polarity.
Step 6: Test Your Work
When everything is connected:
- Restore power at the breaker.
- Test the wall button and remote.
- Check that the safety sensors stop the door if something crosses their path.
- If the door doesn’t work, double-check all connections for loose wires or swapped colors.
Common Wiring Diagrams
Every opener brand has its own wiring diagram, but most follow a simple structure:
| Component | Wire Type | Connection Point |
|---|---|---|
| Opener Motor | 14/2 Romex | Ceiling outlet |
| Wall Control | 18/2 Bell Wire | Opener control terminals |
| Safety Sensors | 18/2 Bell Wire | Opener sensor terminals |
| Keypad | 22/2 Solid | Accessory terminal |
Always consult your opener’s manual for the exact diagram and color codes.
Practical Tips For A Clean, Safe Installation
- Label wires as you go. Use tape to mark which wire is which.
- Keep wires tight to the wall or ceiling. Loose wires can catch or get damaged.
- Avoid running wires parallel to high-voltage lines for long distances, to prevent interference.
- Don’t staple wires too tightly—you can crush the insulation and cause shorts.
- For a neater job, use plastic wire channels or conduit.
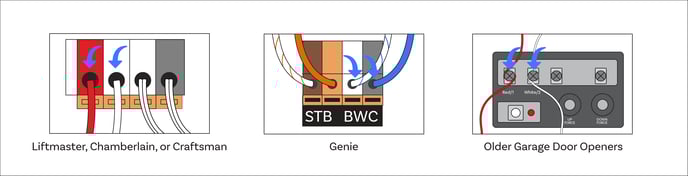
Credit: support.konnected.io
Troubleshooting Common Problems
If your opener isn’t working after wiring, check these areas:
- Wall button doesn’t respond: Check for loose or disconnected wires at the button or opener.
- Sensors won’t light up: Make sure black and white wires match at both ends. Clean the sensor lenses.
- Door reverses before closing: Sensor wires might be swapped or shorted.
- Opener hums but doesn’t move: Power is reaching the unit, but check for a jam or wiring issue at the motor terminals.
Real-world Example
Let’s say you replaced your wall button, but the door still doesn’t move. You test the wires with a voltage tester and find no voltage at the opener terminals. On closer inspection, you see a staple has cut through the insulation, shorting the wires.
Removing the staple and replacing the wire solves the problem.
Safety Precautions
Working with electricity carries risks. Follow these safety tips:
- Always turn off power before starting.
- Use a voltage tester before touching any wires.
- If you’re unsure, hire a professional—especially for high-voltage work.
- Use only UL-listed wires and parts.
- Never bypass safety sensors. It’s dangerous and can void your warranty.

Credit: community.smartthings.com
Upgrading To Smart Garage Door Openers
Many homeowners are adding smart controls to their garage doors. These let you open or close the door from your phone. Wiring a smart controller usually involves connecting two wires to the wall button terminals. Check the manual for your model, and make sure your WiFi signal is strong in the garage.
Comparison: Traditional Vs Smart Wiring
| Feature | Traditional Opener | Smart Opener |
|---|---|---|
| Wiring Complexity | Simple | Moderate |
| Remote Control | Physical remote only | App + remote |
| Extra Devices | Wall button, keypad | WiFi bridge, phone app |
| Installation Time | 1–2 hours | 2–3 hours |
Smart openers may cost more, but they add convenience and security features.
Mistakes Beginners Often Make
- Forgetting to turn off power: This is dangerous. Always cut power at the breaker.
- Swapping sensor wires: Most openers require black to black, white to white. Swapping these stops sensors from working.
- Using too thin wire: For long runs, use 18-gauge or thicker wire to avoid voltage drop.
- Pinching wires with staples: Tight staples can cut insulation, causing shorts.
- Not labeling wires: Multiple wires in the ceiling can get mixed up—label as you go.
When To Call A Professional
While most low-voltage wiring is DIY-friendly, call a licensed electrician if:
- You need to run new high-voltage lines or outlets.
- You’re unsure about local electrical codes.
- Your garage is old and has no ground wire.
- The opener instructions are unclear or don’t match your wiring.
A professional ensures everything is safe and up to code.
Where To Find More Help
Most brands provide detailed manuals and wiring diagrams online. You can also find step-by-step videos on sites like YouTube. If you want the official safety and installation standards, check the resources at UL Solutions.
Frequently Asked Questions
How Much Wire Do I Need To Install A Garage Door Opener?
Most garages need about 25–40 feet of low-voltage wire for the wall button and sensors. Measure your space and add 10% extra for mistakes or rerouting.
Can I Use Any Wire For The Sensors?
No. Use 18/2 bell wire or the wire included with your opener. Thinner wire may cause poor sensor performance, especially over longer distances.
What If My Wall Button Doesn’t Work After Wiring?
Check for loose connections, swapped wires, or a blown fuse in the opener. Test the button with a voltage tester. If it’s still not working, try connecting the wires directly at the opener to rule out a faulty button.
Is It Safe To Install A Garage Door Opener Myself?
For low-voltage wiring, yes—if you follow instructions and safety rules. For high-voltage wiring (outlets, breakers), hire a professional unless you have experience.
Do Smart Garage Door Openers Need Special Wiring?
Most smart controllers connect to the same terminals as the wall button, using the same type of wire. Some may need a power outlet for WiFi bridges.
A well-wired garage door opener is reliable, safe, and easy to use. Take your time, follow each step, and never guess with electricity. With the right approach, even beginners can handle garage door opener wiring like a pro.