How To Program Homelink With Liftmaster
Programming your Homelink system with a LiftMaster garage door opener can feel confusing, especially if you’re new to smart home features. Many people worry about making mistakes or getting stuck. The good news is, Homelink and LiftMaster are designed for easy connection—if you follow the right steps. In this guide, you’ll learn exactly how to program Homelink with LiftMaster, get answers to common problems, and discover tips that most beginners miss.
What Is Homelink And Why Use It?
Homelink is a universal remote system built into many cars. You’ll usually find it on the sun visor or overhead console. It lets you control your garage door, gates, and even smart lights—without extra remote controls.
LiftMaster is one of the most popular garage door opener brands in the US. If your home has a garage, there’s a good chance you have a LiftMaster system.
Why program Homelink?
- No need to carry a separate remote.
- Open your garage with a single button in your car.
- Works for multiple devices, not just garage doors.
Who should do this?
- Anyone with a car that has Homelink built-in.
- Homeowners with a LiftMaster garage door opener (including Chamberlain and Craftsman, which use similar technology).
What You Need Before You Start
Programming Homelink with LiftMaster is simple if you have the right things ready.
- Your car’s Homelink buttons (check the sun visor or roof console).
- Your LiftMaster garage door opener remote (the handheld remote).
- Access to the garage door opener motor unit (usually on the garage ceiling).
- Your car’s ignition key (some cars need the engine running or in accessory mode).
Important:
Check your car manual and the garage door opener manual for model-specific details. Some cars and older LiftMaster models may need extra steps.
Understanding The Programming Process
Here’s a simple overview:
- Clear old Homelink codes (if needed).
- Pair Homelink with your handheld remote.
- Connect Homelink to the LiftMaster opener (using the Learn button).
Most mistakes happen in steps 2 and 3. People often skip clearing old codes, or don’t press the Learn button correctly. Let’s go through each step clearly.
Step 1: Clear Homelink Buttons (if Needed)
If your car is new, or you’ve never used Homelink, you can skip this. If you bought a used car, clear old codes first.
- Press and hold the two outer Homelink buttons.
- Keep holding until the indicator light changes from solid to flashing rapidly (usually 20 seconds).
- Release both buttons.
Now all old codes are erased. This prevents old remotes from interfering.

Credit: www.youtube.com
Step 2: Pair Homelink With Your Remote
This step teaches Homelink the signal from your existing LiftMaster remote.
- Turn your car’s ignition to the ON position (engine running or accessory mode).
- Hold your LiftMaster remote 1-3 inches from the Homelink buttons.
- Choose the Homelink button you want to program.
- Press and hold both the remote button and the Homelink button at the same time.
- Watch for the Homelink indicator light:
- Slow blink: It’s learning.
- Rapid blink or stays on: Success.
- Release both buttons.
Some newer cars show a solid light for success. If the light blinks slowly for more than 30 seconds, try again.
Step 3: Connect Homelink To The Liftmaster Opener
Now, you need to link Homelink to the opener’s control board.
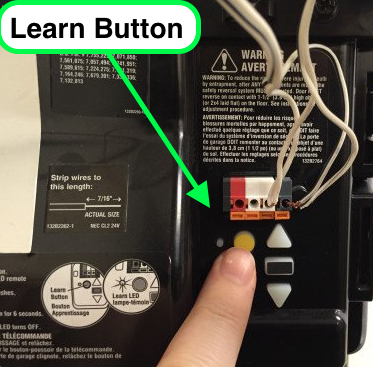
- Go to your garage and locate the Learn button on your LiftMaster opener (usually on the back or side, near the antenna wire).
- Press and release the Learn button. An LED light will turn on (you have 30 seconds to finish).
- Return to your car quickly.
- Press and hold the programmed Homelink button for 2 seconds, then release.
- Repeat this press-hold-release sequence up to 3 times, until the garage door moves.
When the door opens or closes, programming is complete.
Tip: If nothing happens, check that you pressed the Learn button—not the reset or other buttons.
Quick Reference: Homelink And Liftmaster Steps
Here’s a quick comparison of the main steps for different car models:
| Car Model | Ignition Required? | Learn Button Location | Typical Programming Time |
|---|---|---|---|
| Honda Accord | Accessory/On | Back of opener | 5-10 min |
| Toyota Camry | On | Side of opener | 5-10 min |
| Ford F-150 | Accessory/On | Back/Side | 7-12 min |
Troubleshooting: Common Problems And Fixes
Programming usually works the first time, but problems do happen. Here’s how to fix the most common issues.
Problem 1: Homelink Light Keeps Blinking
- Solution: Try clearing the Homelink memory and repeat all steps.
- Make sure the remote control battery is fresh.
- Hold the remote and Homelink button longer.
Problem 2: Door Won’t Move After Programming
- Solution: Check if you pressed the Learn button (not another button).
- You only have 30 seconds to return to your car after pressing Learn.
- Try the press-hold-release sequence up to 3 times.
Problem 3: Homelink Only Works Close To The Garage
- Solution: Some cars have weak transmitters. Try holding the Homelink button longer.
- Check for interference (LED bulbs near the opener can sometimes block signals).
Problem 4: Older Liftmaster Openers
- Solution: Openers made before 1996 may not be compatible with rolling code Homelink. You might need a Homelink repeater kit.
Non-obvious tip: Many people forget to replace the battery in their handheld remote before programming. A weak remote battery can prevent Homelink from learning the signal.

Credit: www.youtube.com
Homelink Compatibility: Rolling Code Vs. Fixed Code
Most LiftMaster openers after 1996 use rolling code technology. This means the code changes every time you use the remote, making it more secure.
How to check?
- Look at the color of the Learn button:
- Yellow, purple, or red: Rolling code (Security+).
- Green: Fixed code (older).
- If your opener is pre-1996, you’ll need a compatibility bridge or repeater.
Here’s a quick comparison for clarity:
| Learn Button Color | Opener Type | Homelink Compatibility |
|---|---|---|
| Yellow | Security+ 2.0 (rolling code) | Yes |
| Purple | Security+ (rolling code) | Yes |
| Red/Orange | Security+ (rolling code) | Yes |
| Green | Fixed code | No (needs bridge) |
Insider advice: If your Homelink won’t program, and you have a green Learn button, check the Homelink website or contact LiftMaster for a repeater kit.
Safety And Security Tips
Programming Homelink is not just about convenience—it’s also about safety.
- Never program Homelink while the car is moving.
- Clear codes if you sell your car.
- Don’t let children play with the Homelink buttons.
- Keep your garage door area clear during programming.
Practical insight: Some cars let you program Homelink with the ignition off, but for security, always set up with the car safely parked.
Credit: veterangaragedoor.com
When To Call For Help
If you follow all steps and Homelink still doesn’t work, here’s when to ask for support:
- Your car is older than 2005 or the opener is pre-1996.
- The Homelink light never changes, even with a fresh remote battery.
- You get error messages on your car’s dashboard.
Contact your car dealer, Homelink support, or LiftMaster customer service. They can check for compatibility issues or recommend bridge devices.
Programming Multiple Doors Or Devices
You can program up to three Homelink buttons for different devices:
- Garage doors (main, side, workshop).
- Front gate.
- Smart home lights.
Repeat the pairing and Learn button steps for each device. Label your Homelink buttons with small stickers or keep a note in your car manual.
Expert tip: If you share a garage with someone else, each car can have its own Homelink button programmed separately.
Real-world Example: Programming A 2021 Toyota Camry With Liftmaster
Let’s walk through an example for a popular car and opener:
- Start your Camry and find the three Homelink buttons near the rearview mirror.
- Hold your LiftMaster remote near the Homelink panel.
- Press and hold the remote button and Homelink button 1. The light flashes rapidly after a few seconds.
- In the garage, press the yellow Learn button on your LiftMaster opener.
- Within 30 seconds, press and hold Homelink button 1 for two seconds, then release. Repeat until the door opens.
Most users report success in under 10 minutes. If it fails, clear the Homelink memory and try again.
Key Data: Homelink And Liftmaster Usage
Some numbers show why Homelink and LiftMaster are so widely used:
- Over 70% of US cars from 2007 onward have Homelink pre-installed.
- LiftMaster accounts for over 40% of new garage door openers in the US.
- Average programming time: 7-10 minutes for most users.
- Less than 10% of users need a repeater kit, mainly with older openers.
Advanced Tips Most Beginners Miss
- Reprogram after power outages: If your garage loses power, Homelink usually keeps its memory, but some systems may need a quick reset.
- Check for firmware updates: Some newer cars allow Homelink software updates through your dealer.
- Test from outside: Always check that your programmed button works from outside the garage before you rely on it daily.
Where To Find More Information
For more details, visit the official Homelink website. They offer step-by-step videos and a compatibility checker for your car and opener.
Frequently Asked Questions
How Do I Know If My Car Has Homelink?
Look for three small buttons with a house icon on your sun visor, roof console, or rearview mirror. Most cars since 2007 have Homelink built-in. Check your car’s manual for the Homelink logo.
What If My Liftmaster Opener Is Too Old?
LiftMaster openers made before 1996 may not work directly with Homelink. You can buy a Homelink bridge or repeater kit, available from Homelink or LiftMaster dealers. Check the Learn button color for compatibility.
Can I Program Homelink Without The Original Remote?
You need the original handheld remote for the pairing step. If it’s lost, order a replacement remote first. Some newer Homelink systems can clone codes from other Homelink devices, but this is rare.
Why Does My Homelink Only Work When I’m In The Driveway?
Short range often means interference, a weak car transmitter, or the garage opener’s antenna is not hanging down. Try replacing the remote battery and check for LED lights near the opener.
Is It Safe To Program Homelink Myself?
Yes, it’s designed for user setup. Always park your car in the driveway, not in gear, and keep people away from the garage door during programming. If you’re unsure, ask a professional for help.
Programming Homelink with LiftMaster is one of the fastest ways to make your daily routine smoother. With careful steps and a little patience, you’ll enjoy hands-free garage access for years to come.