Sealing the sides of a garage door from inside is a practical way to improve comfort, security, and energy efficiency in your home. Many people overlook this simple project, but it can make a big difference in stopping drafts, blocking pests, and keeping your garage warmer in winter and cooler in summer.
Beginners often feel unsure about where to start, what materials to use, or how to avoid mistakes. This guide will help you understand the process step by step, with clear advice, real examples, and useful data. You’ll learn how to seal garage door sides from inside in a way that’s easy, affordable, and effective.
Why Seal Garage Door Sides From Inside?
Garage doors are designed to move up and down easily, but this means there are small gaps along the sides. These gaps can let in cold air, rainwater, dust, and even insects or rodents. By sealing these gaps, you:
- Save on heating and cooling bills (up to 15% lower energy loss, according to the US Department of Energy)
- Protect your garage contents from moisture damage
- Prevent pests from entering
- Reduce outside noise
Beginners often miss that sealing from inside is usually easier, safer, and less exposed to weather than sealing from outside. Inside sealing also lasts longer, since it’s not affected by rain or sun.
Materials And Tools You Need
Before you start, gather the right materials. This saves time and prevents common mistakes, like using the wrong seal or adhesive.
- Garage door side seals: Flexible vinyl or rubber strips
- Adhesive or mounting tape: For attaching seals
- Measuring tape: To check the length of the sides
- Scissors or utility knife: For cutting seals to size
- Cleaning supplies: Rags and mild detergent
- Screwdriver or drill: Only if you choose screw-on seals
Most beginners find vinyl seals easiest to install. They are flexible, affordable, and stick well to most surfaces.
| Material | Ease of Use | Durability | Typical Cost |
|---|---|---|---|
| Vinyl Strip | Very Easy | 5-7 years | $10-$20 |
| Rubber Strip | Easy | 7-10 years | $15-$25 |
| Foam Tape | Moderate | 3-5 years | $8-$15 |
| Brush Seal | Moderate | 10+ years | $25-$40 |
Credit: www.snirtstopper.com
Step-by-step Guide To Sealing Garage Door Sides From Inside
You don’t need advanced skills for this project. Follow these simple steps:
1. Clean The Door Sides
Dust and grease can stop seals from sticking. Use a damp rag and mild soap to clean the sides where you’ll attach the seal. Dry thoroughly.
2. Measure The Sides
Use a measuring tape to check the height of each side. Beginner mistake: not measuring both sides, which might be slightly different.
- Write down the measurements.
- Allow a little extra length (about 1 inch) for each seal.
3. Cut The Seal Strips
Cut the vinyl or rubber strips to match the measurements. Scissors or a utility knife work well. If you use foam tape or brush seal, follow the same process.
4. Attach The Seals
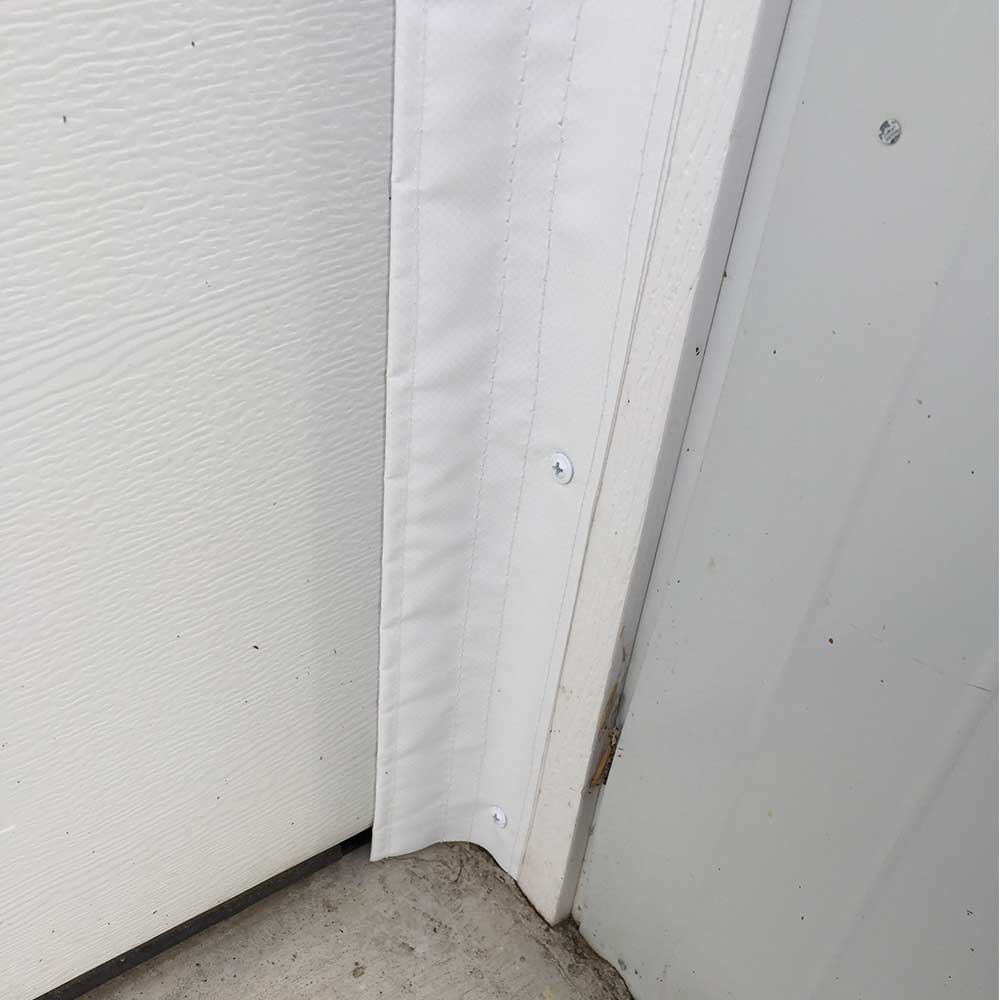
Most seals use adhesive backing or mounting tape. Peel off the protective layer and press the seal firmly onto the side edge, just inside the door frame.
- Start at the top and work down.
- Press firmly for at least 30 seconds per section.
- If using screw-on seals, drill pilot holes first, then attach with screws.
5. Test The Seal
Open and close the garage door several times. Make sure the seal does not block movement or get caught.
- Check for gaps. If you see any, add a small piece of foam tape.
- If the seal comes loose, clean the area again and reapply.
Types Of Garage Door Side Seals
There are several types of seals you can use. Each has advantages and disadvantages.
Vinyl Strips
- Flexible and easy to install
- Good for beginners
- Works well in most climates
Rubber Strips
- Thicker and more durable
- Slightly harder to cut
- Better for extreme weather
Foam Tape
- Simple to apply
- Not as durable
- Good for small gaps
Brush Seal
- Looks professional
- Blocks dust and pests well
- Needs screws for installation
| Seal Type | Best Use | Installation Difficulty | Weather Resistance |
|---|---|---|---|
| Vinyl Strip | Standard home garages | Beginner | Good |
| Rubber Strip | High moisture areas | Beginner/Intermediate | Excellent |
| Foam Tape | Temporary fix | Beginner | Fair |
| Brush Seal | Dusty environments | Intermediate | Good |
Common Mistakes And How To Avoid Them
Sealing garage door sides is simple, but beginners often make mistakes. Here are the most frequent ones and how to prevent them:
- Wrong measurement: Always measure both sides separately.
- Poor surface cleaning: Dirt can ruin adhesive. Clean thoroughly.
- Using the wrong seal: Choose vinyl for easy jobs, rubber for tough conditions.
- Overlapping the seal: Don’t let the seal block the door’s movement.
- Ignoring small gaps: Fill tiny spaces with foam tape.
Most people forget to check the seal after a few days. Revisit your installation and adjust if needed.
Data: Energy Savings And Comfort
Sealing garage door sides can have a measurable impact. Studies show that insulated garages maintain a temperature 10–12°F warmer in winter. Air leaks can account for up to 20% of garage heat loss. By sealing the sides, you can reduce drafts and moisture entry by about 80%.
Example: A typical 2-car garage (20×20 feet) can lose up to 500 kWh of heat energy per year through unsealed gaps. With proper sealing, this drops to less than 100 kWh.
| Garage Size | Heat Loss Before Sealing | Heat Loss After Sealing | Estimated Energy Savings |
|---|---|---|---|
| Single (12×20 ft) | 300 kWh/year | 60 kWh/year | 80% |
| Double (20×20 ft) | 500 kWh/year | 100 kWh/year | 80% |
| Large (24×24 ft) | 720 kWh/year | 144 kWh/year | 80% |

Credit: www.youtube.com
Practical Tips For Beginners
- Choose self-adhesive vinyl if you want a quick, easy job.
- Check local weather patterns; rubber seals are best for rainy climates.
- Try installing on a warm, dry day for better adhesive performance.
- If you notice gaps after installation, use foam tape to fill them.
- Don’t rush. Take time to press seals firmly and let adhesives cure.
- Keep leftover seal strips for future repairs.
Beginners often miss that well-sealed garage doors also improve security. Seals make it harder for small tools or hands to slip through gaps.
When To Replace Garage Door Side Seals
Over time, seals wear out, especially in extreme weather. Look for these signs:
- Cracks or tears in the material
- Seals coming loose from the door frame
- New drafts or moisture inside the garage
Most seals last 5–10 years. Inspect them yearly and replace if needed.

Credit: www.reddit.com
Example: Sealing A Garage Door Step By Step
Let’s look at a real example. Sarah, a homeowner in Minnesota, sealed her garage door sides last winter.
- She bought two vinyl strips ($18 total) from her local hardware store.
- Cleaned the door sides with soapy water and dried them.
- Measured both sides (each 6.5 feet).
- Cut strips to match, leaving an extra inch at the bottom.
- Applied adhesive, pressed firmly, and held for 45 seconds.
- Tested door movement, found a small gap, filled it with foam tape.
Her garage was 8°F warmer the next week. She noticed fewer bugs and less dust. The whole project took just 40 minutes.
Maintenance After Sealing
Proper maintenance keeps your seals working longer.
- Check for loose sections every 6 months.
- Clean seals gently with a damp cloth.
- Replace if you see cracks, gaps, or mold.
- Keep an eye on adhesive strength, especially after heavy rain or snow.
Safety Tips
- Always unplug any garage door opener while working.
- Wear gloves to protect your hands from sharp edges.
- Use a stable ladder for tall doors.
- Avoid installing seals in freezing temperatures.
Beginners often skip safety steps. Taking time to prepare makes the job easier and reduces risk.
Advanced Options For Better Sealing
If you want a more professional result, consider these upgrades:
- Double seals: Install two layers for extra insulation.
- Weatherproof paint: Coat the door frame before sealing.
- Garage door insulation kits: Combine side sealing with insulation panels.
These steps cost more, but they maximize comfort and energy savings.
Frequently Asked Questions
How Often Should I Replace Garage Door Side Seals?
Most seals last 5–10 years. Replace if you notice cracks, gaps, or loss of adhesion.
Can I Seal Garage Door Sides From Inside In Any Weather?
It’s best to work in warm, dry weather for better adhesive performance. Avoid freezing temperatures.
What If My Garage Door Still Has Drafts After Sealing?
Check for small gaps and fill them with foam tape. Make sure the seal is pressed firmly and covers the entire edge.
Is Sealing Garage Door Sides From Inside Better Than Outside?
Sealing from inside is usually easier and longer-lasting, since it’s protected from rain and sun.
Where Can I Learn More About Garage Door Sealing?
For detailed information and research, visit Energy.gov.
Sealing garage door sides from inside is a simple project that gives real benefits—lower energy bills, improved comfort, and fewer pests. With the right materials and careful installation, even beginners can do it in less than an hour. Remember to check your work, fill any gaps, and maintain the seals yearly.
Your garage will feel warmer, cleaner, and safer.