The best way to remove a rusted, rounded, or stripped bolt is to start with penetrating oil and the correct-size socket. If the bolt will not turn, try gentle tapping, locking pliers, a bolt extractor socket, or controlled heat when safe. Drill the bolt only as a last resort.
Across the United States, rusty bolts are a common headache during car repairs, home improvement, lawn equipment maintenance, and work in a damp garage. Road salt in northern states can speed up corrosion on cars and trucks. Moisture can also seize bolts on outdoor gates, decks, mowers, and metal storage racks. A bolt that once turned with a small wrench may now refuse to move or lose its shape under pressure.
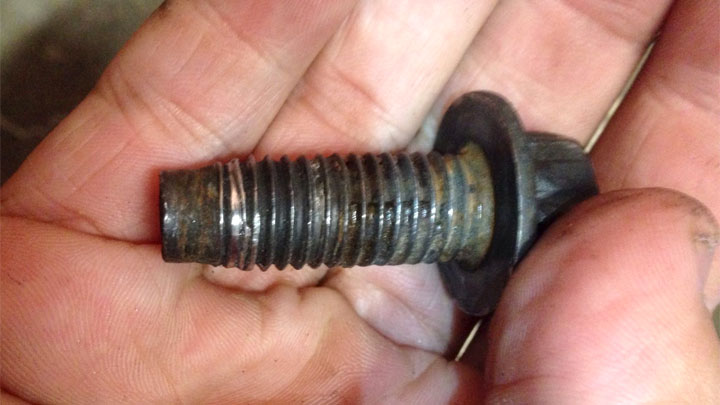
The right removal method depends on the bolt’s condition, its location, and the material around it. A rusted bolt may still have a good head, while a rounded bolt has damaged edges that no longer grip a normal wrench. A stripped bolt may have damaged internal or external threads, or a damaged drive recess. These problems can overlap, so inspect the fastener before choosing a tool.
Start with the least destructive method. Clean away loose rust, apply a suitable penetrating oil, allow time for it to work, and use a well-fitting tool. Increase force slowly rather than leaning hard on a wrench. This approach can help protect the surrounding part and reduce the chance of snapping the bolt or damaging its threads.
No single method works for every fastener. A small bolt in an aluminum engine part needs a different approach from a large, exposed bolt on a steel trailer. If the fastener is part of a brake, steering, suspension, pressure system, or other safety-critical assembly, stop before a removal attempt could damage the part.
Source: cartreatments.com
1. Identify the Bolt Problem Before You Start
First, determine what is stopping the bolt from turning. Corrosion can lock the threads together, a rounded head can prevent a socket from gripping, and damaged threads can make a fastener bind. Choosing the wrong method may make the damage worse.
Clean the exposed head with a wire brush and inspect it under good light. Look for rust flakes, worn corners, a damaged hex opening, or a bolt head that has already snapped off. Check whether the fastener is attached to steel, aluminum, plastic, or another material.
If the bolt is in a critical assembly, check the service manual before removal. The manual may specify a replacement fastener, a special removal procedure, or a torque requirement for reassembly.
Source: garagetooled.com
Rusted or seized bolt
The head may still be intact, but corrosion has increased resistance between the bolt and the threaded part.
Rounded bolt head
The outer corners of a hex head are worn, so a regular wrench or socket slips instead of turning the fastener.
Stripped drive recess
The slot, Phillips cross, Torx recess, or hex socket inside the head is damaged and cannot transfer enough turning force.
Broken bolt
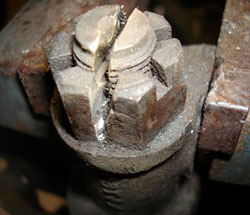
The head has separated from the shank. Removal may require an extractor, drilling, or professional machining.
Why Rust Makes a Bolt Hard to Remove
Rust forms when iron or steel reacts with oxygen and moisture. Corrosion products can occupy more space than the original metal and make the joint tighter. Dirt, road salt, old thread-locking compound, and years of vibration can add to the problem.
Penetrating oil can help reach narrow gaps around the threads and reduce friction. It cannot restore metal that has already disappeared or guarantee that a badly corroded bolt will come out intact.
Look for structural damage
If the bolt head, shank, bracket, or surrounding metal is deeply pitted or cracked, consider replacing the damaged part instead of forcing it apart.
2. Gather the Right Tools and Safety Gear
The right tools improve grip and give you better control. Before starting, gather the items that match the bolt’s condition rather than using the most aggressive tool first.
Wear safety glasses or goggles, especially when brushing rust, striking a tool, cutting metal, or drilling. Gloves can help protect your hands during cleaning and handling, but keep loose gloves, clothing, and hair away from rotating machinery. Secure the workpiece so it cannot shift while you apply force.
If you use penetrating oil, follow the product label and provide ventilation. Many penetrating oils are flammable. Keep them away from sparks, open flames, hot surfaces, and ignition sources.
Source: cartreatments.com
Basic hand tools
Use a wire brush, a correctly sized six-point socket, a sturdy ratchet or breaker bar, and suitable combination wrenches.
Grip and extraction tools
Locking pliers, a dedicated bolt extractor socket, and an extractor kit can help when the head is damaged.
Penetrating oil
Choose a product intended for seized fasteners and allow the label’s recommended working time.
Advanced tools
A manual impact driver, drill, left-hand drill bit, center punch, or suitable heat tool may help in specific cases.
Choose a Six-Point Socket When Possible
A six-point socket contacts the flats of a compatible hex bolt more directly than a typical twelve-point socket. This can reduce the chance of slipping on a fastener whose corners are already worn. The socket must still fit tightly and match the bolt size.
Do not force a socket onto a head that is too large for it. If a standard socket slips, stop and reassess before the corners become more rounded.
Check the fit
Seat the socket fully on the head and make sure it does not rock or slip before applying force.
3. Apply Penetrating Oil and Let It Work
Penetrating oil is often the best first treatment for a rusted bolt that still has a usable head. It can seep into small gaps around the threads and help loosen corrosion. This method is less aggressive than cutting, drilling, or heating the fastener.
Brush away loose rust and dirt first. Apply the product around the point where the bolt enters the threaded part, following its label. Give it time to penetrate; heavily corroded joints may need repeated applications over a longer period.
After the oil has had time to work, fit a snug socket and try a controlled turning motion. If the fastener does not move, avoid immediately adding a long extension or striking the wrench with a hammer. Reapply the oil and consider gentle tapping on the fastener or nearby robust metal surface if the part can safely withstand it.
Some bolts are held by thread-locking compound rather than rust alone. Penetrating oil may not solve that problem, and the correct removal method depends on the compound and the component’s temperature limits.
Source: vautobasics.com
How to Use Penetrating Oil Correctly
Use a small amount at the joint instead of soaking the whole assembly. Allow it to reach the threaded area, then wipe away excess oil before using tools. If the joint is exposed to a flame or heat source later, remove flammable residue and follow the product safety instructions before proceeding.
Signs of progress
The bolt begins to move slightly, rust flakes loosen, or the fastener turns with less force than before.
If nothing changes
Repeat the treatment as directed, verify the socket size, and move to another suitable method rather than applying uncontrolled force.
4. Use the Correct Socket or Wrench
If the bolt head is still in reasonable shape, use a snug six-point socket or a well-fitting wrench. A good fit helps transfer turning force without rounding the head further. Clean dirt from the head and make sure the tool is fully seated.
Turn slowly and steadily. For a stubborn fastener, a small controlled movement in the tightening direction may help break the corrosion bond before you loosen it, but do not do this if the bolt or surrounding part is fragile. Stop if the head begins to deform or the bolt twists without turning.
A breaker bar can provide more leverage than a short ratchet, but leverage also increases the risk of snapping the bolt. Use it only when the fastener, tool, and surrounding assembly can safely handle the force. Never extend a wrench with an improvised pipe unless the tool manufacturer permits it.
Source: cartreatments.com
What If the Socket Keeps Slipping?
Stop as soon as the socket slips. Repeated attempts can round the head until a normal socket no longer works. Clean the head, confirm the size, and switch to a dedicated extractor socket if the corners are damaged.
Avoid twelve-point sockets on damaged heads
A six-point socket is generally a better starting point for a worn external hex head.
5. Grip a Rounded Bolt With Locking Pliers
Locking pliers can remove a rounded bolt when enough of the head or exposed shank remains available to grip. Their jaws lock onto the metal and can provide a stronger hold than ordinary adjustable pliers. This method is especially useful for accessible bolts outside a recessed hole.
Clean the exposed metal and adjust the pliers so their jaws clamp firmly. Position the jaws as close to the base of the bolt head as practical without trapping nearby parts. Lock them securely, then apply slow, controlled turning force.
If the pliers slide, stop and readjust them rather than squeezing harder while turning. Avoid crushing thin brackets, soft metal, or parts that could bend. Locking pliers may damage the head further, so use them when preserving the original head is no longer realistic.
Source: cartreatments.com
When Locking Pliers Are Not the Right Choice
Pliers are usually ineffective when the bolt head sits inside a deep recess or when too little metal is exposed. In those cases, a bolt extractor socket designed to bite into the head may offer better access.
Protect the surrounding part
Keep the jaws away from hoses, wiring, painted surfaces, and delicate castings that could be crushed or scratched.
6. Remove the Bolt With an Extractor Socket
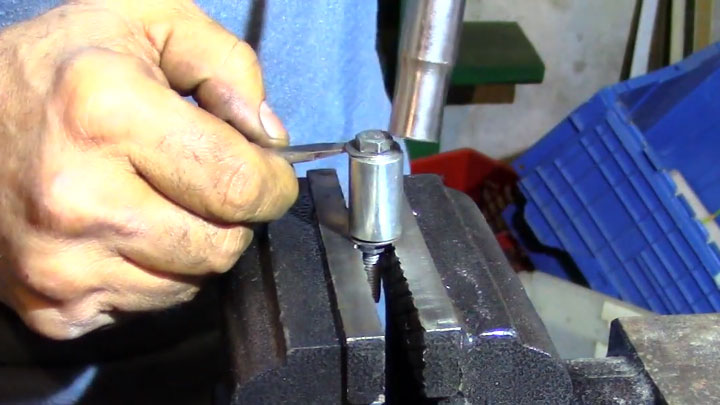
A dedicated bolt extractor socket is often the next step when a rounded external bolt head will not grip a normal socket. Many extractor sockets have a spiral or specially shaped internal surface that bites into the damaged head as turning force is applied. Use a size and design intended for the fastener.
Clean the head and seat the extractor fully. Follow the manufacturer’s instructions for fitting and turning it. Apply force gradually with a suitable hand tool, keeping the socket aligned with the bolt. Do not use an impact wrench unless the extractor is specifically rated for impact use.
Extractor sockets work best when enough of the bolt head remains to engage the tool. They may fail on severely corroded, very small, recessed, or broken fasteners. Some extractor designs also require enough clearance to remove the socket after the bolt comes free.
Source: cartreatments.com
Choose Between an Extractor Socket and a Screw Extractor
An extractor socket is generally intended for damaged external heads. A screw extractor is designed to engage a drilled hole in a fastener that lacks a usable head or drive feature. The tools serve different purposes, so select one based on the shape and access available.
External head is rounded
Start with an extractor socket when the head is accessible and there is enough material for it to bite.
Head is broken off
Consider a carefully centered drilled hole and a suitable extractor, provided the part can be protected from drilling damage.
7. Try a Manual Impact Driver for a Stripped Recess
A manual impact driver can help when a bolt or screw has a damaged internal drive recess. Unlike a standard screwdriver, a manual impact driver converts a controlled hammer strike into turning force. It can help free certain stubborn fasteners while keeping the bit pressed into the recess.
Choose the correct bit, seat it fully, and keep the driver aligned with the fastener. Secure the workpiece, wear eye protection, and use controlled strikes according to the tool’s instructions. Stop if the bit slips, the head begins to crack, or the surrounding part is too fragile to withstand impact.
This method is not suitable for every bolt. It is mainly useful when the fastener has a drive recess that matches the tool’s bit. It will not solve a completely rounded external hex head, and excessive impact can damage brittle parts or sensitive assemblies.
Source: cartreatments.com
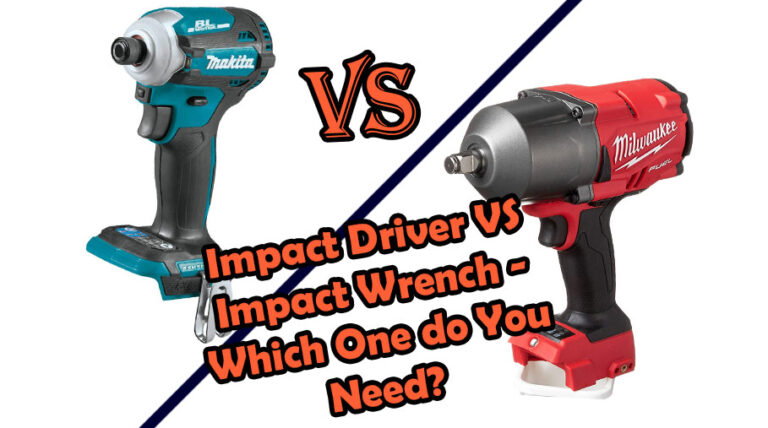
Do Not Confuse a Manual Impact Driver With an Impact Wrench
A manual impact driver is commonly used with bits for stubborn screws and suitable fasteners. A powered impact wrench uses a motor and hammer mechanism to turn compatible sockets. Neither tool should be used indiscriminately on small, fragile, or safety-critical fasteners.
Use the right attachment
Follow the tool maker’s instructions and use impact-rated accessories where required.
8. Apply Heat Only When the Surroundings Allow It
Controlled heat can help loosen some seized fasteners by expanding metal and weakening certain thread-locking compounds. However, heat is one of the riskiest methods because it can ignite flammable materials, damage nearby components, and alter the properties of metal.
Before using a torch or other heat source, identify everything around the fastener. Fuel lines, fuel vapors, oil, penetrating-oil residue, plastic parts, rubber seals, wiring, paint, batteries, and pressurized components can make heating unsafe. Do not heat a component if you cannot confidently control these hazards.
Never use an open flame near fuel systems, flammable vapors, or unknown residues. Some parts, including heat-treated fasteners and components made from aluminum or other alloys, can be damaged by excessive heat. If heat is appropriate, follow the equipment manufacturer’s procedure and use suitable fire protection and ventilation.
Source: cartreatments.com
Why Heating and Cooling Must Be Controlled
Different materials expand at different rates, and temperature changes may help break a corrosion bond in some joints. But uneven heating can warp a part or create cracks, and cooling a hot component suddenly can cause thermal stress. Avoid improvised heating and cooling cycles when the material or assembly is unknown.
Stop when the risk is unclear
If the bolt is near fuel, brakes, wiring, a battery, a sealed unit, or a heat-sensitive component, choose a non-heating method or seek professional help.
9. Drill Out a Broken or Severely Damaged Bolt
Drilling is a last resort for a bolt whose head is gone or whose other removal methods have failed. The main goal is to remove the fastener without damaging the threads in the surrounding hole. This takes patience, accurate alignment, and the correct drill bits.
Secure the part and mark the center of the remaining bolt with a center punch. Use a drill bit suited to the fastener material and begin with a small pilot hole. Keep the drill aligned with the bolt’s centerline and use a controlled speed appropriate for the bit and material.
A left-hand drill bit may help in some cases because it cuts while turning in the loosening direction. Sometimes the bolt backs out during drilling. If it does not, enlarge the hole carefully only as needed for the chosen extraction method.
Avoid drilling freehand into a valuable component when you cannot maintain alignment. If the drill wanders into the surrounding threads, the repair may become more difficult and expensive. A broken extractor can be especially difficult to remove because extractor materials are often very hard.
Source: garagetooled.com
How to Reduce the Risk of Damaging Threads
Identify the bolt diameter and thread size if possible, then use a reliable drilling guide or other alignment aid. Protect the part from metal chips, and remove debris before reassembly. If the bolt is recessed, close to a fluid passage, or inside a costly aluminum housing, professional machining may be the safer option.
Do not guess the drill size
Use the extractor manufacturer’s instructions or a suitable fastener reference to select the correct pilot-hole diameter.
Stop if the bit wanders
A hole that drifts off center can cut into the surrounding threads or damage the component.
10. Compare the Best Bolt Removal Methods
The best method depends on how damaged the bolt is and how much room you have to work. Use this table as a starting point, not a guarantee that a method will succeed. Always account for the surrounding material and the consequences of damaging the hole.
Source: cartreatments.com
Penetrating oil
Best first step for accessible rusted threads when the head is still usable. It is low in mechanical risk but may not work on severe corrosion or thread-locking compound.
Six-point socket
Best when the external head still has enough shape for a snug fit. It is simple and helps avoid further rounding.
Locking pliers
Best for exposed rounded heads or shanks that the jaws can grip. It may damage the fastener and needs enough clearance.
Extractor socket
Best for many rounded external bolt heads. It needs a compatible size and enough remaining head material.
Manual impact driver
Best for suitable fasteners with damaged internal drive recesses. It requires the correct bit and a part that can tolerate impact.
Controlled heat
May help on certain seized metal joints or thread-locked fasteners. It carries substantial fire and component-damage risks.
Drilling
Best reserved for broken or severely damaged fasteners after other methods fail. It risks damaging the original threads.
A Practical Decision Guide
If the head is intact, begin with cleaning, penetrating oil, and a well-fitting six-point socket. If the head is rounded, use locking pliers when accessible or an extractor socket when the bolt is recessed. If the internal drive is stripped, consider a matching bit or manual impact driver. If the head has broken off, assess whether a centered drilling operation is appropriate.
The least destructive method is not always the one that needs the least time. A few extra minutes spent checking access, material, and tool fit can prevent damage that takes much longer to repair.
Prioritize the surrounding part
When the fastener is in an expensive casting, a critical vehicle system, or a part that is difficult to replace, favor precision over force.
11. Common Mistakes That Make a Stuck Bolt Worse
Most failed removal attempts become harder because the tool slips, the force rises too quickly, or the fastener is damaged before the correct method is chosen. If the bolt does not move, pause and inspect the setup instead of repeating the same attempt with more force.
A bolt can also break below the surface, leaving less material available to grip. Once this happens, extraction may require drilling or machining. Prevention is easier than repair, so protect the head and threads during every attempt.
Source: cartreatments.com
Using the wrong socket size
A loose socket can slip and round the corners. Check the fit before turning.
Applying excessive force too early
A long lever can snap a corroded bolt or damage the threaded housing. Increase force only when the setup can handle it.
Ignoring the direction of the threads
Most common bolts loosen counterclockwise when viewed from the head, but some assemblies use left-hand threads. Verify the design before turning.
Heating a joint with flammable residue
Penetrating oils and nearby fluids may ignite. Never use a flame around unknown vapors or combustible materials.
Drilling off center
A wandering drill can damage the original threads and make the repair harder.
Reusing a damaged fastener
Replace a fastener if its threads, head, or shank are damaged beyond the limits allowed by the service procedure.
Know When to Stop
Stop if the bolt twists, the head starts to shear, the surrounding metal cracks, or the tool repeatedly slips. Also stop if you cannot keep the drill centered or safely control heat. A repair shop or machine shop may have equipment that removes the fastener with less risk to the part.
Safety-critical assemblies
Seek qualified help if the fastener is in a brake, steering, suspension, lifting, or other safety-critical assembly and the removal process could affect safe operation.
12. Clean the Threads and Prevent Future Rust
Once the bolt is out, inspect the threaded hole and the removed fastener before installing a replacement. Remove loose debris and corrosion with a suitable brush or cleaning method. Avoid forcing a new bolt into damaged threads.
If the threads are dirty but otherwise sound, use the appropriate thread-cleaning tool specified for the application. A cutting tap removes material, so do not use one casually when the original threads need to be preserved. A thread chaser or another suitable cleaning tool may be more appropriate for light contamination.
Replace damaged fasteners with the correct diameter, thread pitch, length, strength grade, and material. For vehicle or machinery repairs, follow the service manual and use the specified torque. Lubrication or anti-seize compound changes friction and can affect clamping force, so do not apply it to every bolt by default.
To reduce future corrosion, keep outdoor fasteners protected with a suitable coating or corrosion inhibitor. Use materials and protective products compatible with the assembly. Inspect exposed bolts periodically, especially on equipment that sees road salt, rain, or frequent washing.
Source: cartreatments.com
Should You Apply Anti-Seize to the New Bolt?
Anti-seize can help reduce corrosion and make future disassembly easier in some applications. However, it changes the friction between the threads and bearing surfaces, which can alter the clamping force produced by a given torque. Use it only when the manufacturer permits it and follow any revised torque instructions.
Follow the service specification
Do not change thread lubrication, fastener grade, or tightening torque on a critical assembly without confirming the correct procedure.
Frequently Asked Questions
Q
What is the easiest way to remove a rusted, rounded bolt?
If the bolt head is intact, clean it, apply penetrating oil, and use a snug six-point socket. If the head is rounded, a bolt extractor socket or locking pliers may work better. The easiest method depends on the bolt’s location, corrosion level, and remaining head shape.
Q
Will WD-40 remove a rusted bolt?
A product’s ability to loosen a seized bolt depends on its formulation. Some products sold under the WD-40 name are general-purpose lubricants, while dedicated penetrating oils are designed for stubborn fasteners. Check the exact product label and allow adequate time for it to work.
Q
Should I loosen or tighten a stuck bolt first?
Most standard right-hand-threaded bolts loosen counterclockwise when viewed from the head. A small controlled movement in the tightening direction may help break a corrosion bond in some cases, but it is not always appropriate. Confirm the thread direction and avoid this technique if the fastener or surrounding part is fragile.
Q
Can I use an impact wrench on a rounded bolt?
An impact wrench may help with some stubborn fasteners, but it can also spin an unsuitable socket, damage the head, or snap a weakened bolt. Use a correctly fitted, impact-rated socket and follow the tool and fastener manufacturer’s instructions. A dedicated extractor socket may be needed for a rounded head.
Q
How do I remove a bolt when the head has broken off?
If the broken shank is exposed, locking pliers may grip it. If it is flush or recessed, a centered pilot hole and suitable extractor may help. Drilling requires care to protect the original threads. For valuable parts, aluminum housings, or safety-critical assemblies, professional machining may be the better option.
Q
Can vinegar dissolve rust around a bolt?
Mild acids can dissolve some rust, but household vinegar is not a dependable solution for every seized bolt. It may also affect nearby metals, coatings, and finishes. A suitable penetrating oil is usually a more practical first step for an assembled fastener.
Q
When should I replace a bolt instead of reusing it?
Replace a bolt when its threads are damaged, its head or shank is cracked or badly corroded, or the service procedure requires replacement. Some critical fasteners are designed for one-time use. Match the replacement to the specified dimensions, strength grade, material, and tightening procedure.
✦ Wrapping Up
Conclusion
The best ways to remove a rusted, rounded, or stripped bolt start with careful inspection and the least destructive method. Penetrating oil and a correctly sized socket may free a rusted fastener. Locking pliers and extractor sockets can help when the head has lost its grip, while a manual impact driver may work on a suitable damaged drive recess.
Use controlled heat only when the surrounding materials and conditions make it safe. Reserve drilling for fasteners that cannot be removed by simpler methods, and stop when further work could damage the threaded part. A little patience and the right tool can save the surrounding component from an avoidable repair.
💡 Key Takeaway
Inspect the bolt, clean away loose rust, apply suitable penetrating oil, and try a snug six-point socket first. If the head is rounded, switch to a compatible extractor socket or locking pliers. Protect your eyes, avoid uncontrolled force, and seek professional help when the fastener is in a safety-critical part or the removal process risks damaging the housing.
Sarah believes that a messy garage is a wasted room. After years of working in professional home staging and interior design, she shifted her focus to the most neglected part of the house: the garage. She focuses on vertical storage, aesthetic floor coatings, and converting dusty corners into functional workspaces. Sarah’s goal is to help you "unlock" every square inch of your garage.
Sarah believes that a messy garage is a wasted room. After years of working in professional home staging and interior design, she shifted her focus to the most neglected part of the house: the garage. She focuses on vertical storage, aesthetic floor coatings, and converting dusty corners into functional workspaces. Sarah’s goal is to help you "unlock" every square inch of your garage.