To use a timing light, connect its power leads to the vehicle battery and its pickup clamp to the correct spark plug wire. Start the engine, aim the flashing light at the crankshaft timing marks, and compare the reading with the manufacturer’s specification. Adjust ignition timing only if your engine uses an adjustable ignition system and the service manual calls for it.
If you work on an older car in your home garage in the United States, a timing light can help you check whether the spark reaches each cylinder at the right point in the engine cycle. It is useful for many classic cars, older trucks, and vehicles with adjustable ignition distributors. You can also use one on certain compatible engines in boats and other equipment.
A timing light flashes when it detects the electrical pulse that fires a spark plug. The flashes make a moving crankshaft timing mark appear nearly still, so you can compare its position with the timing scale on the engine. This helps you see whether ignition timing matches the value listed in the vehicle’s service manual.
Before you begin, confirm that your engine has a timing mark you can read and an ignition system that supports this test. Many modern American-market vehicles use electronic engine controls and do not have a conventional, manually adjustable base timing setting. On those vehicles, a scan tool and the manufacturer’s diagnostic procedure may be more appropriate.
This guide explainsthe tools you need, how to connect and aim a timing light, how to read the marks, and what to do if the result looks wrong. It also covers common mistakes and important safety steps for working around a running engine.
Source: storage.googleapis.com
What Is a Timing Light and What Does It Do?
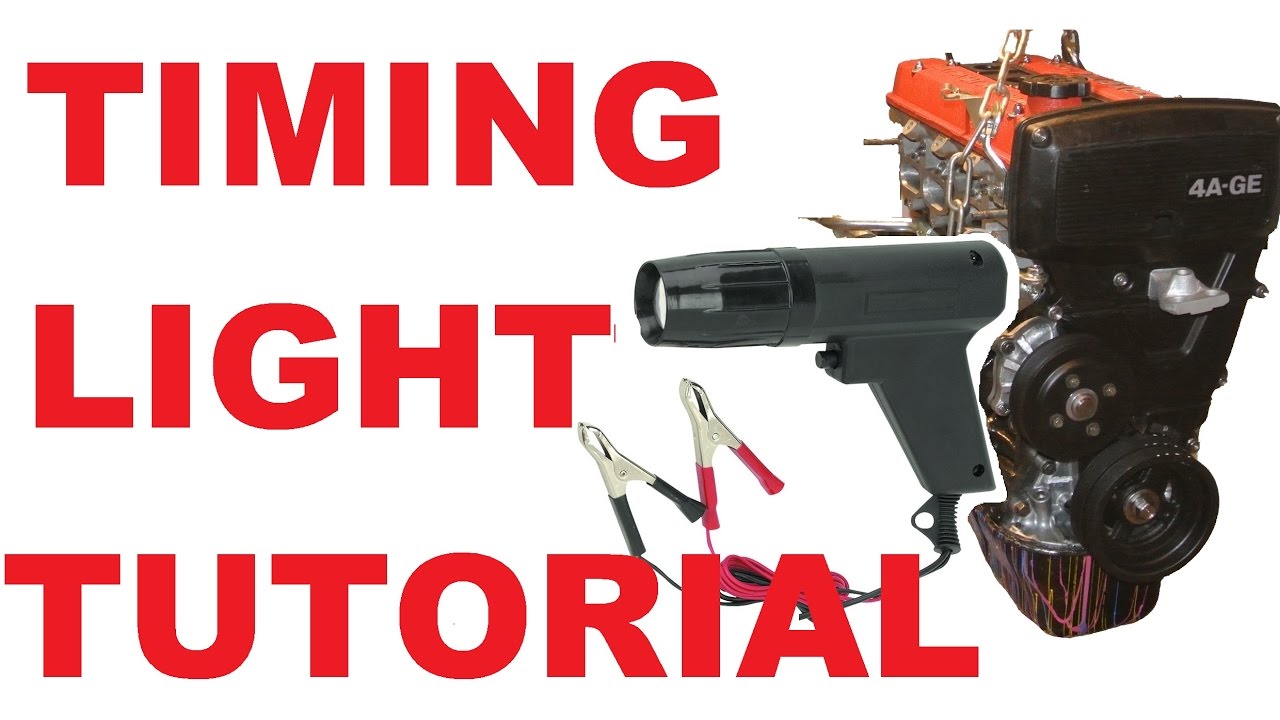
A timing light is an automotive diagnostic tool that uses brief flashes of light to show ignition timing on an engine with a visible timing scale. It helps you determine when a spark plug fires in relation to the piston’s position. This matters because the spark must occur at the correct point for the engine to run as designed.
Most conventional timing lights have a trigger, a light source, battery power leads, and a pickup sensor that detects the ignition pulse. When the sensor detects a spark event, the light flashes. Because the flashes are synchronized with the engine, the crankshaft timing mark appears to hold still when you aim the light at it.
The tool is especially useful on older gasoline engines with distributor-based ignition systems. Some modern timing lights also have an advance feature that lets you dial in a timing angle. However, the tool does not directly measure combustion quality, diagnose every misfire, or replace the vehicle’s service information.
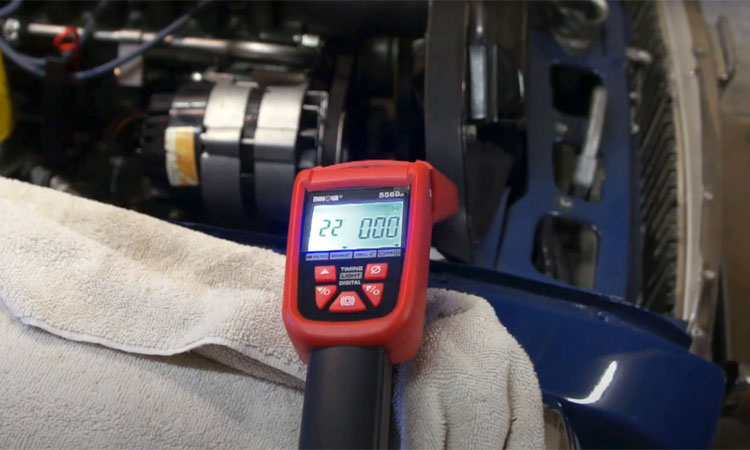
Source: YouTube > The Z Garage
Basic timing light
A simple model flashes in sync with the ignition pulse and lets you read the timing mark against a fixed scale.
Advance timing light
An adjustable model can delay the flash by a selected angle, allowing certain timing measurements to be made against the zero mark. Follow the tool instructions and verify whether the engine specification uses this method.
Digital timing light
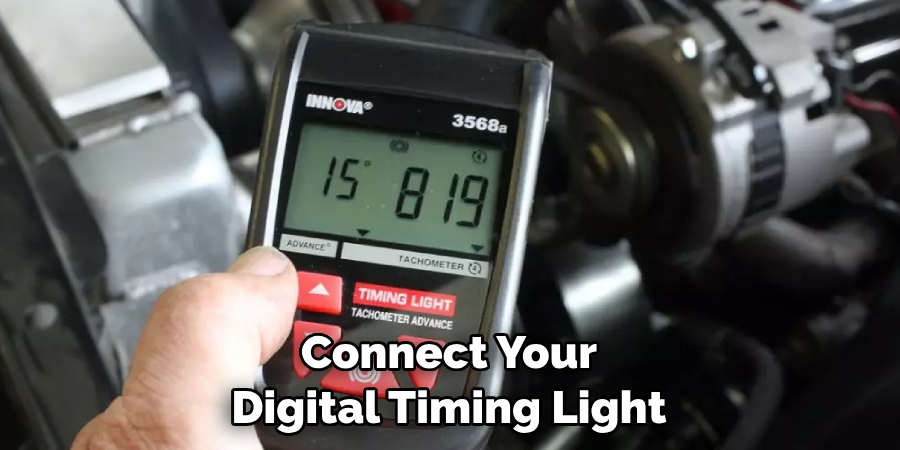
A digital model may display engine speed, selected advance, or other readings. Features differ by model, so check the manufacturer’s instructions.
What Does Ignition Timing Mean?
Ignition timing describes when the spark plug fires relative to the piston’s position in the cylinder. The position at the top of the compression stroke is called top dead center, or TDC. Many gasoline engines fire the spark before the piston reaches TDC so combustion pressure can develop at the intended point in the power stroke.
Timing is often stated in degrees before top dead center, abbreviated BTDC. A reading of 10 degrees BTDC means the spark occurs when the crankshaft is approximately 10 degrees of rotation before the piston reaches TDC. A reading after top dead center is written as ATDC.
The correct value depends on engine design and operating conditions. Base timing, idle speed, engine temperature, vacuum connections, and electronic advance controls can all affect the reading. Never assume that one timing value applies to every car.
When Should You Use a Timing Light?
Use a timing light when a compatible engine’s service procedure calls for checking ignition timing, such as during distributor installation, ignition troubleshooting, or maintenance on an older vehicle. It can also help confirm whether an adjustment produced the intended result.
If an engine runs poorly, a timing check may help identify an ignition setting that is outside specification. However, hard starting, poor acceleration, or unusual engine noise can have many causes. A timing light alone cannot determine whether the underlying problem is a worn timing chain, faulty sensor, weak ignition component, or fuel delivery issue.
Tools and Preparation Before You Start
Gather the correct tools and identify the manufacturer’s procedure before starting the engine. A few minutes of preparation can prevent a false reading or an unsafe adjustment. If the service manual requires a special connector, scan tool, or timing mode, obtain it before proceeding.
Work outdoors or in a properly ventilated workshop. Park on level ground, apply the parking brake, place the transmission in Park or Neutral as appropriate, and keep the wheels secure. Let the engine reach the temperature specified in the service procedure, but avoid touching hot engine parts.
Inspect the timing light, battery clamps, sensor, and wires for damage. Do not use a tool with cracked insulation, exposed conductors, loose connections, or a damaged pickup. Keep loose clothing, long hair, jewelry, and cables away from moving engine parts.
Source: YourMechanic
Timing light
Use a compatible inductive timing light or the specific tool required by the vehicle manufacturer.
Vehicle service manual
Find the specified ignition timing, engine speed, engine temperature, transmission state, and any required diagnostic mode.
Basic hand tools
A wrench or socket may be needed to access covers or loosen a distributor clamp, but use adjustment tools only when the manual requires them.
Safety equipment
Wear eye protection and suitable clothing. Keep a fire extinguisher appropriate for automotive use accessible when working around fuel systems.
Timing mark reference
Locate the crankshaft pulley or harmonic balancer marks and the matching fixed pointer or scale before connecting the tool.
Find the Correct Timing Specification
Look up the exact engine code or vehicle configuration in the service manual. A model year alone may not be enough because engines, emissions equipment, and ignition controls can vary within the same model range.
Record the specified timing value and the conditions under which it must be checked. Some engines require a particular idle speed, a disconnected vacuum advance hose, a bridged diagnostic connector, or a designated service mode. Other engines require no manual timing adjustment at all.
If you cannot confirm the procedure, do not guess at a setting. Incorrect timing can contribute to poor performance, overheating, spark knock, or engine damage under some conditions.
Locate the Timing Marks
The timing marks are usually on the crankshaft pulley or harmonic balancer, with a pointer or scale attached to the engine. The scale may show zero, degrees before top dead center, and degrees after top dead center. Some engines use a different arrangement, so consult the service manual.
Clean dirt from the marks while the engine is off. Use a suitable cleaning method and, if needed, a marking product intended for this task to improve visibility. Never reach near a moving pulley to clean or paint the marks while the engine is running.
If the pointer or balancer appears damaged, the marks are missing, or the scale cannot be identified confidently, stop and resolve that issue before taking a reading.
How to Use a Timing Light Step by Step
The basic process is to identify the correct spark plug wire, connect the light, prepare the engine as directed, and observe the timing mark while the engine runs. These steps apply to many conventional gasoline engines, but the vehicle-specific service procedure always takes priority.
Before connecting anything, confirm that the ignition system is compatible with the timing light and that the engine provides an accessible timing reference. Never connect the pickup to a random wire or probe a high-voltage ignition lead with an ordinary electrical test probe.
Source: lightow.com
Step 1: Switch Off the Engine
Turn the ignition off and remove the key or switch off the vehicle according to the manufacturer’s procedure. Let moving parts stop completely before placing the timing light’s pickup or power leads.
Identify the number one cylinder and its spark plug wire using the service manual. The number one cylinder is not always the cylinder closest to the front of the vehicle. Engine layouts differ, and the wrong wire can produce a misleading reading.
Check the pickup direction
If the pickup has an arrow, align it in the direction specified by the timing light manufacturer, commonly toward the spark plug.
Step 2: Connect the Timing Light to the Battery
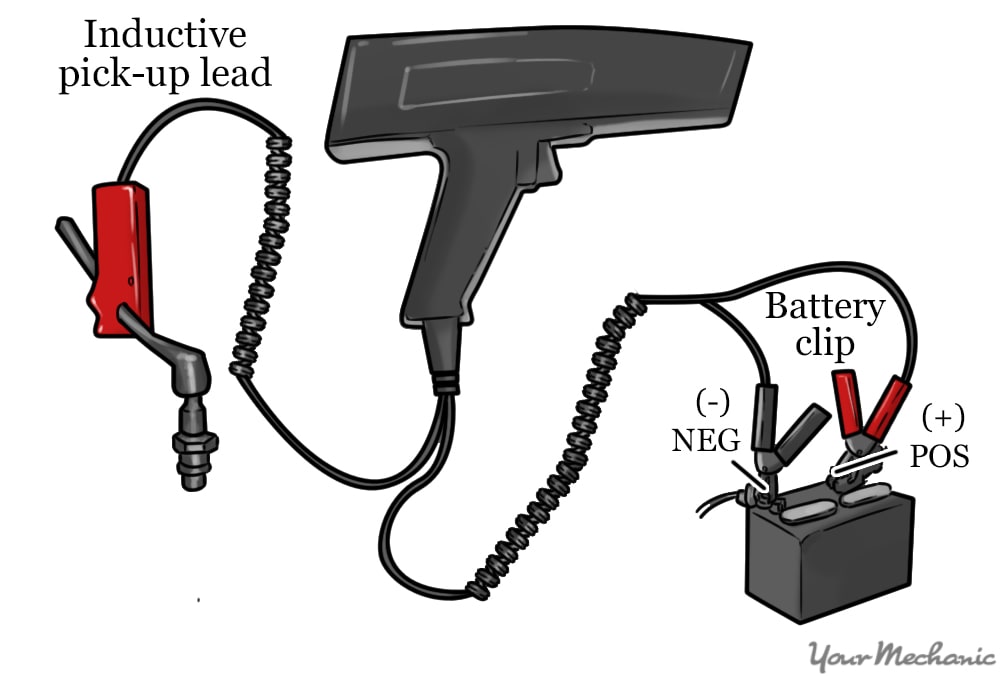
Attach the timing light’s positive power clamp to the battery positive terminal and the negative clamp to the negative terminal, unless the tool’s instructions specify another connection. Keep the clamps clear of belts, fans, hot surfaces, and other moving parts.
Route the cables so they cannot fall into the engine’s moving components. Do not place wires across sharp edges or hot exhaust parts. If the battery is in an unusual location or the vehicle has a special electrical procedure, follow the manufacturer’s guidance.
Positive lead
Connect the red power lead to the designated positive supply point.
Negative lead
Connect the black power lead to the designated negative or ground point.
Step 3: Attach the Inductive Pickup
Clip the inductive pickup around the number one spark plug wire. Make sure it sits securely and is positioned as directed in the tool instructions. An incorrectly seated pickup, reversed orientation on some tools, or interference from nearby ignition wires can cause unreliable flashes.
Keep the pickup cable away from the exhaust manifold and moving components. Do not disconnect spark plug wires while the engine is running. Ignition systems can produce dangerous high voltage, and careless handling can cause shock, injury, or damage to electronic components.
Step 4: Prepare the Engine for the Test
Check that the transmission is in the required position, the parking brake is applied, and the work area is clear. Start the engine only after all leads are secure and positioned safely. Follow the manual’s requirements for engine temperature, idle speed, and any diagnostic connector or vacuum hose procedure.
Some vehicles require the engine to run in a special base-timing mode. Others need the vacuum advance disconnected and the hose plugged. Do not perform either action unless the service manual specifically calls for it, because the wrong setup can change the reading.
Do not rev the engine unless instructed
Use the specified engine speed for the test. If the manual requires an RPM check, use a suitable tachometer or the timing light’s verified RPM feature.
Step 5: Aim the Light at the Timing Scale
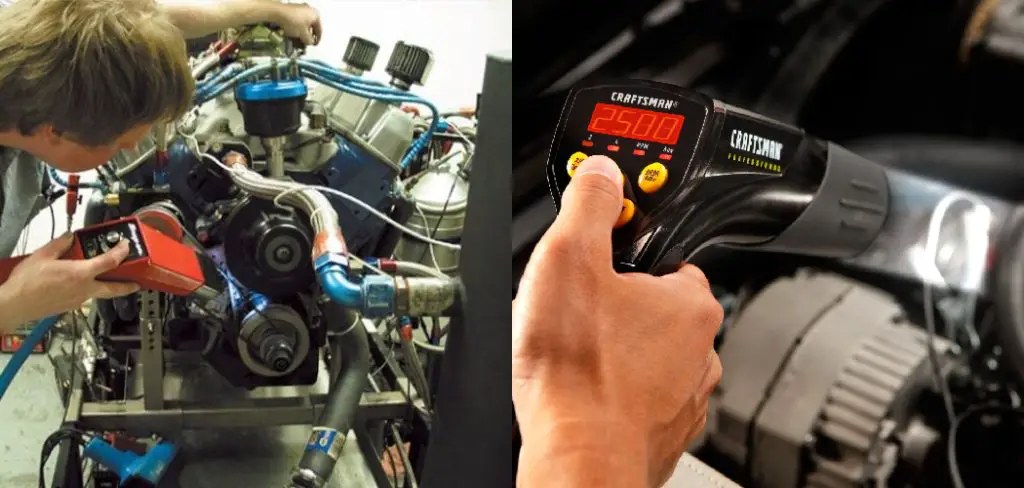
With the engine running under the required conditions, point the timing light at the crankshaft pulley and timing pointer. Pull the trigger to produce flashes. The pulley mark should appear nearly stationary, making it easier to compare with the fixed scale.
Keep your hands and the tool body clear of the pulley, belts, fan, and other moving parts. Stand where you can see the marks without leaning over the engine unnecessarily. If you cannot obtain a clear view from a safe position, switch off the engine and improve access before trying again.
Step 6: Read the Ignition Timing
Read the position of the moving crankshaft mark against the fixed timing scale. If the mark aligns with 8 degrees BTDC, for example, the observed timing is approximately 8 degrees before top dead center, provided the correct scale and test conditions are being used.
Compare the observed value with the service manual’s specification. A correct reading should fall within the specified range under the stated conditions. If the mark jumps around, disappears, or appears far from the expected position, investigate the cause before changing anything.
Record the engine speed and other test conditions along with the reading. This makes it easier to repeat the check and distinguish a genuine change from a difference in engine setup.
Step 7: Switch Off and Disconnect the Tool
When the measurement is complete, release the trigger and switch off the engine. Wait until all moving parts stop before removing the pickup and battery clamps. Follow the tool manufacturer’s recommended disconnection order.
Reconnect any vacuum hose, diagnostic connector, or component that the service procedure required you to disconnect or change. Verify that all connections are secure before restarting the engine. If you adjusted timing, repeat the prescribed check and confirm that the final reading meets specification.
How to Read Timing Marks Correctly
Reading the marks correctly is essential because the timing light only shows a reference position; it does not tell you whether the setting is correct for the engine. First identify the zero mark and determine which side of the scale represents before top dead center and which represents after top dead center.
The scale may use numbered marks, small lines, or a pointer with a degree scale. On some engines, the pulley mark aligns with a fixed pointer, while others use a graduated scale on a timing cover. Do not assume the layout is the same across vehicles.
An adjustable timing light can provide another way to measure timing. With the dial set to a selected advance angle, the light delays its flashes so the pulley mark may align with the zero reference. This method is appropriate only when the tool and engine instructions support it.
Source: lightow.com
BTDC
Before top dead center. The spark occurs before the piston reaches the top of its compression stroke.
TDC
Top dead center. The piston is at the top of its travel, at the boundary between compression and power strokes.
ATDC
After top dead center. The indicated position is beyond the top reference in the direction of crankshaft rotation.
A Simple Timing Reading Example
Suppose a hypothetical engine manual specifies 10 degrees BTDC at a defined idle speed, with the engine warm and the ignition system in base-timing mode. You connect the light correctly and see the pulley mark align with the 10-degree BTDC mark under those same conditions.
That reading matches the stated target. If the mark instead aligns with 4 degrees BTDC, the measured value is 6 degrees less advanced than the 10-degree target. This calculation describes the difference between the two readings; it does not prove that the distributor should be adjusted by that amount without checking the full service procedure.
Why Timing Readings Can Change With RPM
On systems with mechanical or electronic spark advance, ignition timing may change as engine speed rises. Vacuum advance systems can also change timing in response to engine load and vacuum conditions.
A reading taken at one engine speed cannot automatically be compared with a specification for another speed. Always use the exact RPM and operating conditions required by the service manual. If the manual calls for a timing curve check, follow its full sequence rather than relying on a single idle reading.
How to Adjust Ignition Timing When the Vehicle Allows It
Only adjust ignition timing if the engine has a system designed for manual adjustment and the service manual provides an adjustment procedure. Many older distributor-equipped engines permit this, while many modern vehicles use computer-controlled ignition timing that should not be adjusted by rotating parts.
On an adjustable distributor system, the distributor controls the position of the ignition trigger relative to the engine’s rotation. Turning the distributor can change when the spark occurs. Even a small movement may change timing enough to affect engine behavior, so make adjustments in small, controlled steps and recheck the result.
Before loosening anything, confirm the specified setting, engine state, and any required base-timing mode. Some systems need the electronic advance disabled through a service connector or scan tool. Skipping this step can lead to an incorrect setting even if the timing light is working properly.
Source: lightenify.com
General Distributor Adjustment Procedure
The following is a general outline, not a substitute for the exact service instructions. With the engine off, identify the distributor hold-down and confirm that the distributor is safe to access. Do not begin if the engine has exposed moving parts that prevent safe access.
Prepare the engine according to the specified procedure, then loosen the hold-down only as much as needed to allow controlled movement. Restart the engine if the manual requires a running adjustment, keep clear of moving parts, and move the distributor only as directed by the manufacturer. Do not assume a universal clockwise or counterclockwise direction because the result depends on the engine and distributor design.
Recheck the timing after each small adjustment. Once the specified value is reached, follow the manual’s procedure for tightening the hold-down and verify the reading again. Some engines can shift slightly as the clamp is tightened.
Switch off the engine before removing tools or restoring any disconnected components. Restart only after confirming that the timing light, tools, and wiring are clear of the engine bay.
Avoid blind adjustments
If the mark is unreadable or the timing specification is uncertain, solve those problems first instead of turning the distributor at random.
Do not force seized parts
A stuck distributor or damaged clamp may require professional repair rather than extra force.
What About Modern Cars With Electronic Ignition?
Many modern vehicles calculate spark timing through the engine control module using inputs from crankshaft and camshaft position sensors, load sensors, temperature sensors, and other systems. Their ignition timing changes dynamically to suit operating conditions.
On these vehicles, rotating a distributor may be impossible or inappropriate because the engine has no conventional distributor. A timing light might still be useful for a limited diagnostic check if the manufacturer permits it, but the visible mark is not always intended for manual adjustment.
If a modern vehicle reports an ignition timing or sensor fault, use the specified diagnostic procedure. A scan tool, wiring checks, sensor inspection, and manufacturer-specific tests may be required.
Common Timing Light Problems and How to Fix Them
If the timing light does not flash or the timing mark is hard to read, check the basic setup before assuming the ignition system is faulty. Power connections, pickup placement, the wrong cylinder wire, poor lighting, and incorrect engine conditions can all affect the test.
Work through the checks with the engine off whenever possible. Never move a pickup clamp or handle exposed ignition wiring while the engine is running unless a specific manufacturer procedure explicitly requires it and provides appropriate protection.
Source: hitchesguide.com
The Timing Light Does Not Flash
First, check that the battery clamps are firmly connected to the correct terminals and that the tool’s power requirements are met. Inspect the leads for damage and verify that the trigger, switch, and pickup are properly connected.
Next, confirm that the inductive pickup is attached to the correct spark plug wire and oriented as instructed. A weak or absent ignition pulse, a defective pickup, or a damaged timing light can also prevent flashes. If basic checks fail, stop the test and diagnose the ignition system using the service manual.
Likely setup issue
Loose battery clamps, incorrect pickup placement, or damaged cables.
Possible engine issue
No spark or a weak ignition signal on the selected wire.
The Timing Mark Jumps Around
A moving or unstable mark may result from engine speed changes, an incorrectly seated pickup, electrical interference, or a genuine variation in ignition timing. Confirm that the engine is running at the required speed and that the pickup cable is routed away from other ignition wires as recommended.
If the reading remains unstable, investigate possible distributor wear, a loose distributor shaft, timing-chain wear, crankshaft trigger problems, or other engine-specific causes. These are possible explanations, not diagnoses that can be confirmed by the light alone.
The Reading Does Not Match the Specification
Verify that you are using the correct timing pointer, the correct cylinder wire, and the specified engine speed. Check whether the manual requires a warm engine, a disconnected vacuum line, or a special base-timing mode. A reading taken under different conditions may be valid for those conditions but unsuitable for comparison with the target.
If the setup is correct, inspect the ignition system and timing reference for faults. The harmonic balancer’s outer ring can shift on some designs, and a damaged or inaccurate timing pointer can lead to misleading readings. Follow the manufacturer’s checks before adjusting ignition timing.
The Marks Are Difficult to See
Switch off the engine and clean the timing scale and pulley marks. Improve the work light and use an appropriate marking product if permitted by the vehicle manufacturer. Confirm that the pulley mark and fixed pointer belong to the correct reference system.
Do not use your fingers or a cleaning tool near a moving pulley to make the marks easier to see. If the reference marks are hidden behind a cover or accessory, follow the approved access procedure instead of removing components unsafely.
Timing Light Safety Tips for Home Mechanics
A timing light is simple to operate, but the test usually involves a running engine, electrical leads, hot parts, and exposed rotating components. A safe setup matters more than finishing the measurement quickly. If the vehicle cannot be positioned securely or the timing marks cannot be viewed safely, do not continue.
Work in a ventilated area because gasoline engines produce exhaust gases, including carbon monoxide. Never run an engine in a closed garage without suitable exhaust extraction. Carbon monoxide is odorless and can cause serious injury or death.
Use eye protection, keep loose clothing away from the engine, and avoid leaning over fans or belts. Electric cooling fans may start unexpectedly, including on some vehicles when the engine is hot. Keep your hands clear even when a fan appears stationary.
Source: YouTube > driving 4 answers
Secure the vehicle
Apply the parking brake, select the proper transmission position, and secure the wheels when appropriate.
Protect against high voltage
Handle ignition components only as directed. Never pull a spark plug wire off a running engine to test for spark.
Keep cables clear
Route all leads away from belts, pulleys, fans, exhaust parts, and sharp edges.
Avoid fuel hazards
Do not perform the test around fuel leaks, spilled gasoline, or flammable vapors.
Stop when conditions are unsafe
Turn off the engine before repositioning the pickup, moving wires, or accessing a hidden timing reference.
When to Get Professional Help
Ask a qualified automotive technician for help if the engine has no clear timing reference, the service procedure is unavailable, or the ignition system requires specialized diagnostic equipment. Professional help is also sensible when the timing reading remains unstable after basic setup checks.
Stop immediately if the engine develops severe knocking, overheating, fuel leakage, or other signs of a potentially serious fault. Do not keep running an engine in an attempt to force the timing mark into the correct position.
Frequently Asked Questions
Q
Can I use a timing light on any car?
No. A timing light works best on engines with compatible ignition signals and accessible timing marks. Many older gasoline engines with distributor ignition support conventional timing checks, while many modern vehicles use computer-controlled ignition systems that do not allow traditional manual adjustment.
Check the service manual to determine whether a timing light is appropriate for your specific engine and what conditions are required.
Q
Does a timing light connect to the spark plug wire or the battery?
Many conventional timing lights connect to both. The positive and negative leads supply power from the battery, while an inductive pickup clips around the specified spark plug wire to detect ignition pulses.
Follow the instructions for your particular model. Do not assume every timing light uses the same connectors or setup.
Q
What should the timing light read at idle?
There is no single correct idle timing value for every engine. The required setting depends on the engine design, ignition system, idle speed, and test conditions specified by the manufacturer.
Look up the exact specification for your engine and follow the required base-timing procedure before judging the reading.
Q
Can I adjust ignition timing without a timing light?
A timing light is the usual tool for accurately checking conventional ignition timing against a visible crankshaft scale. Some manufacturers provide other procedures or diagnostic methods, but guessing based on sound or engine feel is not a reliable substitute.
If your engine requires a timing light, use one compatible with the ignition system or have a qualified technician perform the adjustment.
Q
What does it mean if the timing mark moves while I rev the engine?
The mark may move because the ignition system advances or changes spark timing as engine speed increases. On systems designed with mechanical or electronic advance, some movement is expected.
The amount and direction of movement depend on the engine and ignition design. Compare the observed behavior with the manufacturer’s timing procedure rather than assuming that movement indicates a fault.
Q
Can an incorrect timing setting damage an engine?
Yes, incorrect ignition timing can contribute to poor performance, excess heat, spark knock, or engine damage under certain operating conditions. The risk depends on the engine design, the size of the error, the load, and other factors.
Use the correct service specification and stop the engine if you hear severe knocking or notice other serious warning signs. Do not keep driving a vehicle that shows signs of potentially damaging combustion.
Q
What is the difference between a standard and an advance timing light?
A standard timing light flashes in sync with the ignition event so you can read the crankshaft mark directly against the timing scale. An advance timing light allows you to select an advance angle and changes the flash timing to support a different measurement method.
An advance feature does not make every measurement method suitable for every engine. Follow the tool instructions and confirm the procedure in the vehicle service manual.
✦ Wrapping Up
Conclusion
Learning how to use a timing light can make ignition checks more precise on compatible engines. Connect the tool correctly, identify the right cylinder and timing marks, prepare the engine according to the service manual, and compare the reading with the specified value.
Remember that a timing light shows ignition timing under the conditions being tested. It does not automatically identify the cause of a running problem, and it does not make every modern engine manually adjustable. A correct procedure and a clear understanding of the vehicle’s ignition system are essential.
If the reading differs from the specification, verify the setup and test conditions before changing anything. When the timing reference is unclear, the reading is unstable, or the adjustment procedure is unfamiliar, use the manufacturer’s diagnostic information or consult a qualified technician.
💡 Key Takeaway
Before starting, write down the exact engine timing specification, locate the correct timing marks, and confirm the required test conditions. Then connect the light with the engine off, take the reading safely, and make adjustments only when the service manual authorizes them.
Sarah believes that a messy garage is a wasted room. After years of working in professional home staging and interior design, she shifted her focus to the most neglected part of the house: the garage. She focuses on vertical storage, aesthetic floor coatings, and converting dusty corners into functional workspaces. Sarah’s goal is to help you "unlock" every square inch of your garage.
Sarah believes that a messy garage is a wasted room. After years of working in professional home staging and interior design, she shifted her focus to the most neglected part of the house: the garage. She focuses on vertical storage, aesthetic floor coatings, and converting dusty corners into functional workspaces. Sarah’s goal is to help you "unlock" every square inch of your garage.