The best garage hacks help you reclaim floor space, store tools within easy reach, protect your belongings, and make daily chores easier without spending a fortune.
In American homes, the garage often does far more than shelter a car. It may hold lawn mowers, sports gear, holiday decorations, garden tools, paint cans, and boxes from the last big move. When these items pile up, parking becomes hard, and even a simple home repair can turn into a long search for the right tool.
Practical garage hacks can help you fix these problems with simple changes. Wall hooks, labeled bins, sturdy shelves, and clear work zones can turn a crowded space into a useful part of your home. You do not need a full remodel to make progress. Start with what you own, use the space you have, and add storage only where it solves a real problem.
This guide covers affordable garage organization ideas, smart ways to use vertical space, simple DIY storage projects, cleaning shortcuts, and safety tips. It also explains which common tricks need extra care, especially when they involve heavy loads, power tools, chemicals, or items stored overhead. The goal is a garage that works for your family, your budget, and your daily routine.
Source: www.pinterest.com
1. Start With a Simple Garage Decluttering Plan
The first garage hack is to remove items you no longer need before building more storage. Extra shelves cannot solve a problem caused by broken equipment, empty boxes, unused sports gear, and supplies you forgot you owned. A short sorting session can reveal how much room you already have.
Begin with one small area, such as a workbench, a shelf, or a corner near the garage door. Move items into groups for keeping, donating, recycling, and disposing of them. Check local rules before discarding paint, batteries, motor oil, fuel, pesticides, or other household hazardous waste.
Avoid emptying the entire garage onto the driveway unless you have enough time and a safe place to keep everything dry. A smaller project is easier to finish in one session. Once the first area is clear, you can use it to sort the next group of belongings.
Source: The Family Handyman
Keep
Save items that you use, need for a planned task, or must retain for household reasons.
Donate or sell
Pass on usable tools, sports equipment, and household goods that no longer serve your needs.
Repair
Set aside broken items only when a repair is practical and you have a clear plan to complete it.
Dispose safely
Use approved collection programs for hazardous products and follow local rules for electronics, batteries, and other special waste.
Make a Keep List Before Buying Storage
Write down the main groups of items that must stay in your garage. These might include car supplies, garden tools, power tools, holiday decorations, camping gear, and cleaning products. Knowing what you need to store helps you choose shelves, bins, hooks, and cabinets that fit the job.
Measure the available wall space and note doors, windows, outlets, and electrical panels. Leave room for safe access and for the car doors to open. A simple sketch with a few measurements can prevent wasted money on storage that does not fit.
Measure first
Record the width, height, and depth of the areas you plan to use.
Plan for daily use
Keep frequently used items close to where you work, park, or enter the house.
2. Use Wall Space to Free Up the Floor
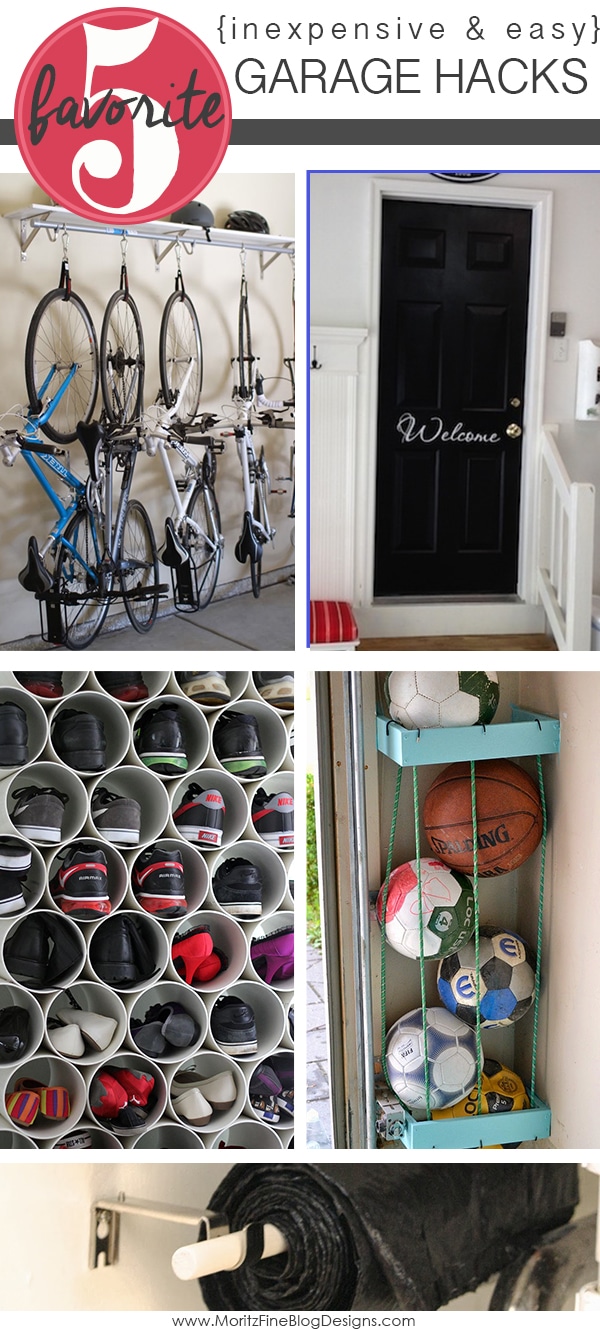
Wall storage is one of the most useful garage hacks because it moves suitable items off the floor and into clear, easy-to-reach places. Hooks, rails, shelves, and pegboards can hold many tools without taking up much room. The right setup depends on the wall material, the weight of the items, and how often you use them.
Before drilling, check for hidden wires and pipes. Use fasteners suited to the wall and the load, and attach heavy storage to appropriate framing or masonry anchors. Do not assume that drywall anchors or ordinary nails can support a loaded shelf simply because the shelf feels secure when empty.
Arrange tools by use rather than by appearance. Put everyday hand tools near the workbench, garden tools near the yard supplies, and car-care items in a separate area. This makes it easier to put everything back after a project.
Source: moritzfinedesigns.com
Install a pegboard
Use a suitable pegboard system for lightweight hand tools, measuring tools, and small accessories. Follow the mounting instructions and check the load limits.
Add wall hooks
Hang suitable hoses, extension cords, folding chairs, and garden tools on purpose-made hooks. Store each item according to its shape and weight.
Use a wall rail
A compatible rail system can make it easy to rearrange hooks and holders as your storage needs change.
Create a sports zone
Use bins, ball racks, and suitable hooks to keep helmets, balls, rackets, and other gear together.
Make a Simple Tool Wall
Choose a clear section of wall near your main work area. Mount the board or rail according to its instructions, then arrange tools by size and purpose. Leave enough room between items so you can remove and replace them without knocking neighboring tools loose.
A basic outline behind each tool can help you see where it belongs. This is useful in a shared family garage because everyone can tell when a tool is missing. Keep sharp blades, heavy tools, and items used by children in appropriate secure storage.
Group similar tools
Keep screwdrivers together, measuring tools in one area, and frequently used hand tools near the bench.
Check the mounting
Inspect fasteners and hooks from time to time, especially after moving heavy tools or changing the layout.
3. Make the Most of Shelves and Storage Bins
Shelves and bins help keep small items together and make better use of vertical space. Choose a system that fits the items you own, rather than buying containers first and trying to fill them later. Sturdy shelving is useful for larger supplies, while small bins work well for fasteners, craft supplies, and seasonal accessories.
Use clear bins when you want to see the contents without opening each one. Opaque bins may be better when you want to limit light exposure or create a cleaner visual look, but they need clear labels. For either type, use short labels that describe the contents, such as car wash supplies, camping gear, or holiday lights.
Place heavy items on lower shelves to reduce the risk of injury if something falls. Follow the manufacturer’s load rating for each shelf and for the complete unit. Keep shelves stable and secured as directed, and do not stack containers higher than the system allows.
Source: homeaddict.io
Label every bin
Use large, easy-to-read labels on the front or side so you can identify contents when containers are stacked.
Group by season
Keep summer recreation gear, winter supplies, and holiday decorations in separate labeled groups.
Store heavy items low
Put bulky tools and dense supplies on lower shelves rather than above shoulder height.
Keep moisture-sensitive items dry
Use suitable sealed containers and a dry storage area for paper goods, fabrics, and other items that can be damaged by damp air.
Use a First-In, First-Out Shelf
For supplies that you use up and replace, arrange older usable stock toward the front and newer stock behind it. This simple habit helps prevent forgotten products from expiring or sitting unused for years. It works well for suitable sealed household supplies and workshop consumables.
Do not use this method to justify keeping old chemicals indefinitely. Check the product label, condition, and storage requirements, and dispose of products that are no longer safe to use. Never combine unknown liquids or move hazardous products into unmarked containers.
Check before restocking
Look through the existing shelf before buying more of the same item.
Keep labels visible
Store products so their names, warnings, and instructions remain readable.
4. Try Smart Ceiling and Overhead Storage
Overhead storage can help when wall and floor space are limited, but it is not suitable for every garage. Ceiling racks may hold seasonal items that you rarely need, while wall-mounted systems can keep selected bulky belongings out of the way. These systems must be designed for the building structure and the loads they will carry.
Never mount a heavy rack to drywall alone. Identify suitable structural members, use the hardware and installation method specified by the rack manufacturer, and check that the structure can support the planned load. If you cannot confirm the framing, attachment method, or safe capacity, consult a qualified installer.
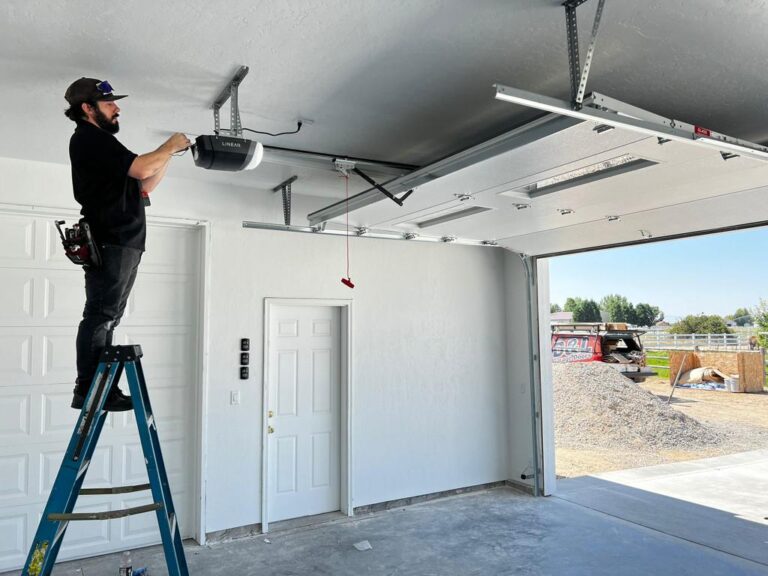
Keep access practical. Items stored overhead should be light enough to handle safely, and you should have a reliable way to reach them without standing on a chair or balancing on a ladder. Leave room for garage doors, openers, lights, sprinklers, and other installed equipment.
Source: www.msn.com
Store seasonal items
Use suitable overhead storage for lightweight decorations and other items that are needed only occasionally.
Check clearance
Confirm that racks and containers cannot interfere with the garage door, opener, vehicles, or other equipment.
Respect load limits
Follow the rated capacity for the rack, fasteners, and supporting structure. The weakest part limits the safe load.
Avoid risky lifting
Ask for help with awkward objects and use a stable, appropriate ladder when access is necessary.
Should You Build Your Own Overhead Rack?
A DIY rack may appear cheaper than a ready-made system, but its safety depends on the design, materials, fasteners, framing, and installation. A few screws and scrap lumber are not enough to establish a safe load rating. Do not rely on a rack that has never been properly designed or checked.
For most homeowners, a rated storage system with clear installation instructions is easier to assess. If you choose a custom design, have the supporting structure and attachment details checked by someone qualified to assess the loads involved.
Use a rated system when possible
Choose a rack with documented capacity and installation requirements that suit your garage.
Keep heavy items elsewhere
Store dense tools, liquids, and objects that are hard to lift on suitable low shelves or in floor-level cabinets.
5. Organize Small Tools, Screws, and Hardware
Small parts can make a garage feel messy even when larger items are organized. Screws, nails, washers, drill bits, wall plugs, and spare fasteners are easy to lose in mixed boxes. A dedicated small-parts system saves time when you repair furniture, hang shelves, or work on a household project.
Use compartment organizers, divided boxes, or small drawers that close securely. Label each compartment with the part type and size when that information matters. Keep sharp drill bits and other cutting accessories in holders that protect both the edges and your hands.
Avoid storing different chemicals or loose hardware together in a way that could cause damage or confusion. Keep small items away from young children and pets, especially tiny batteries, sharp parts, and products that can be swallowed.
Source: ca.pinterest.com
Sort by type and size
Separate screws, nails, anchors, washers, and specialty fasteners into clearly marked compartments.
Reuse suitable containers
Clean, dry containers may work for nonhazardous parts when they close securely and are labeled clearly.
Keep common sizes handy
Place the hardware you use most often near the workbench, with specialty parts stored separately.
Use a parts inventory
Keep a short list of common sizes and supplies so you can check stock before buying more.
Create a Grab-and-Go Repair Kit
A small portable box can hold the basic supplies you use for everyday home repairs. Depending on your needs, it might include a tape measure, pencil, screwdrivers, a small level, suitable fasteners, and a utility knife with a protective cover. Keep the kit limited to tools you can use safely and correctly.
Store specialized equipment in separate cases so you do not have to carry everything for a simple task. After a repair, return loose parts to their labeled compartments and replace anything you used. A kit works best when it is ready for the next job.
Choose a sturdy case
Use a box with secure latches and compartments that keep tools from shifting during transport.
Check the contents
Review the kit now and then for damaged tools, missing parts, and worn cutting accessories.
6. Improve Your Garage Workbench
A well-planned workbench makes repairs, crafts, and small DIY projects easier. You do not need a large professional bench to get started. A stable surface, good lighting, a clear place for tools, and room to work on common projects can make a big difference.
Place the bench where you can reach frequently used tools without crossing a cluttered floor. Leave enough space to handle materials and operate equipment according to its instructions. If the bench is near a vehicle, make sure the work area does not create a trip hazard or block the path to an exit.
Use a bench mat or other suitable protective surface when working with materials that may scratch the top. Keep liquids, food, and unrelated household items away from the active work area. Clean up dust and debris before they collect around electrical equipment or moving parts.
Source: nadabookinfo.com
Add task lighting
Use suitable lighting to see small parts, read labels, and inspect work clearly. Choose fixtures appropriate for the garage environment.
Store daily tools nearby
Keep measuring tools, common screwdrivers, pliers, and other frequently used items within easy reach.
Create a clear surface
Keep only the tools and materials needed for the current task on the bench.
Add a cleanup station
Keep a suitable brush, dustpan, and approved cleaning supplies nearby to make cleanup part of the job.
Make a Fold-Down Work Surface for a Small Garage
A fold-down work surface can free up room in a narrow garage when you do not need a permanent bench. It should be designed for the intended load and mounted to suitable structural supports using appropriate hardware. The wall, hinges, brackets, and fasteners must all be able to handle the forces involved.
Keep the folded surface clear of the garage door and vehicle path. Before using it, check that the supports lock or engage as designed and that the surface does not move unexpectedly. If you cannot verify the wall structure or load requirements, choose a freestanding bench with a documented capacity instead.
Measure the working area
Check the available space with the vehicle parked and the garage door in its normal positions.
Test according to the design
Follow the manufacturer’s or designer’s load and installation guidance before putting tools or materials on the surface.
7. Use Simple Hacks to Keep the Garage Clean
A garage stays cleaner when small messes are handled before they spread. Dirt from shoes, leaves from the driveway, sawdust, and bits of packaging can quickly collect around stored items. A simple cleanup routine is often more effective than waiting for a large weekend project.
Place a durable mat near the entry point where dirt often comes inside, provided it does not create a trip hazard or interfere with a door. Keep a broom and dustpan in a reachable spot. For dust, spills, and debris, choose a cleaning method suited to the material and the substance involved.
Do not sweep or vacuum unknown chemical spills as if they were ordinary dirt. Check the product label and safety instructions, keep people away from dangerous spills, and seek appropriate hazardous-material guidance when needed. Never mix cleaning chemicals, since some combinations can release harmful gases.
Source: uk.pinterest.com
Sweep regularly
Remove ordinary dust and debris before they build up around storage, tools, and walking areas.
Use a suitable shop vacuum
Choose a vacuum designed for the material you need to collect and follow its instructions. Do not use an ordinary shop vacuum for flammable vapors or unknown hazardous dust.
Clean spills promptly
For ordinary nonhazardous spills, follow the product directions and prevent the liquid from spreading.
Protect the floor
Use suitable mats in work areas where they will stay flat, remain stable, and not block drains or create slip hazards.
Remove Oil Stains Without Damaging the Floor
For a small oil stain on a suitable concrete floor, begin by keeping people and vehicles away from the affected area. Use an absorbent material intended for the spill, then collect and dispose of it according to the product instructions and local rules. Follow with a cleaner approved for the surface if the product label recommends one.
A stain may remain even after the surface is clean. Avoid mixing cleaners or using strong acids, solvents, or pressure washing without checking their suitability for the floor. If the spill involves a large amount of fuel, an unknown chemical, or a substance that could enter a drain, use appropriate professional or local hazardous-waste guidance.
Act early
Fresh stains are often easier to address than oil that has soaked into porous concrete.
Read the cleaner label
Check surface compatibility, protective equipment, ventilation, and disposal instructions before use.
8. Save Space With Smart Garden and Outdoor Gear Storage
Garden tools, hoses, folding chairs, camping supplies, and sports equipment can occupy a large part of a family garage. Giving these items their own storage zone makes it easier to move between indoor projects and outdoor chores. The best layout keeps bulky equipment accessible without blocking parking or walkways.
Use purpose-made hooks or holders for long-handled tools, and store sharp tools with their blades protected. Keep garden chemicals in their original containers and follow the label’s storage instructions. Do not place fertilizers, pesticides, or fuel where a leak could reach food, pet supplies, or household cleaning products.
For seasonal equipment, use labeled containers and store only items that can tolerate the garage’s temperature and humidity. Some materials, batteries, fabrics, and electronics may need a more controlled indoor environment. Check the manufacturer’s storage guidance before leaving valuable or sensitive items in an unconditioned garage.
Source: www.pinterest.com
Hang long-handled tools
Use compatible holders for rakes, brooms, shovels, and other tools that can be stored safely on a wall.
Keep hoses off the floor
Use a suitable hose reel or hanger to reduce tangles and keep walking areas clear.
Separate outdoor supplies
Create distinct areas for garden tools, recreation gear, and car-care products.
Protect equipment from dampness
Dry wet gear before storage when appropriate, and check for leaks or signs of mold in nearby containers.
Organize Camping and Sports Equipment
Store camping gear together so tents, sleeping bags, lanterns, and cooking equipment are easy to find before a trip. Dry equipment fully before packing it away, and check that fuel-burning equipment is clean and stored according to its instructions. Never store fuel-burning devices in a way that allows residual fuel or vapors to accumulate indoors.
Use separate bins or racks for balls, helmets, gloves, and other sports gear. Keep heavy equipment low and make sure hooks or racks cannot fall when items are removed. If children use the area, put frequently used gear at a safe height while keeping sharp tools and hazardous products secured.
Pack by activity
Group gear for camping, cycling, yard work, and other activities to make preparation faster.
Check gear before storage
Look for moisture, damage, leaks, and missing parts before putting equipment away.
9. Make Garage Lighting and Power More Practical
Good lighting helps you find tools, read labels, and spot trip hazards. A dark garage corner can make a simple repair frustrating and may hide damaged cords or leaking containers. Start by checking whether existing lights cover the workbench, storage shelves, entry door, and parking area.
Choose lights suited to the location, moisture conditions, and intended use. Follow the manufacturer’s instructions for installation and clearance. If new wiring, outlets, or permanent electrical changes are needed, use a qualified electrician when the work is outside your training or local rules require a licensed professional.
Keep power cords out of walkways and away from sharp edges, hot surfaces, and moving machinery. Do not overload outlets or power strips, and do not use damaged cords. A power strip is not a substitute for installing the correct permanent circuit for equipment with higher power needs.
Source: The Family Handyman
Light the workbench
Add suitable task lighting so small parts and markings are easy to see.
Use cord management
Route cords so they do not cross walking paths or get trapped under doors and equipment.
Inspect electrical items
Replace damaged cords and stop using equipment that shows signs of overheating or electrical damage.
Plan before adding outlets
Check equipment needs and have permanent electrical work assessed and installed appropriately.
Choose a Useful Work Light
A portable work light can be useful for car checks and repairs in corners that fixed lighting does not reach. Select a model intended for the conditions in which you will use it, and position it so it does not shine directly into your eyes or create deep shadows. Keep lights away from fuel, solvents, and other flammable materials unless the equipment is specifically approved for that environment.
Before using a light, inspect its housing, plug, cable, and mounting method. Follow the instructions for charging and battery care if it is cordless. Put it away after the job so the cord or fixture does not become another source of clutter.
Aim the light carefully
Illuminate the work area without creating glare or blocking the path.
Match the environment
Use equipment rated for the location and exposure conditions rather than assuming every indoor light suits a garage.
10. Keep Hazardous Products and Fire Risks Under Control
A tidy garage must also be a safe garage. Gasoline, paint thinners, solvents, some adhesives, propane cylinders, and other products can create fire, poisoning, or exposure risks when stored or used incorrectly. Keep these items in approved containers and follow their labels, safety data, and applicable local requirements.
Do not store gasoline in ordinary drink bottles or unapproved plastic containers. Keep fuel away from ignition sources and living areas, and never use gasoline as a cleaning agent. Fuel vapors can ignite at a distance from the liquid, so a closed garage is not a safe place to refuel or operate an engine simply because a door is open.
Never run a car, generator, pressure washer, or other fuel-burning engine inside an attached garage, even with the garage door open. Carbon monoxide is a colorless, odorless gas that can cause severe injury or death. Operate fuel-burning equipment outdoors as directed by its manufacturer and install carbon monoxide alarms in the home according to applicable guidance.
Keep fire extinguishers accessible and choose one suitable for the hazards present. Learn how to use it, but do not attempt to fight a fire that is spreading, involves hazardous chemicals, or puts you at risk. Leave the area and call emergency services when needed.
Source: homeaddict.io
Keep products labeled
Store chemicals in their original containers whenever possible and keep all hazard information visible.
Prevent ignition
Keep flammable liquids away from sparks, flames, heaters, and equipment that can ignite vapors.
Maintain clear exits
Do not block the door to the home, exterior doors, or access to emergency equipment.
Use protective equipment
Follow the product instructions for gloves, eye protection, respiratory protection, and ventilation.
Store Batteries and Chargers Properly
Rechargeable batteries can become damaged by impact, excessive heat, improper charging, or unsuitable storage. Follow the instructions for the exact battery and charger, and use compatible equipment. Do not charge batteries on piles of paper, near flammable liquids, or where a damaged battery could block an exit.
Stop using a battery that is swollen, leaking, unusually hot, or visibly damaged. Do not puncture, crush, or attempt to repair a damaged lithium-ion battery. Follow local guidance for battery disposal and recycling rather than placing damaged batteries in ordinary household trash.
Use the correct charger
Match the charger to the battery system and follow the manufacturer’s charging instructions.
Keep batteries protected
Prevent metal objects from touching exposed battery terminals, and store batteries as directed.
11. Choose Garage Hacks That Fit Your Budget
You can improve a garage without buying a complete storage system. Start with inexpensive changes that solve obvious problems, such as labeling existing bins, grouping tools, moving suitable items onto current shelves, and clearing the floor. Spend more only when a purchase improves safety, capacity, or daily use in a meaningful way.
Compare storage options by total cost, installation needs, durability, and load rating. A low-cost shelf may be useful for lightweight supplies but unsuitable for heavy tools. A more expensive system may be worthwhile when it has documented capacity, fits the available space, and can be adjusted as your needs change.
Avoid choosing a product based only on a photograph or a claim that it is heavy duty. Check dimensions, materials, fasteners, instructions, and warranty terms where relevant. Confirm that the product is suitable for your wall or ceiling and that you can install it correctly.
Source: nadabookinfo.com
Free or low-cost changes
Declutter, label existing boxes, rearrange shelves, group supplies, and establish a cleanup routine.
Small purchases
Consider basic hooks, dividers, compartment boxes, and labels when they solve a specific storage problem.
Larger investments
Reserve cabinets, modular wall systems, and rated overhead racks for needs that justify their cost and installation.
Compare Storage Options Before Buying
The following table compares common options by their main use and the checks that matter before installation. These are general guidance points, not product ratings or a claim that one storage type is always best.
Choose the simplest system that safely holds your belongings and fits your routine. A well-labeled shelf that you already own may be more useful than a new cabinet that is too deep or difficult to reach.
Wall hooks and rails
Useful for selected tools and lightweight bulky items. Check wall material, fasteners, and individual hook ratings.
Freestanding shelving
Useful for bins and household supplies. Check shelf capacity, stability, and the need for anchoring.
Closed cabinets
Useful for protecting suitable items from dust and reducing visual clutter. They do not replace correct hazardous-material storage.
Ceiling racks
Useful for suitable seasonal belongings when the structure, rack, and installation support the load safely.
12. Avoid Common Garage Organization Mistakes
The most common garage organization mistake is trying to solve every problem at once. A large project can become expensive and overwhelming if you buy shelves before sorting your belongings or change the layout without measuring. Work in small sections, check the results, and adjust the plan as you learn what works.
Another mistake is treating every wall, shelf, and ceiling as if it can support the same load. Storage capacity depends on the materials, mounting points, fasteners, and overall structure. Follow the manufacturer’s instructions and seek qualified help when structural conditions are uncertain.
Do not sacrifice safe access for a cleaner appearance. Leave room to walk, park, open doors, reach electrical panels, and exit quickly. Keep sharp tools protected and hazardous products secured, even if that means using less of the available space.
Source: www.msn.com
Buying bins too early
Sort belongings and measure the storage area first so containers fit the items and available shelves.
Overloading shelves
Respect load limits and place heavy items low rather than relying on appearance or feel.
Blocking the floor
Keep walking paths clear and avoid leaving boxes where a person could trip while carrying tools.
Ignoring moisture
Look for leaks, damp walls, and condensation before storing fabrics, paper, or moisture-sensitive equipment.
Forgetting maintenance
Check labels, fasteners, shelves, and stored equipment periodically so small problems do not grow.
What to Do When Your Garage Still Feels Crowded
If the garage still feels crowded after you organize it, look at the amount of stuff rather than immediately adding more shelves. Ask whether every stored item belongs in the garage and whether rarely used belongings could fit in another suitable location. Keep weather-sensitive and hazardous items in places that meet their storage requirements.
If the garage must hold a vehicle, test the layout with the car parked inside. Check door clearance, the path to the house, and access to tools you use often. A storage plan that looks neat when the garage is empty may not work once the vehicle and daily equipment are in place.
Reduce duplicate supplies
Keep a sensible amount of common fasteners, cleaning supplies, and household materials instead of buying replacements without checking.
Move items to the right place
Store belongings elsewhere when doing so is safe, practical, and consistent with their environmental needs.
Recheck the layout
Make sure every zone supports a real activity and that the garage remains easy to enter, leave, and clean.
Frequently Asked Questions
Q
What are the best garage hacks for a small garage?
The most useful garage hacks for a small space include wall hooks, narrow shelving, labeled bins, a compact workbench, and storage zones for different activities. Move suitable items off the floor and keep only the belongings you need. Measure carefully and preserve enough room for the vehicle, doors, and safe walking paths.
Q
How can I organize my garage on a tight budget?
Start by decluttering, grouping similar items, labeling containers you already own, and rearranging existing shelves. Add inexpensive hooks or compartment organizers only where they solve a clear problem. Avoid buying a complete system before you know what needs to be stored and how much space it requires.
Q
What should I never store in a garage?
The answer depends on your garage’s temperature, humidity, security, and ventilation. Avoid storing food, medicines, delicate electronics, or other temperature-sensitive items in conditions that conflict with their storage instructions. Fuel, solvents, pesticides, and similar hazardous products require special care and must be stored according to their labels and local rules. Never operate a fuel-burning engine inside a garage, even with the door open.
Q
Are overhead garage storage racks safe?
Overhead racks can be useful when they are designed for the load and attached to suitable structural supports using the specified hardware. Safety depends on the rack, fasteners, building structure, installation, and stored items. Follow the rated capacity, keep access clear, and seek qualified help if you cannot verify the mounting or structural requirements.
Q
How do I keep my garage organized long term?
Give every frequently used item a clear storage place and return it after each task. Spend a few minutes each week putting away tools, removing ordinary debris, and checking whether clutter is building up. Review seasonal belongings before storing them and avoid buying duplicate supplies without checking what you already have.
Q
How can I make my garage safer without a major renovation?
Keep walkways and exits clear, store heavy objects low, secure shelves as directed, and protect sharp tools. Inspect cords and tools, improve lighting with suitable fixtures, and store hazardous products in their original labeled containers according to their instructions. Never run a vehicle or generator in the garage, even if the door is open, because carbon monoxide can build up.
Q
Should I use plastic or metal garage shelving?
Neither material is best for every situation. Compare the stated load capacity, resistance to moisture, stability, dimensions, and installation requirements. Choose shelving that can safely support your actual belongings and suit the garage environment, and place heavy items on lower shelves.
✦ Wrapping Up
Conclusion
The best garage hacks solve everyday problems without adding more clutter. Wall hooks, well-planned shelves, labeled bins, a tidy workbench, and simple cleaning routines can help you use the space you already have. You can start with a small change and build on it as your needs become clearer.
Keep safety at the center of every improvement. Use suitable mounting hardware, respect storage load limits, keep hazardous products under control, and leave clear routes through the garage. If a project involves uncertain structural support, permanent electrical work, or a serious chemical hazard, get qualified help rather than guessing.
A useful garage does not need to look like a showroom. It needs to let you park, find your tools, finish household tasks, and put things away without stress. Begin with one crowded area, remove what you no longer need, and make each storage choice serve a clear purpose.
💡 Key Takeaway
This weekend, choose one garage zone, remove unwanted items, group what remains, and label or arrange the storage you already have. Measure before buying anything new, then make the next improvement based on the space and safety needs you discover.
Sarah believes that a messy garage is a wasted room. After years of working in professional home staging and interior design, she shifted her focus to the most neglected part of the house: the garage. She focuses on vertical storage, aesthetic floor coatings, and converting dusty corners into functional workspaces. Sarah’s goal is to help you "unlock" every square inch of your garage.
Sarah believes that a messy garage is a wasted room. After years of working in professional home staging and interior design, she shifted her focus to the most neglected part of the house: the garage. She focuses on vertical storage, aesthetic floor coatings, and converting dusty corners into functional workspaces. Sarah’s goal is to help you "unlock" every square inch of your garage.