To remove rust from tools, scrub away loose rust with a wire brush, soak suitable metal parts in white vinegar when needed, clean off the loosened rust, dry every part well, and apply a thin coat of protective oil. Choose the method based on the tool’s material and the depth of the rust.
Across the United States, a rusty wrench in a home garage, a stained shovel in a backyard shed, or a corroded saw in a basement workshop is a common sight. Humid summers, coastal air, damp basements, and wet garden soil can all leave metal tools exposed to moisture. Even a tool that looks fine after a long winter may show orange spots when spring projects begin.
The good news is that many rusty tools can be cleaned at home with basic supplies. White vinegar, a stiff brush, fine steel wool, and a clean cloth can handle many small jobs. Heavier rust may need a commercial rust remover or careful mechanical cleaning, while deep pits and damaged parts can mean the tool is no longer safe to use.
The best approach is to start with the mildest method that can do the job. Check the tool’s material, remove loose dirt, protect your eyes and hands, and keep liquids away from electrical parts. Once the rust is gone, dry the metal and protect it from moisture so your work lasts.
Source: epicgardening.com
Why Do Tools Rust, and When Can You Restore Them?
Rust forms when iron or steel reacts with oxygen and moisture. The reddish-brown material is iron oxide, a form of corrosion that can spread across exposed metal. Dirt, wet grass, salt, and certain chemicals can make the problem worse by keeping moisture against the surface.
Rust does more than spoil a tool’s appearance. It can make pliers stiff, cause a wrench to slip, roughen a cutting blade, and damage the fit of moving parts. If corrosion eats deeply into load-bearing metal, the tool may become unsafe even after the visible rust is removed.
Before cleaning, inspect the tool in good light. Surface rust usually looks like a thin orange or brown film. Heavy rust may form thick flakes, rough patches, or deep holes known as pits. A clean-looking surface does not prove that the metal underneath is still strong.
Source: YouTube
Light surface rust
A thin film or a few small spots can often be removed with a rag, light oil, and a fine abrasive pad.
Moderate rust
Wider patches or rust around joints may need brushing, a controlled vinegar soak for removable steel parts, or a suitable rust remover.
Heavy or deep rust
Thick scale and deep pits may need careful mechanical treatment. Replace a tool if its strength, grip, blade, or locking parts are no longer reliable.
Which Tools Can Be Cleaned With a Rust Remover?
Many plain carbon-steel tools, including some wrenches, hammers, pliers, and shovel blades, can tolerate careful rust removal. However, not every part of a tool is bare steel. Handles, springs, bearings, coatings, brass fittings, and fine mechanisms may react differently to liquids and abrasives.
Check the tool maker’s care instructions before choosing a soak or chemical treatment. If the tool has an unknown finish, valuable markings, or historical value, test a mild method on a small, hidden spot or seek advice from a restoration specialist.
Suitable for cautious soaking
Removable, uncoated steel parts with no attached wood, electronics, bearings, or sensitive fittings are often the easiest candidates.
Clean by hand
Use a damp cloth and a small brush on assembled tools, coated surfaces, and items with moving parts that should not be submerged.
Use extra care
Avoid aggressive abrasion on precision tools, measuring faces, sharpened edges, plated finishes, and antique surfaces.
What You Need to Remove Rust From Tools
Gather your supplies before you begin. A simple job may need only a brush, a cloth, and light oil, while a badly rusted removable part may need a container and a rust-removal solution. Starting with the right tools helps prevent damage from rushed scrubbing or unsuitable chemicals.
Work on a stable bench or outdoor work surface with good light and ventilation. Keep children and pets away from cleaning solutions, and use a container that will not be reused for food. Read the label of any commercial rust remover before opening it.
Source: virginiasweetpea.com
Protective equipment
Wear safety glasses or goggles, suitable gloves for the product in use, and clothing that protects your skin. Follow the product label for any added protection.
Cleaning supplies
Use clean rags, a stiff nylon brush, and a hand wire brush suited to the metal. Keep a soft brush available for corners and joints.
Abrasives
Fine steel wool, a nonwoven abrasive pad, or fine sandpaper can remove remaining rust. Choose a gentle grade first to limit scratches.
Rust treatment
Plain white vinegar or a rust remover labeled for the tool’s material may help loosen corrosion. Baking soda is useful for making a mild cleaning paste, but it is not a substitute for every rust treatment.
Drying and protection
Have absorbent cloths ready, along with a suitable light machine oil, tool protectant, or coating recommended for the tool.
Safety Rules Before You Start
Disconnect a power tool from its power source before cleaning it. Remove its battery where applicable, and never allow vinegar, rinse water, or liquid rust remover to enter a motor, switch, battery compartment, bearing, or electrical connection.
Do not mix cleaning chemicals. In particular, never mix acids such as vinegar with bleach or products containing hypochlorite. Chemical mixtures can release dangerous gases. Keep solutions in labeled containers and follow their disposal instructions.
If you use a powered wire brush, follow the tool and brush makers’ instructions. Keep guards in place, use appropriate eye and face protection, check the brush’s speed rating, and secure the workpiece. Loose wires and metal particles can fly at high speed. Use powered abrasives only if you know how to operate them safely.
Avoid open flames
Keep solvents and flammable products away from sparks, cigarettes, hot surfaces, and other ignition sources.
Protect the work area
Use good ventilation, control dust, and keep bystanders away from brushing or grinding.
Check the label
Chemical products differ in ingredients, contact time, rinsing needs, and disposal rules. Follow the exact directions for the product you have.
How to Remove Rust From Tools With White Vinegar
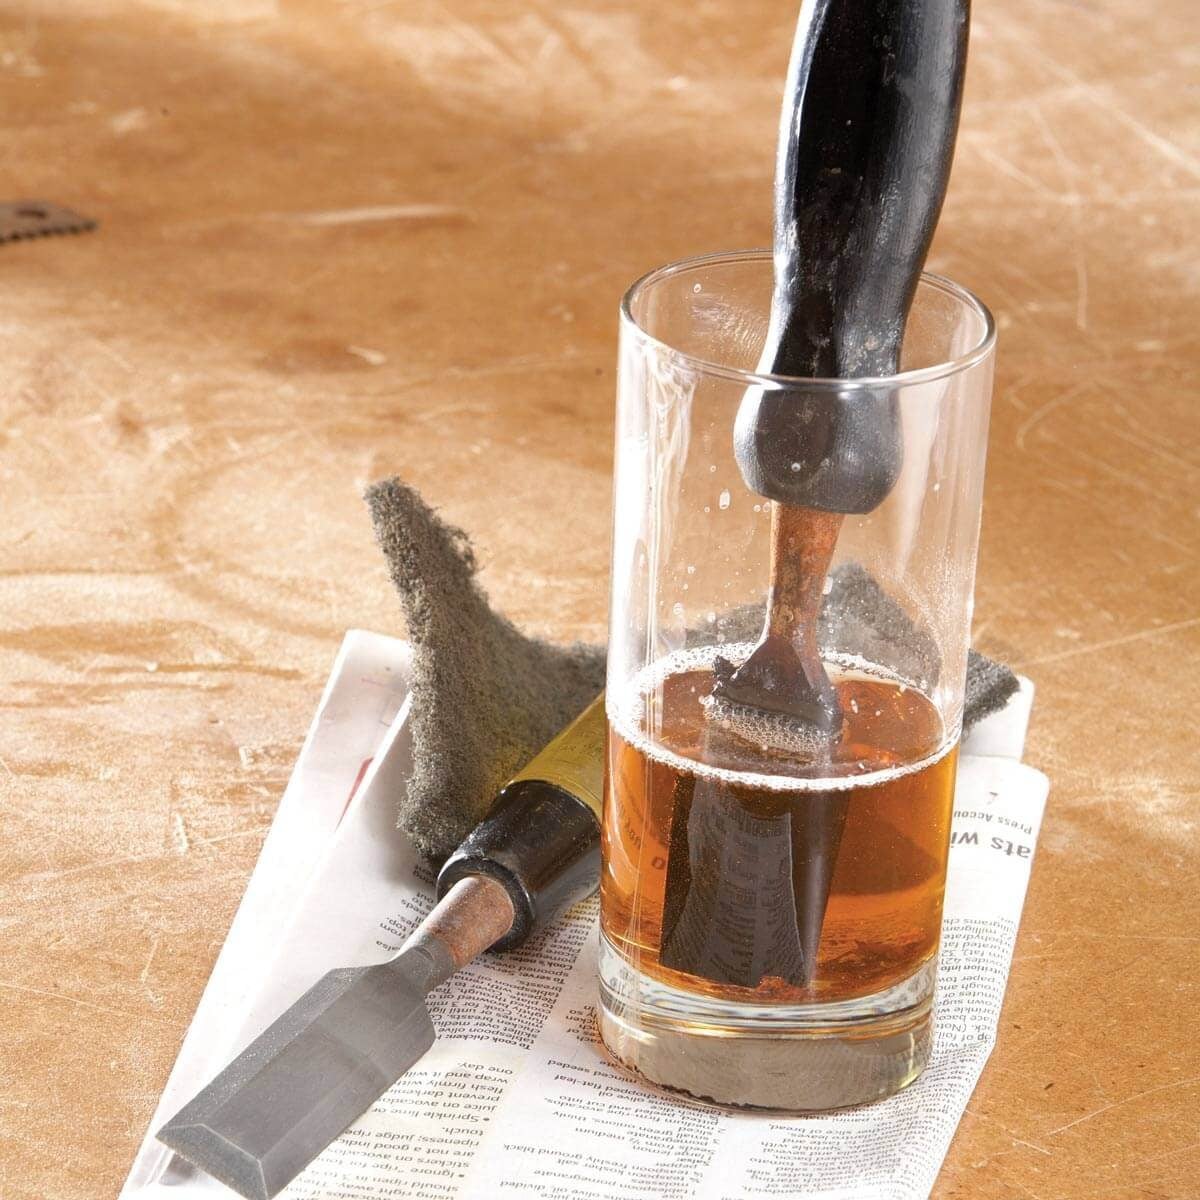
White vinegar is a useful household option for many small steel parts with light to moderate rust. Its acetic acid helps dissolve rust, making the remaining corrosion easier to brush away. It is not the right choice for every metal or assembled tool, and a longer soak is not always better.
Use vinegar only when the tool’s material and construction allow it. It can attack some finishes and metals, and prolonged contact can affect bare steel as well as the rust. Do not use this method on a complete power tool or any part that cannot be dried thoroughly.
Source: artofit.org
Step 1: Clean the tool
Brush off loose dirt, grease, and flakes. A degreasing step may help if oily residue prevents the vinegar from reaching the rust.
Step 2: Prepare the container
Place the removable steel part in a plastic or other compatible container. Add enough plain white vinegar to cover the rusty area, if full immersion is appropriate.
Step 3: Check the progress
Inspect the tool after a few hours rather than assuming it needs an overnight soak. The time required varies with rust thickness, metal condition, and the part’s shape.
Step 4: Scrub the loosened rust
Remove the tool from the solution and use a hand wire brush or suitable abrasive pad. Work gently around edges, grooves, and joints.
Step 5: Rinse and dry
Rinse off vinegar and loosened debris when appropriate, then dry the tool at once with a clean cloth. Dry crevices carefully to prevent flash rust, which is new rust that can form quickly on damp bare steel.
Step 6: Protect the surface
Apply a thin layer of suitable protective oil to exposed steel. Wipe off excess so the tool is not slippery or coated with a heavy film.
What If Vinegar Does Not Remove All the Rust?
If orange spots remain, scrub them gently and inspect the surface again. You may need another short treatment or a rust remover made for the material. Do not keep soaking a part for days in the hope that all damage will disappear.
If the metal is deeply pitted, the rust may be gone while the holes remain. Cleaning removes corrosion, not lost metal. A deeply damaged cutting edge, wrench jaw, hammer face, or load-bearing part may need professional evaluation or replacement.
For small remaining spots
Try fine steel wool or a nonwoven abrasive pad, using light pressure and checking often.
For complicated shapes
Use a small hand brush or a rust remover specifically labeled for the tool’s material.
For deep pitting
Do not grind away large amounts of metal just to create a smooth finish. Check whether the tool remains safe and fit for its intended use.
Other Effective Ways to Clean Rusty Tools
Vinegar is not the only option. For a few small rust spots, light oil and hand scrubbing may be enough. For a large metal surface, careful abrasion can save time, while a suitable commercial rust remover may work better on stubborn corrosion or hard-to-reach areas.
Choose a method that matches the tool, rather than choosing the strongest treatment available. A rough shovel blade and a precision measuring tool have different needs. Removing rust too aggressively can damage a finish, alter a cutting edge, or reduce the accuracy of a measuring surface.
Source: thecooldown.com
Method 1: Light oil and hand scrubbing
For thin surface rust, apply a small amount of suitable oil to a cloth or abrasive pad and rub gently. Wipe away the residue and inspect the surface. This approach is often enough for minor spots on a wrench or pliers.
Method 2: Wire brush and fine abrasive
For loose flakes and thicker surface rust, use a hand wire brush first, then a finer abrasive to remove remaining discoloration. Brush away dust and wipe the metal clean before protecting it.
Method 3: Commercial rust remover
Select a product labeled for the tool’s metal and finish. Follow the stated contact time, ventilation requirements, protective equipment, rinse directions, and waste disposal instructions.
Method 4: Baking soda paste
For small spots on compatible metal, mix baking soda with enough water to form a paste. Rub gently with a soft brush, then rinse and dry. It can assist with mild cleaning, but it may be too weak for established rust.
Method 5: Electrolytic rust removal
Electrolysis can remove rust from suitable bare steel objects, but it requires correct equipment, a suitable electrolyte, and careful control of the electrical setup. It is an advanced method, not a casual household soak.
How to Choose the Right Rust Removal Method
Use the table below as a starting point. It compares typical use cases, not guaranteed results. The best method still depends on the metal, finish, amount of rust, and the tool maker’s instructions.
Light rust on plain steel
Start with light oil and a fine abrasive pad or hand brush.
Moderate rust on a removable steel part
Consider a controlled vinegar soak or a compatible commercial remover, followed by careful brushing and drying.
Heavy rust on a large surface
Begin with a hand brush and consider careful mechanical cleaning if needed. Avoid powered tools unless you can use them safely.
Rust around a joint or spring
Use a small brush, suitable cleaner, and targeted lubrication rather than immersing the entire assembly.
Rust on a precision or valuable tool
Use the maker’s care guidance or consult a restoration specialist before applying abrasives or chemicals.
Is Electrolysis Worth Trying?
Electrolytic rust removal uses a low-voltage direct-current setup and an appropriate electrolyte to help loosen corrosion from a suitable metal object. It can be useful for certain restoration projects, but it requires more knowledge and preparation than vinegar or hand scrubbing.
The process can produce hydrogen and oxygen gases. The setup must be well ventilated and kept away from flames and sparks. The power supply must remain protected from the solution, and the current must be switched off before adjustments. Never use table salt as a substitute for a suitable electrolyte because hazardous chlorine gas can form at the positive electrode under certain conditions.
If you are new to rust removal, start with a hand brush or a product used according to its label. Use electrolysis only after studying reliable instructions for the exact setup and understanding the electrical, chemical, and fire risks.
Do not improvise the power setup
Use suitable equipment and reliable instructions. Never place a household electrical device where it can be splashed or submerged.
Remove sensitive parts first
Wood, brass fittings, and other unsuitable materials should not be included in the bath.
Finish the job carefully
Rinse and dry the cleaned part, brush away residue, and apply protection promptly.
How to Remove Rust From Different Types of Tools
The safest rust removal method changes with the tool. A solid steel shovel can tolerate methods that would damage a power drill or a precision caliper. Before cleaning, identify which parts are steel and which parts may be made from wood, plastic, brass, aluminum, rubber, or coated metal.
Do not assume that a tool is safe to soak simply because its outer surface looks like steel. Liquids can enter hidden joints, damage lubricants, swell wood, and affect coatings. When a tool cannot be dismantled safely, use a controlled cleaning method that keeps liquids away from vulnerable areas.
Source: artofit.org
Wrenches, sockets, and pliers
Clean loose dirt first, then use a hand brush or fine abrasive on exposed steel. Add suitable lubricant to joints after cleaning and check that the tool opens and closes smoothly.
Hammers and chisels
Use a hand brush and careful abrasion on compatible surfaces. Do not remove excessive metal from a hammer face or cutting edge, and replace tools with cracks, serious deformation, or unsafe handles.
Garden tools
Brush off soil and plant residue, clean the metal blade, dry it completely, and protect exposed steel with a suitable oil. Inspect wooden handles for cracks and splinters.
Saws and cutting tools
Keep abrasive treatment away from teeth and sharpened edges unless the method is intended for them. Use the maker’s cleaning instructions and check the cutting edge before returning the tool to service.
Power tools
Disconnect power and remove the battery where applicable. Clean accessible external metal with a dry cloth and suitable hand brush. Do not immerse the tool or allow liquid to enter electrical or moving parts.
Measuring and precision tools
Avoid coarse abrasives and treatments that can alter dimensions or remove markings. If rust affects a measuring face or mechanism, seek model-specific care advice.
How to Restore Rusty Garden Tools
Shovels, hoes, trowels, and pruning tools often rust because soil and plant residue hold moisture against the metal. Start by removing dry dirt with a stiff brush. If the tool has a wooden handle, keep it out of a soaking bath unless the handle can be removed safely.
For rust on a plain steel blade, use a hand wire brush or fine abrasive pad. A short, controlled vinegar treatment may help with stubborn rust on a removable steel part, but it is not necessary for every garden tool. Rinse away residue when appropriate and dry the blade thoroughly.
For pruning shears, clean the pivot area without flooding the joint. Apply a drop of suitable oil to the pivot after cleaning, then check that the blades move freely. If the blade is cracked, badly pitted, or damaged at the cutting edge, consider replacement rather than aggressive grinding.
Protect wooden handles
Wipe them clean, let them dry, and inspect for cracks or splinters. Use a suitable wood-care product when needed.
Keep cutting edges sharp
Remove surface rust without changing the blade angle. Sharpen only with the correct method for that tool.
Clean after use
Remove sap, soil, fertilizer residue, and moisture before storing garden tools.
How to Clean Rust From a Power Tool
Rust on an exposed metal plate, chuck, or exterior fitting may be manageable, but corrosion inside a power tool is a different problem. Unplug the tool or remove its battery before inspection, and follow the manufacturer’s maintenance instructions.
Use a dry cloth or a suitable hand brush on accessible surfaces. Do not spray liquid rust remover into vents, switches, motors, or bearings. If the tool has electrical corrosion, unusual heat, damaged wiring, a stuck motor, or a battery affected by moisture, stop using it and arrange qualified service or replacement.
Keep electrical parts dry
Do not use immersion, rinsing, or wet scrubbing on an assembled power tool.
Check moving parts
Look for smooth operation and signs of corrosion around the chuck, spindle, or other accessible metal fittings.
Test only when safe
Do not reconnect power until the tool has been inspected and is dry and safe according to the manufacturer’s instructions.
How to Prevent Rust From Coming Back
Rust prevention starts with keeping tools clean and dry. Even a successful cleaning job will not last if the metal is put away while damp or left in a wet shed. A thin protective film and sensible storage can make routine maintenance much easier.
This matters in many US homes, especially where garages and sheds face humid summers, winter condensation, coastal air, or repeated wet gardening work. You do not need an elaborate storage system. A dry shelf, a clean cloth, and a habit of wiping tools down after use can make a real difference.
Source: www.familyhandyman.com
Dry tools after every use
Wipe off rain, rinse water, sweat, and soil moisture before storage. Pay attention to joints, handles, and recessed areas.
Apply a suitable protectant
Use a light coat of tool oil or a product recommended for the metal. Avoid heavy residue on handles or working surfaces where it could cause slipping.
Store tools indoors
Keep them in a dry cabinet, toolbox, or sheltered storage area rather than on damp concrete or exposed ground.
Reduce moisture in the storage space
Fix leaks, improve ventilation when appropriate, and use a suitable moisture-control product if condensation is a recurring issue.
Inspect tools regularly
Look for small orange spots, rough patches, and stiff joints. Deal with early rust before it spreads.
Keep garden tools clean
Remove soil, sap, fertilizer residue, and plant debris, since these can hold moisture or contribute to corrosion.
Should You Oil Every Tool?
No. Oil is useful on many exposed steel surfaces and moving metal joints, but it is not appropriate for every tool part. Follow the manufacturer’s directions for coated tools, electrical equipment, measuring instruments, and parts that contact food or other sensitive materials.
For hand tools, a light film on exposed steel can help keep moisture away. For moving joints, use the lubricant recommended by the manufacturer. Wipe away excess oil so it does not collect dust or make the grip unsafe.
Wood handles need a different type of care. Keep them dry, inspect them for damage, and use a suitable wood finish only when appropriate. Oil intended for metal is not automatically suitable for wood, rubber, plastic, or every finished surface.
Use metal protectant on bare steel
Choose a product compatible with the tool and its intended use.
Lubricate joints selectively
Use the specified oil or grease and keep it away from surfaces that must remain clean or dry.
Avoid excess coating
A thin, even film is usually more practical than a thick layer that attracts dust.
A Simple Monthly Tool Care Routine
A short inspection once a month can help catch corrosion before it becomes a major cleanup job. The schedule can be less frequent for tools that are used rarely in a dry indoor space and more frequent for tools exposed to rain, humidity, or soil.
Check exposed metal for new rust, test moving joints, wipe away dust, and refresh protective oil where needed. If you find rust, clean it promptly and inspect the tool for pitting or other damage before putting it back into use.
Inspect
Look at steel surfaces, fasteners, cutting edges, and joints.
Clean
Remove dust, dirt, and residue with a suitable brush or cloth.
Protect
Apply a suitable light coating to exposed metal and lubricate joints as directed.
Store
Return each tool to a dry, organized place where it will not collect moisture.
Common Rust Removal Mistakes to Avoid
The biggest mistake is treating every rusty tool in the same way. A strong chemical or powered brush may remove corrosion quickly, but it can also damage the tool, strip a finish, or create a safety hazard. Start with the gentlest method that suits the material and increase the treatment only when needed.
Another common error is stopping when the orange color disappears. A tool may still have chemical residue, loose abrasive dust, wet crevices, or deep structural damage. A careful final inspection is part of the cleaning process, not an optional extra.
Source: www.youtube.com > Dave Does DIY
Leaving vinegar on too long
Extended exposure can damage bare metal or finishes. Check progress and stop when the rust has loosened enough to remove.
Using a coarse abrasive too early
Aggressive sanding can scratch metal, remove plating, and change a cutting or measuring surface. Start gently.
Soaking assembled tools
Liquid can damage wooden handles, bearings, springs, electrical parts, and hidden surfaces. Soak only parts that can safely tolerate immersion.
Mixing cleaning chemicals
Never mix vinegar or other acids with bleach. Keep products separate and follow their labels.
Skipping the drying step
Water trapped in joints can cause rust to return. Dry all accessible surfaces and crevices before storage.
Applying oil to a wet surface
Oil is not a substitute for removing rinse water and cleaner residue. Dry the tool fully first.
Ignoring structural damage
Deep pits, cracks, loose heads, bent parts, or damaged jaws can make a tool unsafe even after cleaning.
When Should You Replace a Rusty Tool?
A tool should be replaced or assessed by a qualified repair professional when corrosion has affected its strength or safe operation. Deep pitting in a load-bearing area, a cracked hammer head, a badly damaged wrench jaw, or a compromised cutting edge may not be repairable with ordinary cleaning.
Do not rely on appearance alone. If a tool slips under load, has a loose head, will not lock correctly, or shows corrosion inside an electrical mechanism, stop using it. Replacement is often the safer option when the part’s strength or reliability cannot be confirmed.
Stop using cracked or distorted tools
Cleaning cannot restore metal that has cracked or changed shape.
Check load-bearing surfaces
Inspect wrench jaws, hammer heads, handles, fasteners, and other parts that must withstand force.
Get valuable tools assessed
Antique or precision tools may need specialist restoration to preserve their function and value.
Frequently Asked Questions
Q
What is the easiest way to remove rust from tools?
For light surface rust, wipe the tool with a clean cloth, apply a small amount of suitable oil if appropriate, and rub gently with a fine abrasive pad or hand brush. For more stubborn rust on a removable steel part, a controlled white vinegar soak may help. Finish by removing residue, drying the metal fully, and applying suitable protection.
Q
How long should rusty tools soak in vinegar?
There is no single soaking time for every tool. Check the part after a few hours and inspect it regularly. Light rust may loosen sooner, while heavier corrosion can take longer. Remove the part once the rust is ready to scrub away, and do not leave it soaking indefinitely because vinegar can also affect bare metal and some finishes.
Q
Does baking soda remove rust from metal tools?
Baking soda paste can help with mild surface cleaning when used on a compatible material, but it is not the strongest option for established rust. Mix it with a little water, rub gently with a soft brush, then rinse and dry the tool. For moderate rust, a suitable rust remover or controlled vinegar treatment may work better.
Q
Can I use WD-40 to remove rust from tools?
A water-displacing or penetrating product can help loosen grime, lubricate moving parts, and assist with light surface rust when used as directed. It may not remove heavy corrosion by itself. Brush or abrade loose rust carefully, clean the surface, and use a suitable long-term protectant if the product you used is not intended to provide lasting corrosion protection.
Q
How do I remove rust without damaging the tool?
Identify the tool’s material and finish before choosing a method. Start with a soft cloth or hand brush, then move to a fine abrasive only if needed. Avoid long chemical soaks, coarse grinding, and liquid cleaners on assembled power tools. For precision instruments, coated surfaces, and valuable antiques, follow the manufacturer’s instructions or consult a restoration specialist.
Q
Is a rusty tool safe to use after cleaning?
It may be safe if the rust was superficial and the tool remains structurally sound, moves correctly, and has a usable working edge or gripping surface. Cleaning does not repair deep pits, cracks, loose heads, damaged jaws, or electrical faults. Inspect the tool carefully and replace it or seek professional assessment if its strength or operation is in doubt.
Q
How can I stop rust from returning after cleaning?
Remove all cleaning residue, dry the tool thoroughly, and apply a thin layer of suitable protective oil or another compatible coating to exposed steel. Store the tool in a dry place, keep it off damp surfaces, and wipe it down after use. Check the metal from time to time and address new rust spots early.
✦ Wrapping Up
Conclusion
Learning how to remove rust from tools can help you save usable equipment and keep your garage or garden shed in better shape. For light rust, a cloth, a hand brush, and a suitable protective oil may be all you need. For more stubborn corrosion, a controlled vinegar treatment or a compatible commercial rust remover can help loosen the rust so you can clean it away.
The key is to match the method to the tool. Keep liquids away from electrical parts, avoid harsh abrasion on precision surfaces, and stop if you find deep pitting or damage that could make the tool unsafe. Once the rust is removed, dry the metal and protect it before storage.
A few minutes of care after each job can prevent many future rust problems. Clean off dirt, wipe away moisture, check moving parts, and keep tools in a dry place. With a simple maintenance routine, many hand tools can remain ready for the next repair, home project, or day in the garden.
💡 Key Takeaway
Start with one rusty hand tool. Brush off loose dirt, choose a cleaning method suitable for its material, remove the rust without damaging the surface, dry every part completely, and apply the right protective coating. Inspect the tool before using it again, and store it somewhere dry.
Sarah believes that a messy garage is a wasted room. After years of working in professional home staging and interior design, she shifted her focus to the most neglected part of the house: the garage. She focuses on vertical storage, aesthetic floor coatings, and converting dusty corners into functional workspaces. Sarah’s goal is to help you "unlock" every square inch of your garage.
Sarah believes that a messy garage is a wasted room. After years of working in professional home staging and interior design, she shifted her focus to the most neglected part of the house: the garage. She focuses on vertical storage, aesthetic floor coatings, and converting dusty corners into functional workspaces. Sarah’s goal is to help you "unlock" every square inch of your garage.